Many photographers have been tempted to a closer look at the Nik Collection by Google, but may still not have had a chance to do so.
How come? It's FREE (Google made the announcement back in March this year) – https://www.google.com/nikcollection/ – so there's most definitely no excuse not to start learning this professional new tool for post production!
However, if you haven't yet, you're missing out on a great deal i.e. especially compared to the things you can do in Adobe Lightroom.
When it comes to post-processing images in black and white and with Nik's Collection being 100% free, there's no excuse for not trying out this powerful bit of software. Below you will find a list of areas where Nik Silver Efex Pro 2 beats Lightroom for black and white photography.
Before we really get stuck in – Have your considered some guidance from a pro photographer about processing your images in black and white? Kent DuFault's guide to processing your images in Black and White is a great place to start if you're currently using Lightroom.
1. Better Control Over Contrast
Having a good contrast is crucial in black and white photography. Nik Silver Efex Pro 2 steps up and gives you the necessary control of contrast all at your fingertips.
Increasing contrast is about making a greater difference between the dark pixels and the white pixels in your image. However, some programs do this based on an average based algorithm, making the bright/dark pixels an equal amount brighter/darker when contrast increases.
However, in Silver Efex Pro 2 you can choose to amplify blacks causing the dark pixels to become darkened more than the bright pixels are brightened. This kind of manual functionality is really important in my opinion.
Conversely, you can choose to amplify the whites shifting the balance, so the brighter pixels are brightened more than the dark pixels are darkened.
You also get another special contrast slider called soft contrast, which gives you a smoother transition between areas which is amazing at providing a little moody look to your images. Soft contrast is less harsh than the traditional contrast slider.
In Lightroom, you possess only one slider for controlling contrast. Already, as you can see, Silver Efex Pro 2 is doing better…
2. Better Control Over Details
With the absence of colors, attention shifts to lines, composition, shape and texture.
Lines, composition, and shape are more or less determined at the time of capture. Texture, however, can be brought out in post processing. Lightroom unfortunately, offers only limited control of how you can increase the texture in your image.
In Nik Silver Efex Pro 2, the structure slider gives you an excellent general control of textures, but furthermore, you can also control the texture in the shadows, mid-tones, and the highlights separately.
Color Filters
You have color filters available as a dedicated tool in Nik Silver Efex Pro. The color filters will help you choose how colors convert into black and white.
A red color filter will make red color bright and green, the complementary color of red, are converted into dark tones.
A yellow filter will make yellow colors bright,
While blue colors will become dark when converted into black and white.
The color filters are amazing for creating more contrast in your black and white images. I often go to the color mix as one of the very first things when beginning to process a photo for black and white.
Lightroom does have the black and white color mixer tool. However, I find the color filters in Silver Efex Pro easier to use, this might just be a matter of taste, though.
4. Presets Available – There's Just More In Silver Efex Pro 2
Nik Silver Efex Pro 2 comes with more presets than Lightroom – this means more places to begin your post processing from, according to your taste. Furthermore, some of the free black and white presets you get in Lightroom are making up the lack of a dedicated color filter tool.
5. Create Easy Masks by Using Control Points
Control points, which are characteristic for all the Nik Collection tools, make it very easy to work with masks. Just place a few control points on top of where you wish to make local adjustments. So simple.
Control points are much faster and even more precise than creating a mask by using a local adjustment brush in Lightroom. With a control point, you can make local adjustments like: brightness, contrast, structure, amplify whites/blacks and more.
Below you can see an overlay of mask that Nik Silver Efex Pro 2 created by placing just a single control point. White means that it is selected by the control point, and will, therefore, become affected by the modifications you make with the control point.
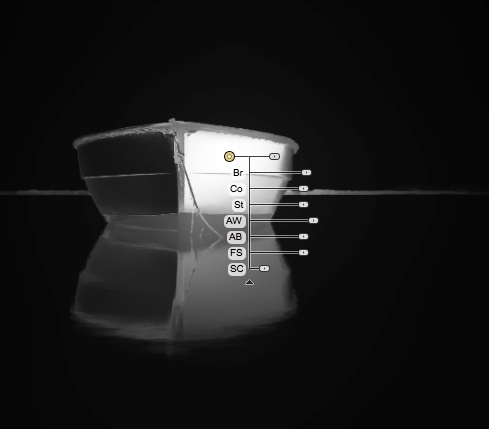
6. Zone System Display
In Nik Silver Efex Pro 2 you can see where different parts of your image are placed in the zone system. The zone system divides the entire tonal range from black to white into 10 zones – from highlights to shadows
This helps you see how well your exposure is balanced. Do you have any tones that are completely black (zone 0) and how much? How much of your image is in zone 10, which is completely white with no details?
You can activate a specific zone by toggling each zone on/off in the Loupe & Histogram panel.
By keeping it active, you can see how each zone is affected while you make adjustments to your image. Below you can see the bright yellow overlay mask of the areas in zone 0.
As you push and pull sliders around, you can easily see how it affects the darkest tonalities (Zone 0).
QUICK LIGHTROOM TIP
In Lightroom, you can hold down the alt/option key while adjusting the shadows/highlights, to see an overlay mask of absolute black/whites values.
However, changing the contrast also affects the shadow and highlights and in Lightroom, you cannot see how i.e. contrast changes affect the amount of absolute black values (or values in Zone 0).
7. Awesome Choice Of Different Black And White Films
For those who love the good ol' film days, this is a real treat. Silver Efex Pro 2 has a great bunch of film presets! These all simulate different film types with color sensitivity and grain levels. With the film types, Nik collection in a way pays tribute to the art form of the old film days, while recognizing that things have changed.
Personally, I think it's great that they put in a grain slider since artistic grain that comes from choosing a high ISO film is very much different from digital noise. So a grain slider is a great way to get back that artistic choice.
8. Tonality Protection
The tonality protection sliders in Nik Silver Efex Pro 2 helps ensuring your post-processing doesn’t result in lost shadows or blown out highlights.
This might sound trivial, however, when working in black and white, where you want to have the greatest tonal contrast between dark and bright in your image, your post-processing modifications may tip to the side, where you begin losing details in your image.
By using the tonality protection slider in Silver Efex Pro 2, you recover the details that are lost due to messing around with the other adjustment sliders.
In other words, move the shadow tonality protection slider to the right to recover the shadow area that has lost detail, without affecting the other tonal values in your image. Cool?
In Lightroom your only option is to decrease the overall exposure or contrast adjustments or the shadow sliders, to recover the details. However, each of these sliders will affect either all of the tonal values or at least all the shadows and not only where your image has lost detail.
Summary of Silver Efex Pro 2
Even though it has been a quite a long time since the Nik Collection was launched, it appears Adobe hasn’t stepped up its effort in making Lightroom better for processing black and white images.
With all the extra control you get when it comes to black and white post-processing you should give Nik Silver Efex Pro a try, today.
What's your experience with using Nik Silver Efex Pro 2 or Lightroom for processing black and white photos? Share your thoughts below!
Want some guidance from a pro photographer about processing your images in black and white? Kent DuFault's guide to processing your images in Black and White is a great place to start if you're using Lightroom.
Don't forget to check out our further resources we think you'll find super useful, too!
I go to Silver efex for all my black and whites, getting to it through Lightroom. However, there is one HUGE problem with it that I wish they’d address: Once you are done with a photo and close SEP2, you cannot go back to the file and have its history available. The only option is to start over.
Yes, before you exit SEP2, you can save your photo’s setting to a custom preset and reapply that later, but that gets messy after a while and I don’t believe it saves control points (could be wrong).
Others begin in Photoshop and use it with a Smart Filter. I’ve never done this as it complicates my workflow. However, even with this, I read about people complaining about the process.
So, I still do use it, but I know that when I press save/close on an image, it better be right or I maybe have to redo the whole this again.
I would not hold my breath for Google to do an update to the product to fix this.
Use it as a Smart Object in Photoshop …. that way you can go back and change whenever you like
Indeed, Silver Efex is much more effective at making bw pictures stand out. I actually never considered Lightroom a contender in that sense.
The NIK collection has way more functionality as you said.
What do you think of the Leica M Monochrom look? Do you feel like their dedicated monochrome sensor gives their images a special look or do you feel like it can be replicated in Silver Efex Pro?
I’ve made a few black and white Presets for Lightroom. They’re available for free on my blog.
I used NIK Software long before it was free. The Silver FX portion is my only B/W editing source.
p.s. I ran the photos through Perfectly Clear v 2.0 after b&w conversion for a final polish.
How can i download silver efex pro 2,please? Is it free? Regards. Marcus.


7 Comments
I go to Silver efex for all my black and whites, getting to it through Lightroom. However, there is one HUGE problem with it that I wish they’d address: Once you are done with a photo and close SEP2, you cannot go back to the file and have its history available. The only option is to start over.
Yes, before you exit SEP2, you can save your photo’s setting to a custom preset and reapply that later, but that gets messy after a while and I don’t believe it saves control points (could be wrong).
Others begin in Photoshop and use it with a Smart Filter. I’ve never done this as it complicates my workflow. However, even with this, I read about people complaining about the process.
So, I still do use it, but I know that when I press save/close on an image, it better be right or I maybe have to redo the whole this again.
I would not hold my breath for Google to do an update to the product to fix this.
Use it as a Smart Object in Photoshop …. that way you can go back and change whenever you like
Indeed, Silver Efex is much more effective at making bw pictures stand out. I actually never considered Lightroom a contender in that sense.
The NIK collection has way more functionality as you said.
What do you think of the Leica M Monochrom look? Do you feel like their dedicated monochrome sensor gives their images a special look or do you feel like it can be replicated in Silver Efex Pro?
I’ve made a few black and white Presets for Lightroom. They’re available for free on my blog.
I used NIK Software long before it was free. The Silver FX portion is my only B/W editing source.
p.s. I ran the photos through Perfectly Clear v 2.0 after b&w conversion for a final polish.
How can i download silver efex pro 2,please? Is it free? Regards. Marcus.