Creating good photographs go a long way, more than composition, light, settings, techniques, etc., because the resulting output image is post-processed and exported using a laptop or a computer with a monitor. If the colours are not calibrated right in the monitor, then the output will not be accurate, which means, the real and accurate colours will not be reproduced when sharing or printing the images.
It takes a lot to get a perfect shot and so, a wrongly calibrated monitor should not be a barrier in producing an exceptionally great image with the correct colours. In order to have the right colours, monitors need to be calibrated and there are various colorimeters available in the market, one of which is Datacolor's SpyderX Pro. In this article, we will take a look at a detailed review of the Datacolor SpyderX Pro, how it can be used to quickly calibrate monitors, and its pros and cons.

Calibrating Monitors
When purchasing monitors for editing purposes, there are usually fears around the fact if the colour reproduction of the monitor would be true or not. In the early days, monitors with good colour reproduction were very expensive and so were colour calibrators – not quite affordable. So although not accurate, some photographers were looking to invest in monitors that had a higher level of accuracy in colour reproduction. But still, when something is a bit off with the colours, it is frustrating when you have spent so much money in purchasing a nearly perfect monitor and you cannot reproduce what you saw or envisioned.
In recent years, with the price for good colour calibrators becoming cheaper and affordable, photographers can now invest in any affordable decent monitor and then use the calibrator to calibrate the display colours to get the best output. A calibrated monitor will truly show a huge difference in the resulting images.

Why Is Colour Calibration Important
When editing or doing post production works on the computer, we make adjustments to various settings to make an image or video look great, for example, adjusting the brightness, white balance, saturation, colours, etc. When these images are printed or shared, they often do not look very good or even look close to what we edited and exported. There could be a loss of details in the shadow areas, the image may look dull and the colours reproduced may be slightly or completely different from what you colour graded on the monitor.
Many of us do not use calibrated monitors for our work but ideally, we should all be using a calibrated display so our work can be equivalent with respect to universal standards. Colours may look good on certain monitors, but unless they are calibrated, there is no true way to confirm if the screen is displaying accurate colours. Moreover, when you print the images post-processed in uncalibrated monitors, the resulting prints will look very different from what you see on screen.
For example, red may look like dark orange, blue may look like teal, yellow may have a brownish tint and so on.

In order to see on prints what you see after post-processing is complete, you need to colour calibrate your monitor so that the true colours are reproduced in the printed or shared images. Once the monitors are calibrated, what you see is what you get in prints.
Calibrating your monitor ensures that you consistently produce accurate outputs that can compare to universal standards and is important for anyone whose work involves delivering colour accurate jobs to their clients. Also, we need to take into account the fact that the monitor's display colours can change as the internal components start to age.
Note: Colour calibration is not only important for photographers, but also for anyone working with colours like graphics, web design, product design, adverts, etc. It is good to have a calibrated monitor even if you use it for general purposes, because, you will be looking at the true colours on the screen.
Why Should You Use A Colorimeter For Calibration
In order to solve the colour issues in the printed or exported images, you need to calibrate your monitor, so you get on prints what you see on the monitor. There are options to manually calibrate monitors which can be really tricky because you do not know if you have calibrated it accurately until you print something.
The colour calibrator or a colorimeter is a device that can help with accurate calibration and it is a really quick process. The first time you calibrate your monitor, it may take a few minutes, as you will be setting up the whole thing, but from the next time onwards, it takes less than two minutes to calibrate your monitor and the colours are as accurate as possible.
Once you have your monitor calibrated with the help of a trusty colorimeter, when you start editing, you can be sure that the colour on your monitor is accurate and you can confidently make changes to your images because your prints will look exactly the same as what you edited and exported thereby maintaining your creative vision.
One of the manufacturers that are well known for their colorimeters is Datacolor and their calibrating devices are one of the best in the market right now.
About Datacolor
Datacolor was founded in 1970 and they provide customers with solutions to ensure accurate colour for materials, products, and images. They help customers working in various fields like Photography & Design, Textile & Apparel, Paint & Coatings, and many more to deliver the right colour experience. Their products are good, fast, accurate and at the same time affordable.
One of Datacolor's products is the SpyderX Pro, which is a colorimeter that can be used to calibrate monitors so they can be trustfully used for post-processing works. SpyderX uses a completely new lens-based color engine technology and provides a higher level of colour accuracy in terms of screen colour, shadow details, and white balance. You do not need to be an expert to calibrate your monitor because Spyder X Pro comes with software that is easy to use, understand and has either basic or advanced calibration options.

What Is SpyderX Pro
SpyderX Pro is a device that can precisely measure the colour response of your display screen and create a colour profile to be used by the operating system and other colour managed applications based on universal standards. It is a product of years of research and the technology is completely new providing accurate ways to measure colour. The lens-based colour engine technology features high light sensitivity and advanced sensors which means, once the monitor is calibrated, you have precise screen colour, white balance, and shadow details.
With SpyderX Pro, you can do a quick colour calibration or you can work on setting up a customized colour profile. It offers a range of options like one-click calibration, step-by-step assistant modes, and features interactive help in every step of calibration.
What's In The Box
- The SpyderX Pro comes in a compact box with the SpyderX sensor which is again compact and a welcome card inside that has a link to software download and warranty information. It also includes links to online demo, user guide, and support information.
- The device comes with a lens cover and a USB cable to connect to your laptop or desktop.
- Each box has a unique serial number that will be required to activate the software.

Quality And Design
The Datacolor SpyderX Pro looks well built with high-quality plastic and comes in a glossy white look. It is a small USB device that is portable and can fit easily into a laptop bag when traveling.

Features
Here are some of the best features of the SpyderX Pro:
- Powerful lens-based color engine technology
- Improved light sensitivity and greater accuracy
- Intuitive software with step-by-step wizard and guides
- Integrated ambient light sensor
- Can calibrate multiple laptops and desktop monitors
- Before-after comparison using the SpyderProof function
- Display analysis and mapping tools to help to check the quality of your display
- 12 calibration setting choices
Setting Up The SpyderX Pro
To set up the SpyderX pro, you require the following:
- Windows 7 32/64 and above or Mac OS X 10.10 and above
- Monitor resolution at least 1280 x 768 or greater
- At least a 16-bit video card although a 24-bit is recommended.
- At least 1 GB of RAM and 500 MB space in the Hard Disk
- Internet connection to download the software
The next step is downloading and installing the SpyderX software.
The SpyderX Calibration Software
Installing the DataColor SpyderX software is pretty simple. You just need to download the software from the URL provided in the box and then install it like you would install any other software.

Once the software is installed and run, you will get a notification like below:

You need to plugin the SpyderX Colorimeter device when the software notifies you to do so.

You will need to validate the software with the provided serial number. The setup wizard will take you through various steps where you will be asked to enter the Serial Number that is provided in the box.
Once done, click next and you will be taken to a window where you will be asked how you wish to activate SpyderXPro. It is always good to activate using the Internet.

You will also need to enter your name and email address so you can retrieve licence information if you accidentally lose it.

When calibrating the monitor or display device using the SpyderX Pro, the wizard will take you through various steps that are simple and self-explanatory. You just need to review, check the necessary options, make required adjustments as advised or suggested on screen by the software, and move next.
Calibrating The Monitor Using The Datacolor SpyderX Pro
Calibrating the monitor using the SpyderX Pro is a pretty easy task. You need to run the SpyderX software, input various settings and follow the onscreen instructions. The calibrator hangs over the screen or display and works together with the software where the difference between the colours on the screen and the actual colours is computed. Using this value an accurate custom colour profile is created and saved on your computer.
SpyderX software shows a few suggestions before starting the calibration process. You will be taken through various screens where you will need to provide the inputs based on the system you are calibrating.
Following are the next few steps, where you will be inputting a few information relating to the monitor that you will be calibrating so that the SpyderX software can determine the calibration process for that particular display or monitor. It is important to select the correct display type and target settings in order for SpyderX to set the colors accurately for that type of monitor.
Here are the steps that the SpyderX software takes you through. As you can see, it is pretty easy and straightforward.
“Welcome” screen

- Your monitor needs to be fully warmed up before calibration, at least 30 minutes.
- Keep the monitor in a location where there is no sunlight or other intense light hitting it directly.
- You need to reset the monitor to its factory settings. You may have made adjustments to brightness, colours, contrast, white balance, etc. and all these need to be reset. The software asks to reset “Contrast” to default settings, set the “Colour Temperature” control to “6500K” or equivalent, and adjust the “Brightness” to the level at which you are comfortable.
- You will also need to disable features like sleep, screensaver, power settings, hibernate, night mode, and any similar settings before starting the calibration process.
- You will need to plug the Spyder into a computer USB port and not into a hub or keyboard.
Note: It is best to calibrate your monitor in a relatively dark environment so the calibration process and the end result are not affected by light in the environment.
- Ambient light can vary throughout the day and although the SpyderX offers ambient light monitoring and compensation, it may not always be accurate using this feature.
- Also when working with colour correction jobs, it is best to have controlled lighting in your workspace so that the lighting is consistent throughout the day.
“Display Type” screen

You will need to choose the type of display:
- Desktop
- Laptop
“Make and Model” screen

- On this screen, you will need to select the display manufacturer and display model.
“Identify Controls” screen

- You need to choose which controls your desktop display offers – Brightness and Kelvin Presets.
“Display Technology” screen

- You will need to identify the technology used in the display which is the type of “Backlight.”
“Calibration Settings” screen
In the “Calibration Settings” screen, you can see the entire workflow on the left, the steps to be performed where you will be selecting certain values or settings will be in the center and some interactive help is displayed on the right side of the screen.

The next step will allow the user to specify the type of calibration. You will need to choose one of the following.
- ReCAL
- CheckCAL
- FullCAL
Depending on what you choose above, your monitor will be recalibrated, checked for calibration or fully calibrated.
You can also click on “Change Setttings” and change certain values if you do not want to go by the recommended or suggested settings.
Once the above steps are done, the user will be advised to set the monitor brightness to acceptable levels.

Once the settings are input and various adjustments are done, the sensor on the SpyderX will measure the ambient light or light level in the area where you have placed your monitor. It will take you through the steps to control the monitor's brightness.
“Room Light Analysis” screen
You will now need to place the SpyderX device on the desk as shown on the screen.

When you click “Next” the room light measurement will be taken. Once done, you will be provided with recommended settings as shown on the screen below. You can choose to keep the settings that you selected or accept the recommended settings.

- The sensor on SpyderX will provide recommended settings based on the light in your room. You can choose to accept the recommended settings or keep the settings you selected.
“Calibration” screen


Once all the above steps are complete, the final step is the calibration itself where the user will be taken through various steps of the calibration process. The step-by-step assistant is the easiest option to go through the calibration process.
In order to perform the calibration, the software will notify you to place the device on the screen in the outline shown. The device comes with a lens cover if when removed acts as a counterweight that allows the SpyderX to be balanced when calibrating. You will need to remove the protective cover from the SpyderX device, which will reveal the lens and the sensor.
You will need to slide the plastic cover down the USB cable till you get the desired length to hang the cover behind the monitor.

You will now need to hang the SpyderX Pro against the display that needs to be calibrated. It should be positioned in such a way that it stays within the outline the software shows on the screen.

You may need to slightly tilt the monitor so the device stays flat on the screen. The device will stay on the screen in that position all through the calibration process.
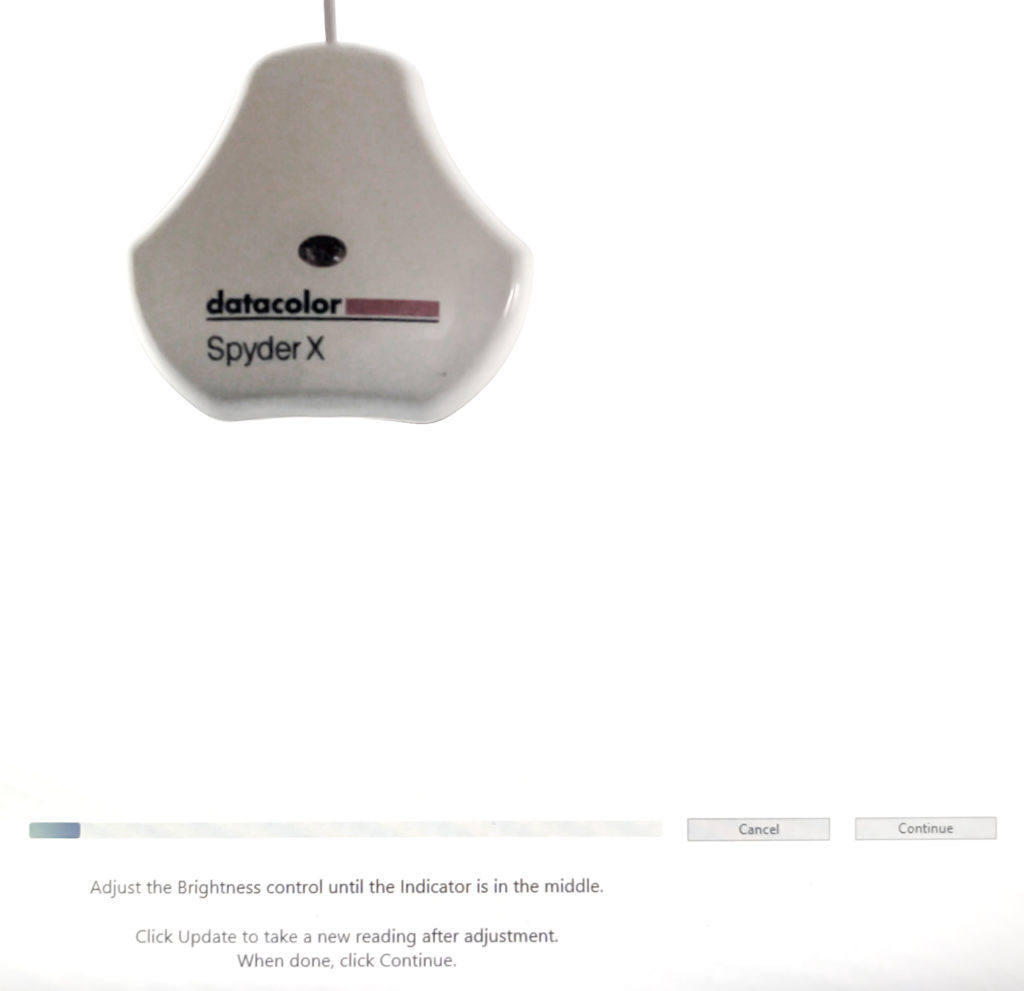
Now the software will display a message to adjust the brightness control until the indicator is in the middle.


You can see the indicator in the image below. The target value is 180.0 cd/m^2 whereas the current value is 190.0 cd/m^2. This value is based on the room light where the device was used and the monitor was calibrated. The indicator is quite beyond the limits – outside the green lines.
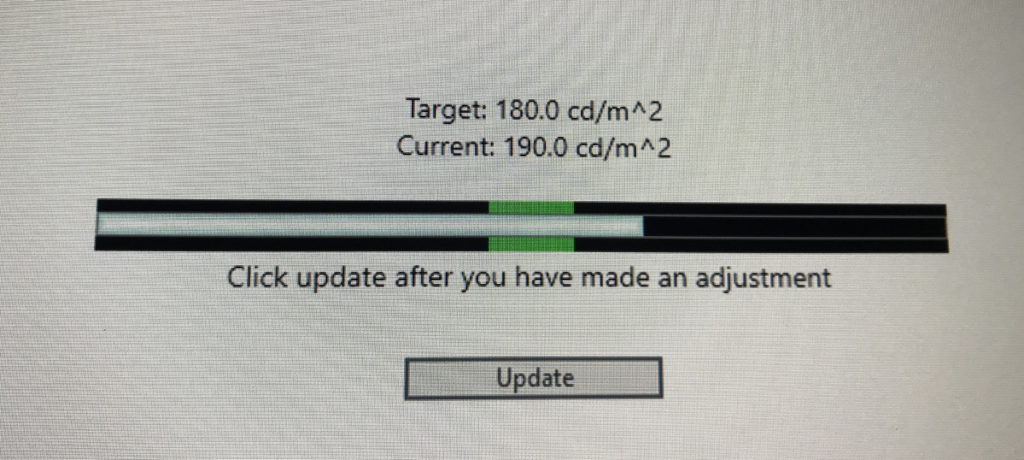
Note: It is recommended that a value between 80 to 100 cd/m^2 should be the goal for the optimal work environment. If the value is more than 120 cd/m^2 it is better to darken the room. The room where I calibrated the monitor has diffused daylight coming in on an overcast day. So SpyderX identified it as medium light.
The brightness on the screen was initially at 70. It was reduced to 66 to bring the indicator to the middle.
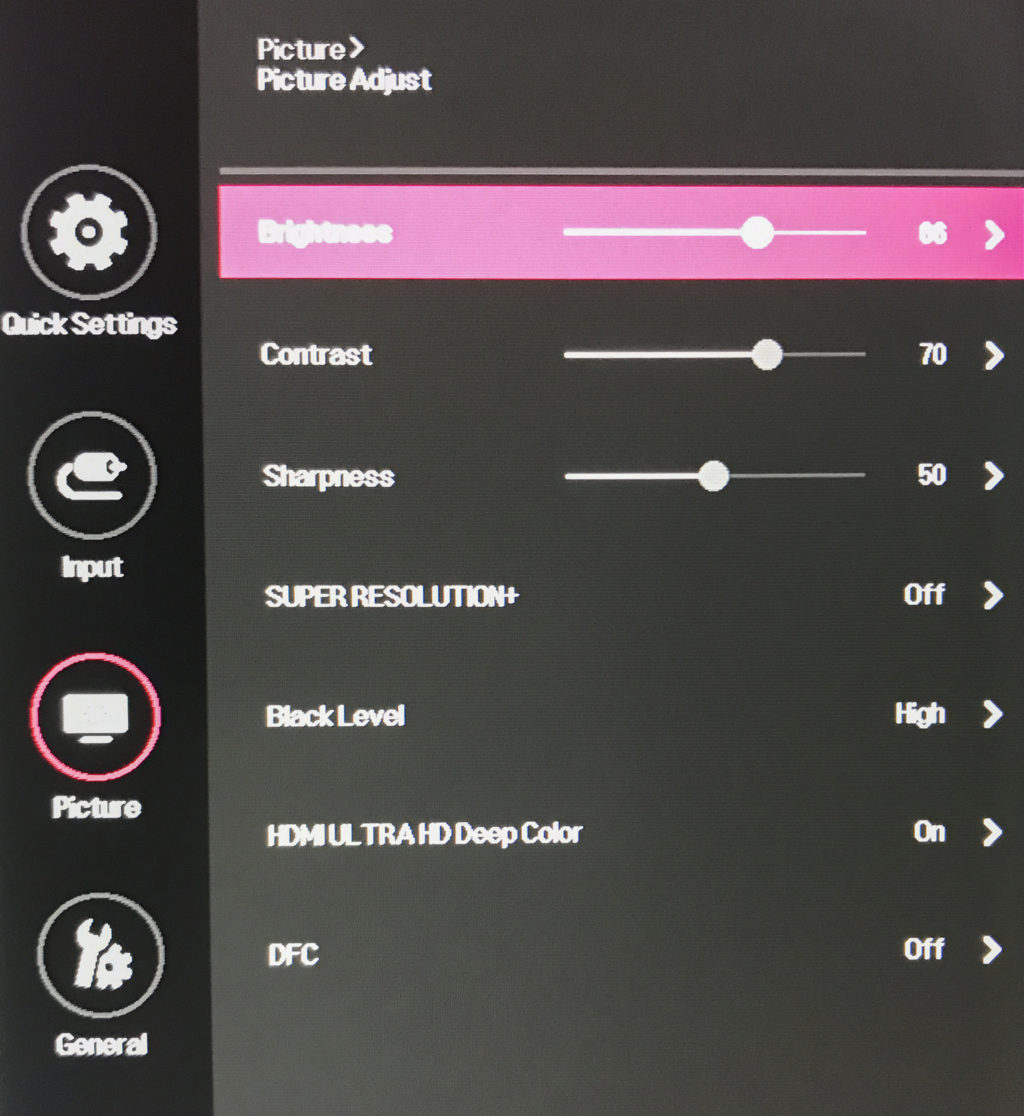
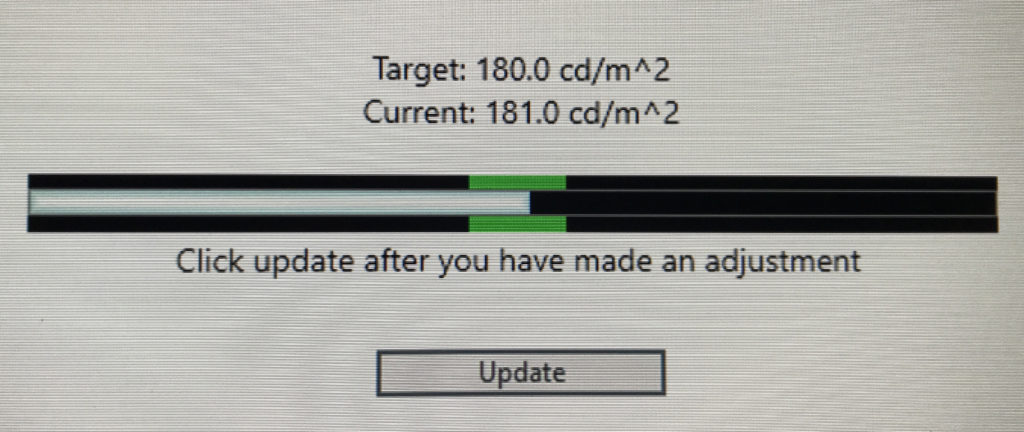
You need to press update to see the current value after changing the brightness value. You can now see that after pressing update, the value has gone to the middle. You need to reduce brightness and press update till you get the results.

Once the brightness is adjusted, the software takes you through a series of flashing screens which is the actual calibration process. SpyderX measures colour values of the monitor so it can be compared with the actual colour values and based on that a colour profile is determined.
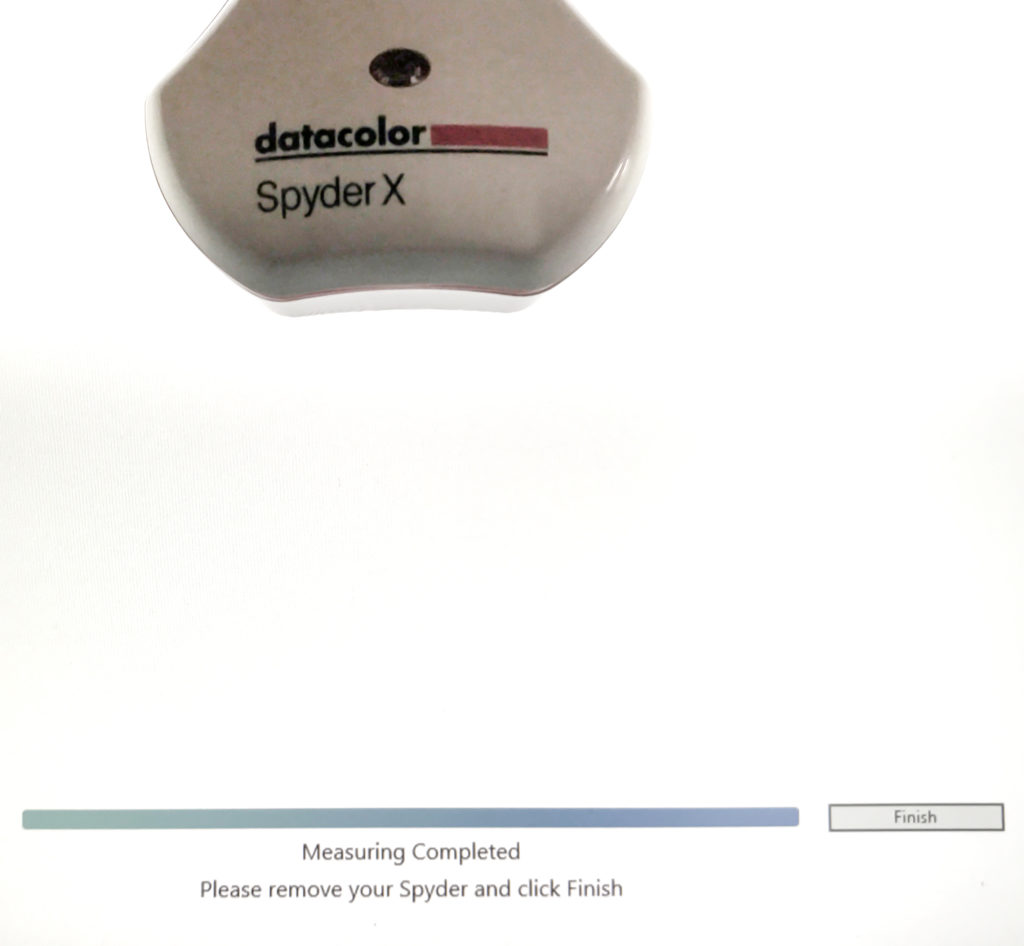
Once the measuring process is complete, you will be advised to remove your Spyder device and click finish.
Once you click finish, you will be asked to give the profile a name and save it.

Once the colour profile is given a name, click “Save,” and the software notifies you that the new colour profile for the calibrated monitor is saved. The screen will also tell you the location on your computer where the new profile is saved.

The finally created and saved colour profile will be used whenever the SpyderX software is loaded. You can turn this profile on or off from the SpyderUtility icon in the menu bar/system tray.
Once the monitor is calibrated, you will be able to see a before/after view where you can see the difference in colours after the monitor was calibrated.
The screen below shows the calibrated view:

The screen below shows the uncalibrated view:
You can switch between the views by clicking the “Switch” button.

A side by side comparison of the views before and after calibration indicates that after calibration, the colours have become slightly richer and the skin tones look more natural. We could not see much difference in the black and white images.

Below is a closer view of the uncalibrated vs. calibrated images, so you can see the difference:


Once the display screen is calibrated, you can see display gamut which is your profile overview. You also have a choice to choose which colour space you choose to work with.

Ease Of Use
The SpyderX is very easy to use because,
- The software guides you through the various steps involved. So, you don't need to be an expert in order to calibrate your monitor. The dialog boxes are very helpful with guides that will help you calibrate the monitor without a problem.
- The device can be easily plugged into one of the USB ports of your desktop or laptop and the calibration can be done in a matter of a few minutes.
- You can recalibrate if you wish or even check to see if calibration is required for a particular monitor.
Speed
It is very fast because:
- You just need to go to the provided URL, download the software and install it. It takes a few seconds to do that.
- The entire calibration process initially takes a few minutes and from then on a full calibration takes less than 2 minutes if you know what type of monitor you are calibrating and if you know to adjust the brightness and other settings on your monitor.
- There are no other complexities involved in the process.
Technology
The technology feels good because,
- The SpyderX Pro uses lens-based colour engine technology that all the latest SpyderX devices excel at.
- It also works based on the latest colour management technologies, so you won't need to look for another colour calibrating device in the market.
Performance
The performance of the SpyderX Pro is also good because,
- The first noticeable advantage of using SpyderX Pro is its speed. It can be quite annoying to spend a lot of time calibrating monitors when there is so much work left to do, but the DataColor SpyderX Pro takes approximately less than 2 minutes to perform full calibration which we think is quite fast. So it is worth investing in if you are looking to buy a monitor calibrator.
- If you have multiple monitors or displays to calibrate, then SpyderX Pro will save a lot of time and is worth investing in or upgrading if you have an older version.
Pros And Cons
Pros
- The lens comes with a protective cover, which we think is great to protect the glass from dust and scratches.
- It is portable which means if you are someone who travels a lot and works from various locations, you can carry the SpyderX device around with ease and calibrate your laptop on the go for the light conditions you are working in.
- The lens-based colour engine technology in SpyderX helps increase the precision, colour accuracy, and low light capability of the device because the new lens design helps the device to focus more light on the colour sensor thereby increasing accuracy.
- It is fast, easy to use, and affordable.
- With a single SpyderX device, you can calibrate multiple laptop screens and desktop monitors.
- It supports all the latest display technologies and thereby ensures that the colours across all your devices are accurate.
- You can have a comparative look of the monitor display colours before and after calibration which can be an eye-opener. This will also allow you to check if the monitor has the desired display colours and details after the calibration.
- Easy management of profiles and quick switching on and off the calibrations.
- The ambient light sensor in the SpyderX device monitors your room light throughout the day and allows you to adjust the brightness and contrast on your display to acceptable levels with the help of the profile switching feature.
- The display analysis option allows you to check the health of the monitor in terms of display and output.
- Supports various languages like English, French, Italian, German, Spanish, Russian, Japanese, Chinese, Korean, etc.
Cons
- From what we have read about the SpyderX Pro compared to other devices in the market, the low light performance can be quite behind when compared to other similar colorimeters in the market with the same specifications and price.
- Also reading a few users' feedback it looks like, one cannot upgrade the software for future types of display. Will need to wait and check on that.
Note: While calibrating the monitor with SpyderX Pro, the room had medium daylight. We will be calibrating the monitor under different light conditions in the future to look for any consistencies and update the review with the results.
Who Is This For
The SpyderX Pro is for serious photographers who want to reproduce accurate colours in their final photographs and who want to manage colours and preserve colour accuracy even when the ambient light is changing. It will also be useful for designers who are looking to manage colours and wish to have control of the colours in their day to day workflow.
Conclusion
After using the SpyderX Pro to calibrate the monitor, the colours in the images generally look richer and the skin tones natural. Since the SpyderX is affordable, we would recommend SpyderX for anyone whose job involves post-processing and also for serious photographers who wish to get the right colours in their resulting image.


2 Comments
The SpyderProof screen is a complete con. Screenshots of an image with calibration on or off should not show any difference. DataColor is deliberately altering the uncalibrated views to show a more drastic difference to fool people into believing a significant positive change due to calibration. Calibration happens from the lookup tables loaded into the graphics card onwards.
The easiest way to verify/dismiss your accusation is to re-calibrate the monitor again after it is already fully calibrated. Because there should be no changes needed/made, the “before” and “after” display should look identical.
TM