White balance is a feature in camera that allows the photographer to capture true colours and this is a feature that is built into all cameras, be it the DSLRs or the mirrorless. There are white balance presets in the camera that can be chosen depending on the light conditions, or for beginners, they can choose auto white balance or experienced photographers can manually set the white balance based on the light conditions they are shooting in. It is important to choose the right white balance because we do not want warm colours in a cold and bleak scene or cool colours in a cheerful scene.
Co-authored by Dahlia Ambrose

In this article, we'll cover how to properly set a custom white balance manually in your digital camera. Before we begin, let's look at what white balance is in photography and why you need it set it up correctly.
Here Is A Brief, Easy To Digest Explanation.
White balance is how warm or how cool the colours look in your photographs. Usually, the camera reproduces colours the same way they look in real life.
For example, even on a bright day, the light is a bit blue when your subject is in the shade. Our eyes don't register this because our brain is very good at dealing with colour casts, processing the information and making it look white to us. But our camera will pick up on this colour cast.

Similarly, indoors under fluorescent or incandescent lights, we don't see much difference in white colour, but the camera sees it. This is what is called the colour temperature and balancing these colours to make the white look natural is adjusting white balance.
Note: Balancing the white colour means, adding warmer tones to cooler light and adding cooler tones to warmer light to make the white look natural.

Light sources emit colour in different temperature ranges, and it is measured in units of Kelvin. For example, the direct light from the sun has a different temperature than light in the shade. Similarly, light from a fluorescent lamp will have a different temperature compared to tungsten or incandescent lights, and so on. So, natural light is cooler, while tungsten and candlelight are warmer. Fluorescent light can give a green colour cast.
Note: Warmer lights have low Kelvin values, whereas cooler lights have higher Kelvin values.

Here Is A Direct Example To Explain Kelvin:
Street lights typically emit an orange colour to them, when you take photographs with your digital camera in auto mode, the orange gets exaggerated, and the result isn't so pleasing. This is typically considered warm lighting.
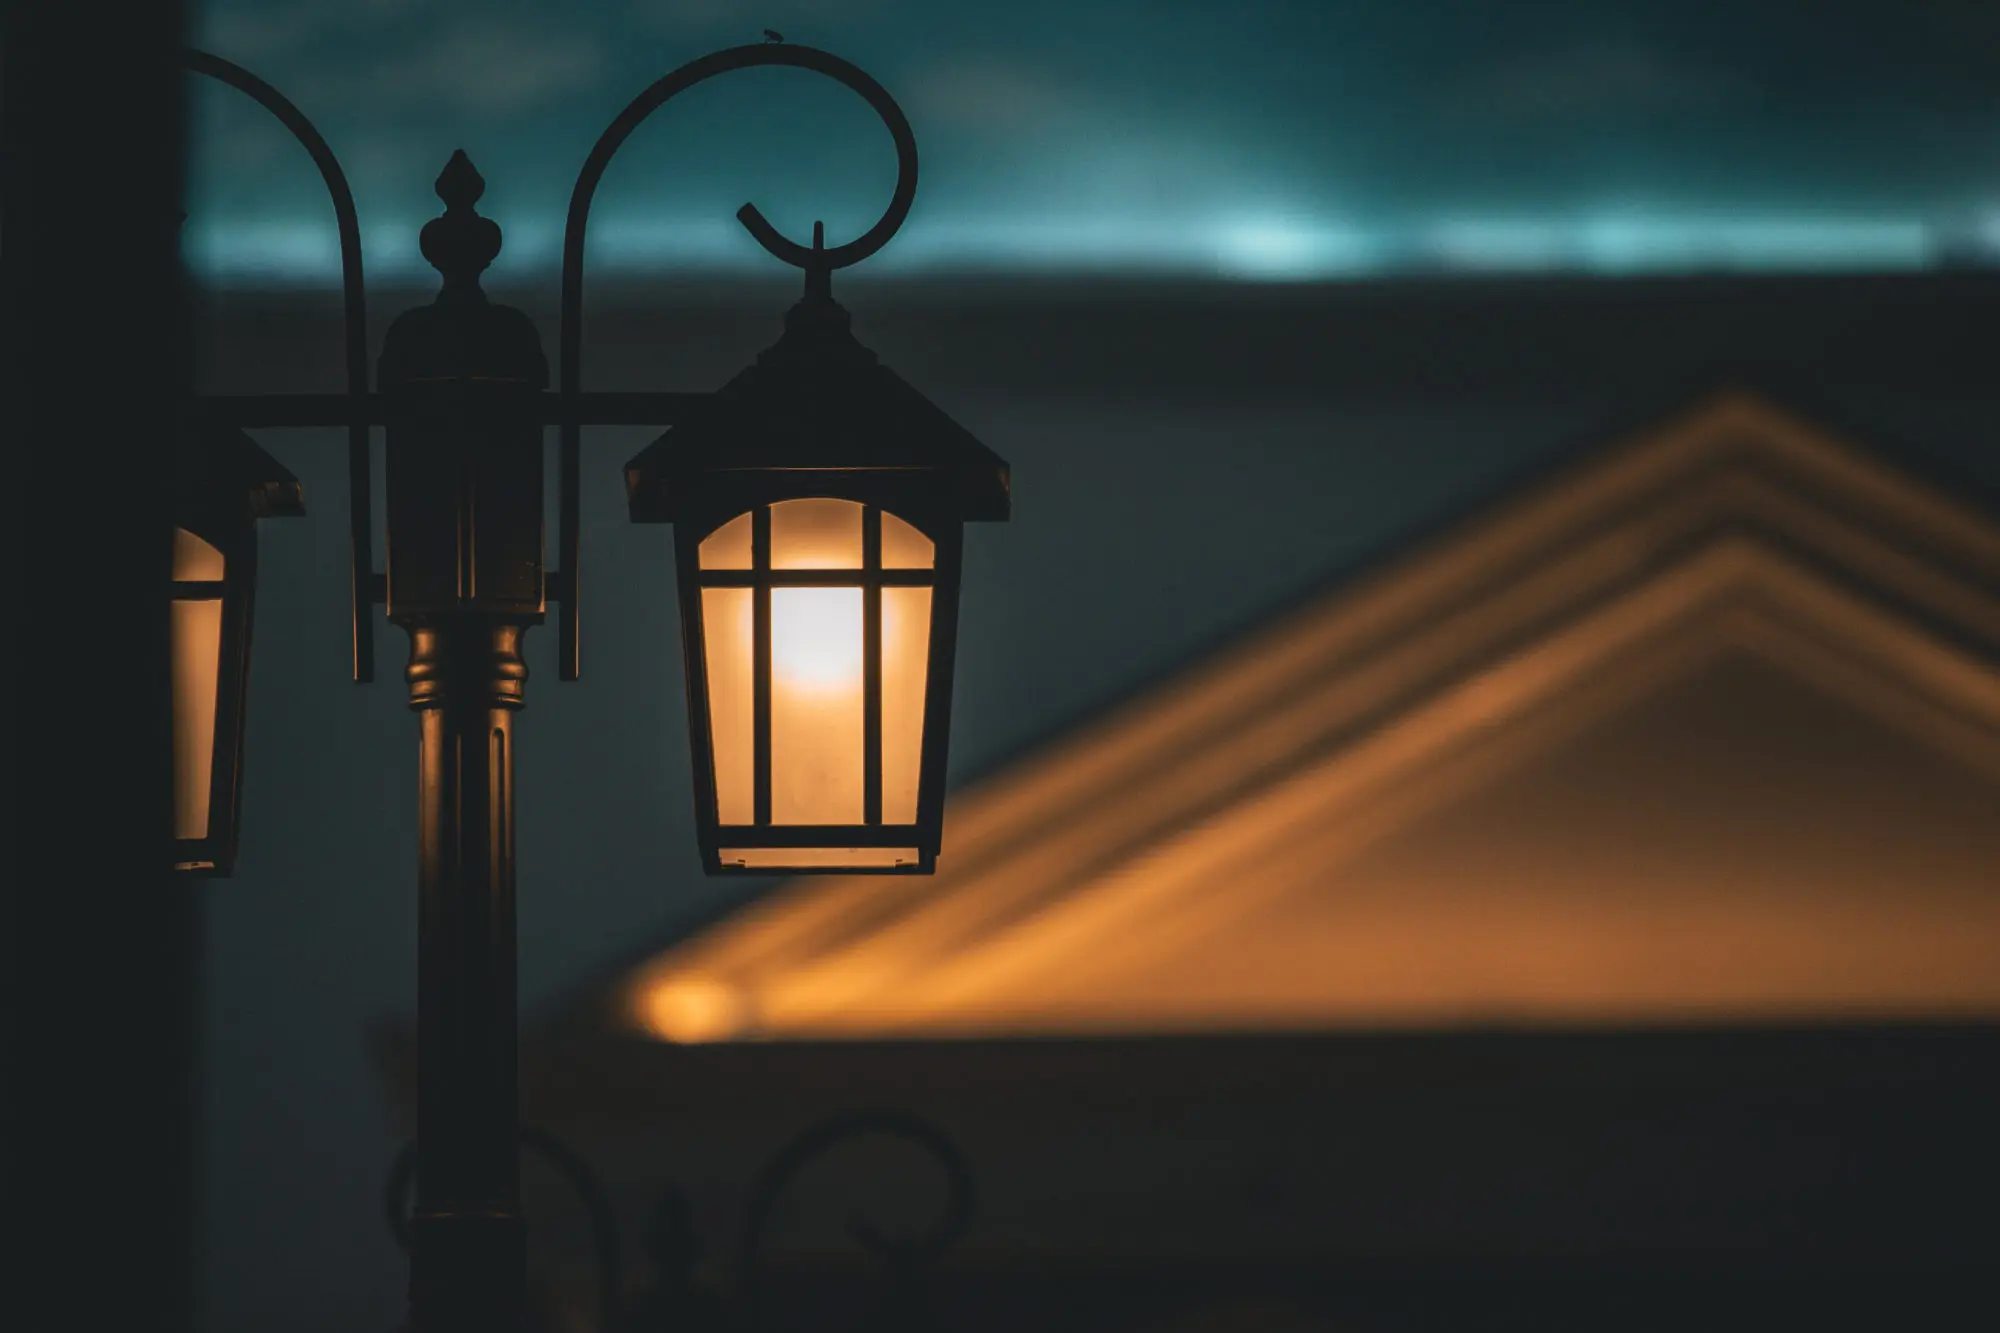
On the other end of the spectrum is cool lighting and favours the blue/white Kelvin spectrum. The new Lexus, BMW, Mercedes headlights all have this white/blue light to them.

In both examples, light is the final result, but the colour is different.
Similar to the above examples, indoor incandescent bulbs cast an orange colour while candles cast an orangish-red glow. Likewise, when the sun is not up in the sky, the blue sky looks very blue and photographs taken in the shade look blue too.
The reason for this is, different light sources emit different amounts of red, blue, green colours and the scattering of different wavelengths of light is the reason for the colours – for example, the reason why the sky is blue is due to the diffusion of blue light off air molecules more than any other wavelengths of light.
In days gone past when film ruled, it was much more lenient towards these particular colour shifts, and two main types of colour film existed, regular and tungsten. While you could use gels in extreme cases, these two film types satisfied the needs of most everyone; digital sensors, however completely changed the game.

So, What Does Setting White Balance Do, And Why Should You Do It?
Setting white balance helps the camera to establish what is white in the scene and then set the colours more accurately for the photos taken in that scene, under that lighting situation. Setting white balance is very important when shooting in tricky light conditions, such as a mixed lighting scenario. Your shot might have artificial light indoors combined with natural light from a door or windows. Setting your white balance in this scenario will ensure you get accurate colours in your images.
Cameras come with inbuilt white balance presets that are good to go most of the time, for a single type of light in a scene, but in situations where there are multiple light sources, the camera gets confused, and that is when you need to set the custom white balance.
Moreover, if you are shooting jpegs for some reason, custom white balance is the way to go as fixing white balance when post-processing is not always possible with jpegs. Even if you are shooting RAW, it is best practice to get the white balance correct in camera.
Almost all digital cameras come with a handful of presets for white balance, each usually has an indicator to get you in the round-about territory of where you should be, plus auto which isn't great all the time.
Here are the most common camera presets for white balance:
- AWB – Auto White Balance, where the camera sets the white balance based on the light in the scene. Most of the time, it is accurate, but there are times when the camera gets confused. So using auto white balance should be limited to situations when you do not have enough time to set the auto white balance for specific shots or lighting conditions. Examples include event and wedding photography where you cannot spend time adjusting the white balance for all the different lighting conditions as it will lead to the photographer missing the most critical moments of the event or wedding.
- Daylight – the camera usually adds warm tones when this preset is selected. So it is best to use this preset when the sun is bright enough as otherwise, it can cast a blue colour in your photographs.
- Cloudy – the camera adds slight warm tones to the images when the sky is completely covered with clouds because the light on overcast days is a bit cooler. There are times when shooting sunset or sunrise may not reproduce the vibrant colours in your pictures, similar to what you see at the location. You can use this preset, so it adds warm reddish tones to your photographs.
- Shade – the camera adds warm tones to the images as otherwise, photographs shot in the shade using auto white balance may end up having blue tones. Also, if you are looking for warmer colours in daylight, you can use this white balance preset.
- Tungsten – the camera adds cool tones to the images as the tungsten light usually adds warm tones. So using this preset adds cool tones to bring down the bright yellow or orange colour casts these lights create in a scene.
- Fluorescent – the camera adds warm reddish tones to the photographs since these lights emit cool light.
- Flash – the camera adds warm tones to the image as the light from a flash is cool. Use this preset only if the flash is your only source of light. If not, you will need to use custom white balance settings.


Here are some sample images shot under various white balance settings to get an understanding of how different white balance values affect colours in the image:


Before going on to custom white balance, you could always try the different presets to see if these work for the light conditions that you are shooting in.
If one preset does not work for a particular light condition, depending on whether you are looking for warmer or cooler tones, you can use the white balance preset above or below to adjust the colours. The preset modes are great when you are 100% sure of your lighting, but how often can that be?
Setting your preset to Sun mode or daylight, for example, doesn't account for the light change from the early morning, high noon and late afternoon. Likewise, most homes have multiple different temperature bulbs, that makes it near impossible to use a preset to get an accurate white balance. Especially with portraits and when shooting people under other light conditions, we want the skin tones to appear natural unless you are going for a creative look or feel in the image.

The goal for white balance is to achieve a neutral and accurate portrayal of what the naked eye sees and to represent that in your photography. Most of the time, auto white balance or one of the presets works fine, but there will be times when the camera gets confused by the light conditions, and you will need to instruct it to see what is white in the scene.
Setting a manual white balance, often called a custom white balance is way easier than most people could ever hope it to be.
You'll want to shoot using custom white balance in any situation that you cannot control the light sources you are using. This will also be helpful in scenarios where there is more than one light source, and you have to use them both while photographing.
- Custom White Balance – the photographer sets the white balance depending on the light in the scene. You tell the camera what is white in the scene so the camera can adjust all the colours in the scene and reproduce the correct colours.
How Do You Set Custom White Balance?
Setting up custom white balance involves taking a photo of something white or mid-grey in the same light where you will be shooting your subject. You then select the camera's custom white balance mode and set it to use the photo of the white or mid-grey thing as reference. Follow the steps below on how to set this up, and this applies for any image.
Note: Refer to the camera's manual if you need help with getting into the white balance menu for your specific camera. Also, most cameras will have a WB button at the top or back of the camera, if not there, then at least white balance menu in the shooting menu.

This is what you see when you press the WB button on a Nikon. Rotate the front or back wheel for custom white balance presets or inbuilt camera's white balance presets.
- Take a photograph of something white in the same location under the same light you intend to shoot. Make sure it is shot at the right exposure, and it covers a large area of the frame or completely. This could be a wall or ceiling, fabric, paper, card or anything white or grey, and it will be used as the reference photo to set white balance manually.
- Then go to your camera's shooting menu, choose white balance settings and select custom white balance or, press the WB button on your camera and turn the dial until the custom white balance icon is displayed.
- Select the image you just photographed (something white or grey under the shooting light) by pressing the set button. The “Set” button is usually the “OK” button; if not, you will be guided on the screen.
- Set your camera's White Balance setting to Custom.
- Now the white balance for the light you will be shooting under is set for your camera and you should get good results for that lighting situation. All the images shot in this lighting scenario in this location should turn out neutral with natural colours and should not have a colour cast. If anything in the scene changes, for example, a background, more light sources or colour of light, you will then need to set the white balance again following the steps above.
- If you move to a different lighting scenario, repeat the same steps above.
Set Custom White Balance – Nikon
- Go to the shooting menu
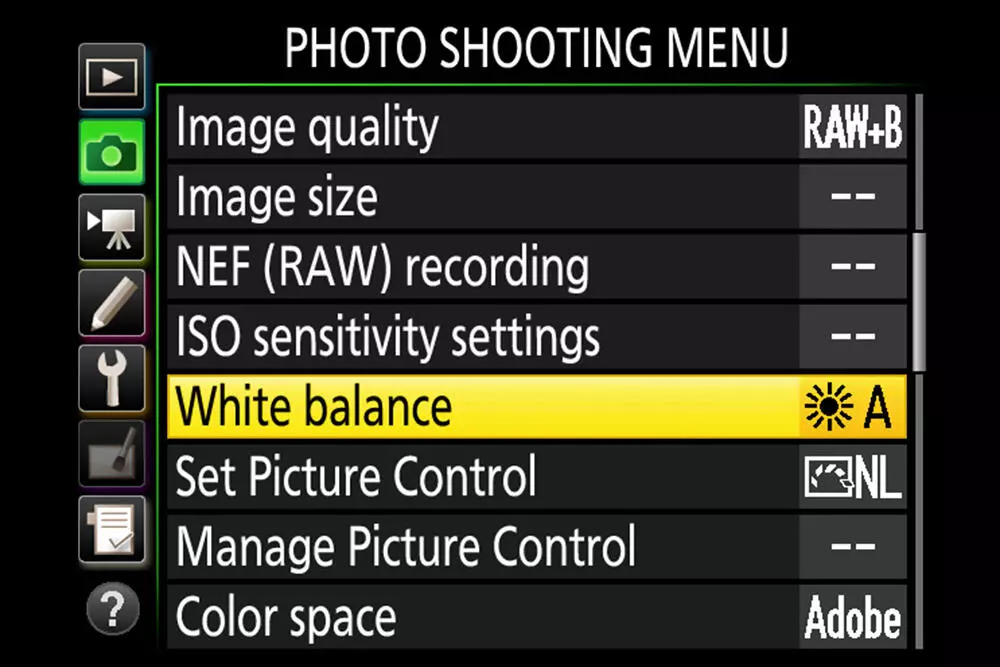
- Choose “Preset Manual” to set custom white balance
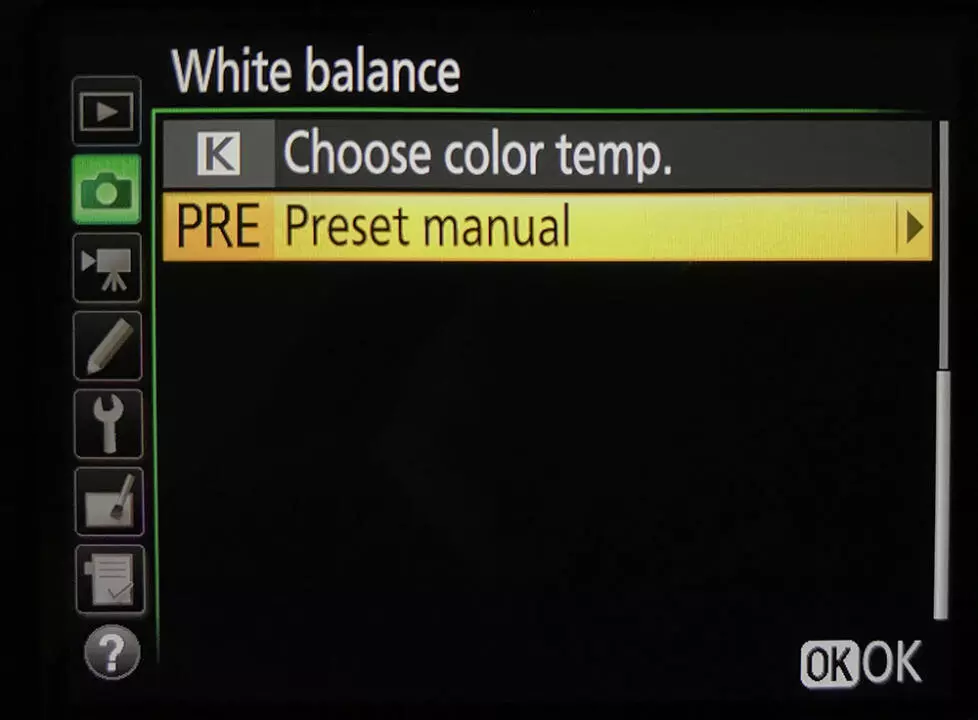
- Select one of these
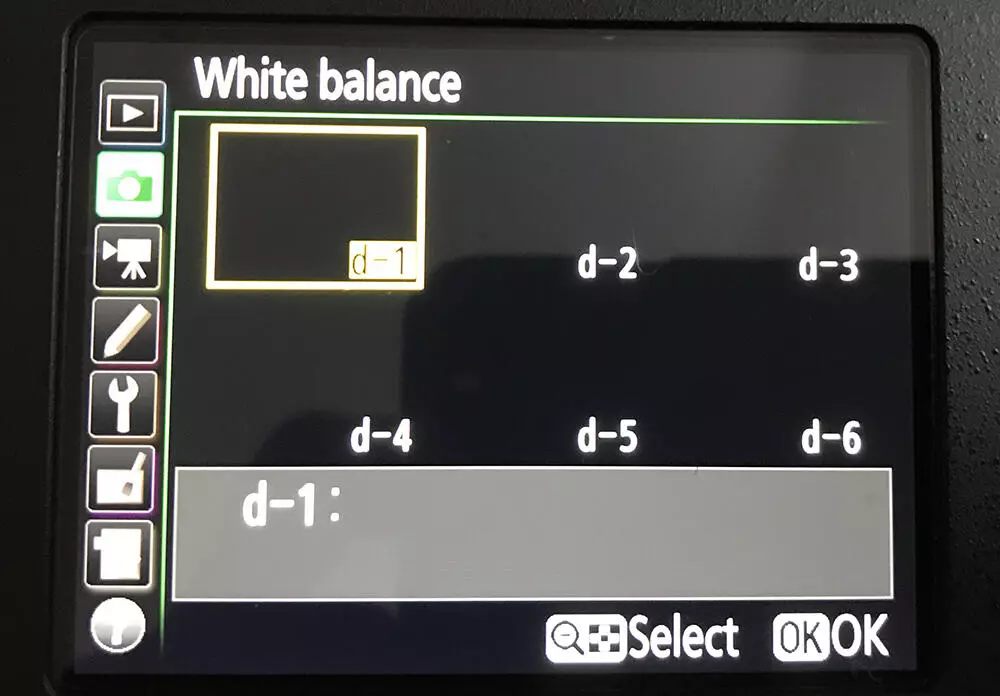
- Select the image shot with grey to set for custom white balance


Set Custom White Balance – Canon
- Choose custom white balance

2. Select the image with the white or grey area
3. Choose OK to use white balance data from this image

4. Click set again

There's no magic; it's that easy!
There is one secret, though. You want your white or grey area to be where your focal point is. That is to say, the model above is holding it directly over their face; that's what is important. If you, the photographer, are standing 15 yards away and hold the grey card in one hand, camera in the other and shoot it, the light falling on the grey card for which you make your custom white balance setting could differ from what falls on your subject. You must get the grey card into the frame with the subject!
Note: The bonus to doing a custom white balance, resulting in more neutral and natural colours is the total decrease in post-production work you'll have adjusting for improper white balance settings.
What If I Don't Have A Neutral Scene?
If you do not have a grey card or anything white or neutral in the scene, you can go the trial and error route. Use the Kelvin scale and depending on the light used, use manual values to increase or decrease the values in the Kelvin scale to set the white balance manually. Take test shots to get the most accurate white balance values. You can also use this as a way to creatively use white balance to add mood to your images.
Choosing Kelvin values for setting white balance:
For Nikon:
In the Shooting Menu -> Choose White Balance -> Choose colour temp.

Adjust the temperature according to your lighting situation

For Canon:
In the shooting menu, choose Kelvin scale adjustment

Here is a rough idea of the values to look out for:

And here is a handy table to use as a guide:
| Candlelight | 1000 – 2000 K |
| Tungsten Bulbs | 2500 – 3500 K |
| Sunset and Sunrise | 3000 – 4000 K |
| Fluorescent Lamps | 4000 – 5000 K |
| Flash | 5000 – 5500 K |
| Daylight | 5500 – 6500 K |
| Midday | 6000 – 7000 K |
| Overcast Day | 6500 – 8000 K |
| Shade or Cloudy | 9000 – 10000 K |
We hope that this overview of white balance and how to set custom white balance has been helpful. If you want to know more about white balance, take a look at these articles:
Further Reading:
- How To Adjust White Balance In Lightroom
- How To Create Mood In Your Images Just By Adjusting White Balance
- Getting Creative with White Balance
- White Balance 101 – How To Get It Right
- Everything You Need to Know About White Balance
Further Learning:
While this tutorial on how to set custom white balance will help you get it right in camera, our images will always need editing. Editing is a huge part of photography, and if you are interested in learning more about it, then take a look at Kent DuFault's Ultimate Guide To Fundamental Editing.


18 Comments
Thanks, I'll have to try that. Seems it should take the guess-work out of the white-balance in RAW Post-Processing.
ojphoto.blogspot.com
So are you saying that one should a different white balance for each situation where lighting conditions are unknown? That seems as involved as trying to use one of the presets…
Unless your gray cardboard does the trick for very different lighting conditions.
How about taking a picture of a sunset for example? Some cameras get confused because the light is reddish in the afternoon. But according to your note, you need to place the gray card where your subject it, which maybe some distant rock or mountain range!… So how do you do it in that case? thanks!
How about taking a picture of a sunset for example? Some cameras get confused because the light is reddish in the afternoon. But according to your note, you need to place the gray card where your subject it, which maybe some distant rock or mountain range!… So how do you do it in that case? thanks!
This only apply to jpeg shooting not RAW. You should never shoot jpeg as you are loosing tons of informations.
If you worry about your mem card space, well just buy bigger card.
This doesn’t only apply to jpeg Yves. This is important to do with RAW as well as it is the best way to get an accurate white balance, yes you can continue to play with the white balance settings in RAW processing but this saves you that trouble.
Louis in a sunset situation you only need to make sure you are taking the white balance grey card image with the light that falls on the subject. In sunsets the light that falls on the grey card when held facing the sun is the same colour temperature as the light that is falling on “some distant rock or mountain range” so just white balance from your grey card facing the sun.
So setting up the custom white balance is an important step .. no wonder my auto wb give me headache ..
What kind of WB would you set when you are shooting a wedding reception and there are different rooms with different intensity of light? Even in the same room there are times when you could have different bulbs with different color temperature. What kind of setting would you use for this?
Try using the custom settings on the main dial. You should have 2 or 3. That would allow to set each to a different room, you can then have the last one set on the manual mode.
Which white balance(AWB for exemple) shall be used to get card picture ?
I’m more confused than before. White balance and a gray card? What if the main focus is white?
I have canon mark ll and I set white balance with greay card 80% sekonic but my color camera is yellow or green and I go to setting but I couldn’t set color on the camera?
thank you
Best regard’s
Will this trick help bring back the “natural” tones gained with film for artificial light shooting cityscapes at night?
How about ExpoDisc ?….
You forget to tell that gray card should be photographed every time the lighting conditions change!
BR
And what steps should be used if you’re photographing landscape where the focal point is an inconvenient distance away?
Min An shoots the loveliest left profile portraits, sigh.
Which white balance setting should be used to shoot the grey card, AWB? prior to using it for the custom WB setting ?