One of the most important terms or concepts in photography is Depth of Field (DoF). It is also a great compositional tool. You may get an understanding of what DoF is from the term itself, but do you know what factors affect it? Have you been taking control or advantage of this amazing technique to make creative and striking photographs?
For example:
- Are you struggling with getting the background blurred when shooting portraits?
- Do your landscape photos have blurred backgrounds and/or foregrounds?
Here is a guide to help you understand depth of field in detail, so you can apply it in your photography to create better images.
3 Useful Resources for Mastering Depth of Field
By Kent Dufault | By Kent Dufault | #3 10 Ingredients of Composition Mastery By Ignacio Palacios |
Best for Beginners | Best for Intermediate – Advanced | Best for Advanced |
 |  |  |
| Download |
The term depth of field may give you a slight understanding – it is the area or zone (depth) that is of acceptable sharpness or focus in an image. It is otherwise the distance between the nearest and farthest elements in the scene that appear acceptably sharp in the image.
The reason we use the word “acceptable sharpness” is, that the cameras can only focus sharply at one point at a time and the transition from sharp to unsharp is gradual. So the term acceptably sharp is not clearly defined and it also depends on various factors like viewing distance, eyesight, etc.

DoF differs for each image depending on various factors. When you closely examine a bunch of images shot at various focal lengths and aperture values you will find that the depth of field varies in each image. DoF values can be chosen for technical and artistic purposes.

Depth of Focus: If you hear the word depth of focus, do not get confused. It is nothing but another term used for depth of field. The term “depth of focus” says it all – it is the area or zone (depth) that is in focus for a given lens, focal length, focusing distance, and aperture value.
In a Nutshell: Depth of Field is controlled by the aperture of your lens and the distance between the camera, subject, and background.
Why Is Depth Of Field Important?
In order to know what needs to be in sharp focus, you need to have a good understanding of the concept of depth of field. This way you will have creative control over the images you create.
We all generally know that aperture affects depth of field and it is the first thing that comes to mind when we need to control DoF. But there are more factors that affect depth of field and understanding this will help you overcome a few constraints and creatively make photographs that you visualize. So let’s have a look at the factors that affect DoF in detail!
What Are The Factors That Affect Depth of Field:
- Aperture
- Focal Length
- Focus Distance – the distance between the camera and the subject
- Camera Movements
- Sensor Size
Before going into detail on how certain factors affect depth of field, we need to understand certain terms. These are terms that we will use in this article when explaining Depth of Field (DoF):
- Circle of Confusion (CoC)
- Hyperfocal Distance
- Image Plane, Sensor, Film Plane, etc.
- Plane of Focus or Focus Plane

1. Circle of Confusion (CoC)
The circle of confusion is the maximum diameter of a blur spot that will appear acceptably sharp in a photo. This blur spot will be seen as a point in the final image. How much of the area in the image is sharp or blurred depends on print size, viewing distance, and also the viewer's visual correctness.
One of the factors that “acceptable focus or sharpness” is based on, is the “Circle of Confusion (CoC)” and we will look at what it is in detail. It may look a bit confusing, but we have given a few illustrations and examples to explain this.
For example, you have a subject that you want to photograph. You put your camera in front of your subject at a distance depending on how you want to frame and then, you focus on a point that you want to be sharply in focus in your final image (for example eyes in a portrait). When you focus on your subject, what happens is, that the focusing element is moved back or forth by rotating the focus ring (if manually focusing) till you get the desired point in sharp focus. This point is the accurate focal point and away from this point (either front or back) everything else in the image is out of perfect focus (but acceptably in focus).

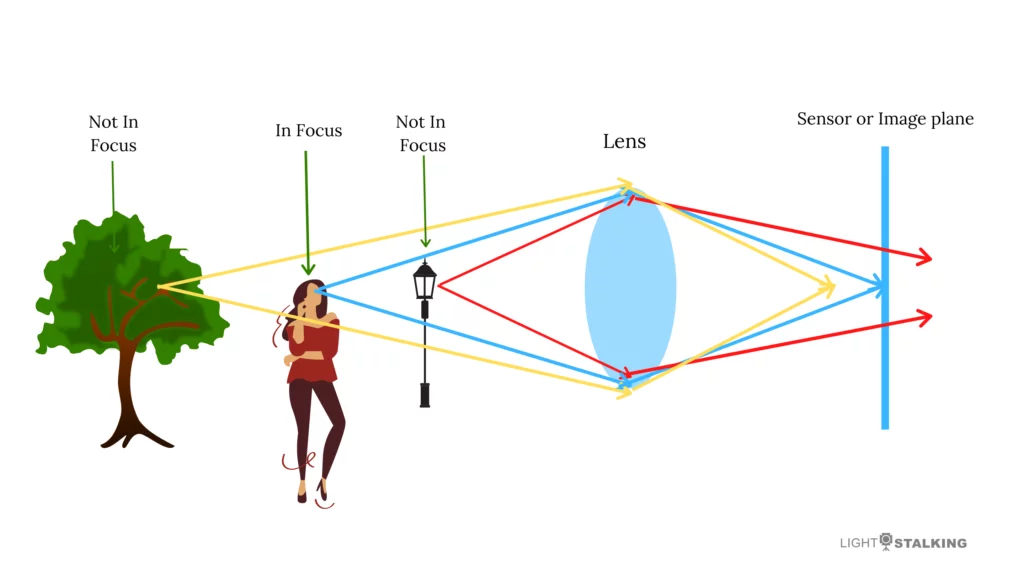
To elaborate, our eyes are capable of resolving the sharpness levels only up to a certain extent. So when a particular area close to the accurate focus is very slightly out of focus, it will not appear blurry but acceptably sharp to our eyes. This is because our eyes are not capable of distinguishing this perfect focus and very slightly out-of-focus regions. The illustrations below explain the very slight difference in focus.


Since our eyes can only perceive blurriness above a certain level, the word “acceptable focus” or “acceptably sharp” is used, which is the area in front and back of the accurate focus point that appears sharp to the human eyes. This area of acceptable sharpness is called the circle of confusion.

The circle of confusion depends on the aperture values, the focal length of the lens, and the distance between the subject and the camera.
The circle of confusion is also dependent on other factors like:
- How big you are viewing or printing the image – the bigger you view or print an image, the CoC needs to be smaller in order to keep the image in acceptable sharpness.
- The distance from which the image is viewed – The closer the viewing distance, the smaller the CoC needs to be to view the image sharply. As the viewing distance increases, the CoC can be larger to view the image acceptably sharp.
- The viewer’s vision – CoC also depends on the viewer’s visual accuracy. If the viewer has very good vision, the CoC needs to be smaller in order to perceive the image as sharp whereas a viewer with not very good vision may be able to see images sharp if the CoC is slightly bigger.
2. Hyperfocal Distance
Hyperfocal distance is the focusing distance at which all objects in the scene can be brought into acceptable focus and this is the focal distance that can give maximum depth of field. Hyperfocal distance is particularly important when taking landscape photographs where you want all the elements in the scene/frame in focus. It is a complex term that is quite confusing for many photographers, both beginners and experienced.
For example, even at very narrow aperture values, you can notice that when you focus on the foreground, the background may appear blurry or when you focus on the background, the foreground may appear blurry.
How do you rectify this problem, especially in landscape photography?
To decrease the blurriness in your foreground or background, you need to focus on an area or point somewhere in between the foreground and background so that you get both the foreground and background elements acceptably sharp. This point of focus or focusing distance that helps you get both the foreground and background elements acceptably sharp is called the hyperfocal distance.
Hyperfocal distance is affected by certain factors. For example, changing the aperture value can affect the hyperfocal distance. Hyperfocal distance is farther for wider apertures and nearer for narrow apertures. The reason is not that the aperture directly changes the focusing distance, but the fact that as you widen the aperture, more of the foreground and background become more out of focus and you need to compensate for that by changing the focusing distance.
Note: Always keep an eye on the shutter speed when changing aperture values in order to get sharp images.
Again, this depends on what type of photography you are looking to do. This will affect landscape photography, architectural photography, night photography, and similar genres.
Another factor that affects the hyperfocal distance is the focal length. For example, a wide-angle lens or lenses with short focal lengths like a 14mm lens will have hyperfocal distance very near compared to a telephoto lens like a 200mm lens that will have a hyperfocal distance very far away.

How far will the focus be if you focus at the hyperfocal distance?
Focusing at the hyperfocal distance will yield sharpness from half the hyperfocal distance up to infinity. For example, if for a given aperture value and focal length, your hyperfocal distance is 10 meters, focusing at the hyperfocal distance will make everything from 5 meters up to infinity acceptably sharp.
When should you use hyperfocal distance?
Hyperfocal distance needs to be used when you want a large area of the scene in acceptable sharpness or focus. So you do not need to apply this to all genres of photography like portrait photography, macro photography, etc. Also, when shooting landscapes from higher vantage points, if you do not have anything in the foreground that will get recorded in the frame, then you do not need to calculate hyperfocal distance – for example, when photographing a distant mountain or any other scene where your foreground elements are quite a lot of meters away.
Another important thing to remember is, that if you have any element very close to the lens, then hyperfocal distance will not be able to help you get all elements of the scene in focus. If you focus on the hyperfocal distance, the foreground elements will be out of focus. If you focus on the foreground elements, your background will be out of focus. In these situations, you may need to try to focus stacking by taking several images of the scene at different focusing distances and then blending them while post-processing.

How to calculate hyperfocal distance?
The hyperfocal distance can be calculated using a simple formula. You will need the focal length used, aperture value, and circle of confusion. Generally, the circle of confusion value is around 0.02mm for crop sensor cameras and 0.03mm for full-frame cameras.
Hyperfocal Distance (H) = f2 / (CoC x F)
where,
f – focal length of the lens
CoC – circle of confusion
F – Aperture value
If you are shooting a landscape at 24mm focal length and aperture f/11, then the hyperfocal distance is calculated as follows:
Hyperfocal distance = 242 / (0.03 x 11) = (24 x 24) / (0.03 x 11) = 576 / 0.33 = 1745.45mm = 1.745m
Focusing your lens at 1.745m or beyond will give you everything from 0.873m up to infinity, in acceptable focus.
There are hyperfocal charts that you can use to get the focusing distance instantly for a given camera, focal length, and aperture value.
There are also apps that have a hyperfocal distance calculator or help you with a hyperfocal table to determine hyperfocal distance. Here is a screenshot of the hyperfocal table in the PhotoPills app:


Here are some Hyperfocal tables and apps that may be helpful:
- Field Tools for iOS
- Hyperfocal for Android
- HyperFocal Pro for Android
- PhotoPills for iOS and Android
- PhotoPills Hyperfocal Distance Table
- Printable Hyperfocal table and calculator
How To Focus At Hyperfocal Distance?
Focusing exactly at the hyperfocal distance can be a difficult task when you are outdoors. Once you know what the hyperfocal distance is, you can focus a bit further away from the hyperfocal distance just to be sure. If you focus in front of hyperfocal distance even by a small amount, then chances are that your background elements will appear blurry.
3. Focal, Image, Sensor, Or Film Plane:
These are all the same. For a digital camera, it is the sensor plane and the focal plane is the surface of the sensor.
4. Plane Of Focus:
The plane of focus or focus plane is the imaginary plane in front of the camera along the point of focus and it lies parallel to the plane of the sensor.
Now that we have an understanding of the terms above, let us look at how various factors control the depth of field.
How Does Aperture Control Depth Of Field?
Aperture plays a very important role in controlling DoF, which means, the size or diameter of the aperture controls the amount of light entering the camera and falling on the sensor and hence DoF. Increasing the diameter of the aperture (wider aperture, smaller f-number) reduces the DoF whereas decreasing the diameter of the aperture (narrow aperture, larger f-number) increases the DoF. The aperture is varied to produce various visual effects and to control how much of the scene should be in focus in the photograph.

To keep it simple:
- Smaller f-number, for example, f/2.8 – shallow or smaller depth of field
- Larger f-number, for example, f/16 – deeper or larger depth of field
“I began to realize that by carefully selecting the depth of field and making it narrow, I could create a sense of movement and reality that was in fact not there” – David Levinthal
How Does Focal Length Control Depth Of Field?
For a given aperture value, the longer the focal length, the shallower the depth of field. For example, let us consider that you are shooting a subject about 10 meters away from the camera using a 35mm lens at f/5.6. From the same distance of 10 meters, you are shooting the same subject at a focal length of 85mm at the same f value, that is f/5.6. If you compare these images, the image shot at 85mm will have a shallower depth of field compared to the image shot at 35mm. This is very similar to how distance controls the depth of field. The scenario of zooming in with 85mm is equivalent to getting closer to your subject with a 35mm.

How Does Distance Control Depth of Field?
Focusing distance is another important factor that affects depth of field. Above the minimum focusing distance for a particular focal length, for a particular aperture value, the depth of field varies with the distance between the subject and the lens. The closer the subject is to the camera, the shallower the depth of field and vice-versa.
Note: All lenses have a minimum focusing distance below which you will not be able to focus.
For a given focal length and aperture setting, the closer your subject is to the camera, the shallower your depth of field is. This means, if the camera-subject distance is smaller, the depth of field will be shallower. As your subject is moved away from the camera, the subject-to-camera distance increases and helps to maximize depth of field and hence the DoF becomes larger or deeper.

Note that moving the subject away or nearer to the camera or lens can change the perspective and composition of the image. The best way to achieve DoF without ruining the composition would be to bring a farther subject near using the zoom facility if you are using a zoom lens or by using another lens with a longer focal length.
There are apps that will give you an idea of the depth of field for a given camera, lens, aperture value, and subject distance. If you look at the screenshots below from the DoF pill in the Photopills app, you can see that the depth of field increases when the camera-subject distance increases.


How Does Camera Movement Affect Depth Of Field?
When you have your camera facing your subject in a straight line, the plane of focus is parallel to the plane of the image, which is the film or sensor. When the lens alone is tilted up or down (like in a tilt-shift lens), the plane of focus and the plane of the image will no longer be parallel, but if the camera itself is tilted or moved as a whole along with the lens, the plane of focus moves along with the image plane and they are parallel.

If you look at the illustration above, the plane of focus moves when the camera is moved or tilted. It is always parallel to the image plane or the sensor. This can particularly help with creative images where perspective goes a long way.
For example, in the third image, by shooting the lady from a higher perspective, we can see that the plane of focus lies along the head and the hands of the lady which means you will have the head and the hands in focus in the image while the other areas will be thrown out of focus and this way depth of field can be used for creative images.
Note: For a given focusing distance, the plane of focus lies along the focus point of the lens and it moves as the camera is moved. The plane of focus is always perpendicular to the optical axis and parallel to the sensor.
How Does Sensor Size Affect Depth of Field?
Sensor size affecting depth of field is one of the most controversial facts among photographers. In reality, sensor size physically does not change the depth of field, but it appears so because of the effective change in focal length when you switch from a full frame to a crop sensor, micro four-thirds, and so on. If you are changing the sensor size for example from full frame to crop sensor, then the effective focal length changes and it is this factor that affects the DoF.
Larger sensors have a very shallow depth of field and smaller sensors have a larger depth of field – consider it this way -> In order to fill the frame in a full-frame camera with what the crop sensor sees, you will need to physically move towards your subject. The closer the camera subject distance, the smaller the depth of field.
In order to understand this better, you need to understand the difference between the focal length and the effective focal length.
Let us consider a 50mm lens on a crop sensor camera. In Nikon APS-C cameras, the crop factor is 1.5, and mounting a lens with a focal length of 50mm on this APS-C camera with a crop factor of 1.5 will yield an effective or equivalent focal length of 50 x 1.5 = 75mm.
What is the difference between mounting a 50mm lens on a full-frame camera versus mounting it on an APS-C camera? It is just that the field of view is different. On an APS-C camera, the field of view of a 50mm lens is narrowed by a factor of 1.5 compared to when it is mounted on a full-frame camera. So the field of view of a 50mm lens on a crop sensor Nikon camera is equivalent to the field of view of a 75mm lens on a full-frame camera.
To get the same field of view on both the full frame and crop sensor cameras with a 50mm lens, the photographer will need to move the full frame camera closer to the subject. This will in turn make the depth of field smaller for a given aperture value for both cameras.

So, a 50mm lens always has a physical focal length of 50mm devoid of whichever camera it is mounted on. The focal length never changes. What changes is the size of the sensor and as a result the field of view changes.
Note: Focal length is the distance between the optic center of the lens and the film or the camera sensor. This is measured in millimeters and is calculated when the lens is focused at infinity.
DOF FAQs
How Does Circle Of Confusion Define Depth Of Field?
We know that lenses have a minimum focusing distance and perfect focus can only be achieved if the object or subject is at or beyond the minimum focusing distance from the camera. When focusing at this distance or beyond, the object will produce a sharp image at the point of focus, for example, a point object or a point source of light will produce a sharp point image.
Away from the focal point (either in the front or back), the point object or the point source of light will produce a blurry spot or a tiny circle that resembles the shape of the aperture – usually a circle. The size of the circle increases as you move further away from the point of focus. The image below is a perfect representation of this phenomenon:

Any areas nearer to the focal point will look sharp to our eyes as our eyes cannot detect very slight loss in sharpness and this is acceptably sharp to our eyes and is called acceptable sharpness. Moving further away from the point of focus, the sharpness reduces and our eyes are able to detect it easily and the areas are no longer acceptably sharp.
How Is Depth Of Field Distributed In The Front And Back Of The Focal Point?
The depth of field is not equally distributed in the front and back of the focal point. It is about a third in the front and about two-thirds behind the focal point (1:2 ratio) for a particular focusing distance. At other focusing distances, DoF will vary depending on where and how you focus. All these factors again vary depending on the focal length of the lens used, the focusing distance, and aperture.
Note: For a particular focal length and aperture combination, there is one focusing distance where the depth of field as mentioned above, is a third in the front and 2/3rds to the back of the focus point (1:2 ratio). Away from this distance, this ratio varies.
As the focal distance increases, the depth of field behind the focal point reaches almost infinity making the 1:2 ratio 1:∞ and this is called hyperfocal distance (at which you can achieve maximum DoF!).
Shallow And Deeper Depth Of Field – When To Use Them?
Depending on what you wish to shoot and how you wish to present your subject, you will need to adjust/alter/control the depth of field in your images.
Shallow depth of field can be used as a compositional technique where one can adjust the aperture or camera-subject distance to determine which part of the scene should be in focus and which should be out of focus. By selectively focusing on a part of the scene the photographer can draw the viewer’s attention to the main subject or a particular area in the frame. Shallow depth of field is used in situations where you want to do exactly this – that is to selectively focus a particular area and hence can be applied for portraits, still life, wildlife, sports, macro, and similar genres of photography. A wider or smaller aperture value or a smaller f-stop value is used to create a narrow depth of field.
A deeper depth of field is used in situations where you want the entire scene in the frame in focus – that is right from the foreground up to infinity. This applies particularly when shooting landscapes, cityscapes, architecture, and similar genres of photography. A narrow aperture or a larger f-stop value is used to create a large or deep depth of field.
If you are sure of the depth of field you intend to use, you can use aperture priority mode for easier shooting as it will give you the flexibility to focus on the photography part rather than worrying about camera settings like changing iso or shutter speed. This is especially useful when you are doing sports, wildlife, and sometimes even event photography.
How To Calculate Depth Of Field?
Depth of field can be determined using DoF tables or other apps that help with calculating depth of field. Here are some useful tables and apps:
- Photopills DoF Table
- DoF Simulator
- DoF Table
- PhotoPills for iOS and Android
- DOF Calculator for Android
- Depth Of Field Calculator for iOS
Further Reading on Depth of Field
Conclusion
We hope you got an idea of how depth of field works and we believe that you can use this knowledge to practically shoot brilliant images. Having a good knowledge of depth of field helps the photographer know what to keep in focus and how to do that when composing the image. You have the creative freedom to shoot what you visualize. Try various focal lengths, aperture values, perspectives, and focusing distances – analyze your images and learn from them.
Do you have any thoughts or questions about depth of field? Please share in the comments section below! And if you want to go even further with depth of field and how to use it well in your photographs, then take a look at Kent Dufault’s guide to advanced composition here.


2 Comments
Excellent explanation with very clear illustrations!
Hi Johan, thank you and glad that the article was helpful! 🙂