There is something quite magical about images taken at night, isn’t there? Night photography, especially late-night photography, can often convey a sense of calm and tranquillity that we rarely see at other times of the day.
But there is so much more to night photography than taking a simple photograph of a lit-up building. We can shoot trails of car lights, stars, and their trails, moonlit landscapes, and many more types of stunning images.
As photographers, we recognize the skill that has gone into another’s night photos. We know that to take amazing photos at night, we need to learn some important skill sets. Today we will introduce you to those skillsets and techniques so that you, too, can produce some amazing night photography.
What Exactly Is Night Photography?
Night photography can be split into two distinct timeframes, the hour just after sunset, l'Heure Blue as the French call it, which translates as the Blue Hour, and the time after, the night proper. Nighttime proper is when the last light in the sky has gone, and the sky is an inky black.
There are apps such as Photopills and The Photographer’s Ephemeris that will help you define the nighttime for any place in the world on any day.
In blue-hour photography, we rely on those blue-violet hues in the twilight sky to define our shot. In night photography, we may be using artificial light from the city, starlight, or even the light of the moon. The night sky is, of course, full of light sources; however, we need to be aware that they produce meager light and will require a long shutter speed to create an impact on the sensor.


Night Photography: The Gear You Will Need
Today's models will do the job in terms of any modern DSLR or mirrorless camera. The most important factors that your camera will need to shoot the night sky are the ability to set an ultra-slow shutter speed, preferably a build setting, and the option to turn off long exposure noise reduction. More on that later. A full-frame sensor will give you the potential to use a higher ISO. However, APS-C and M4/3 cameras are still perfectly suitable at a lower ISO. However, it’s safe to say that most cameras will have some or all of the functionality required.
In terms of lenses, fast will be better but not essential. A wide aperture of f/2.8 is ideal as it will let in more light, but if your lens only has f/4 or f/5.6, this is not a major issue for man-made lighting. Telephotos, wide angles, and standards are all valid in night photography.
However, as mentioned before, if our night photography involves light from astronomical sources, every stop slower our aperture is, doubles the shutter speed time. This is significant when shooting a longer exposure. Your shutter speed may go from four minutes to eight minutes.
One essential item that you will need is a good sturdy tripod. Too cheap out of your three-legged friend, as it will lead to very disappointing image quality. The obvious choice for your tripod legs is carbon fiber. However, a good set of aluminum legs will also work well. They will be heavier, though – a factor to consider if planning to do landscape photography at night.
A good solid ball head will allow you to adjust your camera and lens quickly and lock it off securely. Again don’t cheap out on the tripod head.
Due to the longer shutter speed required for night photography, it is advisable to use some form of the remote shutter release on your camera. This can be in the form of a wired or wireless controller or even a cable release. Modern remote controllers often allow you to get slower shutter speeds on a lower-end camera.

Seeing the camera settings in night photography can sometimes be tricky. For this reason, a flashlight is useful. However, many of us now carry a perfectly adequate flashlight in the form of our smartphones. These can also carry some handy apps with exposure guides for night photography.
With such long exposure times, our camera batteries can deplete quickly. It’s well worth carrying fully charged spares with you.
Settings For Night Photography
Before we delve deep into the art of night photography, let’s look at some basic exposure settings you will typically use to get great night photos. Bear in mind that every genre of night photo will be different, so these settings are a kind of baseline.
- ISO. Your ISO settings should generally be set as low as possible. On a typical camera, the base ISO is between 100 and 200, and this is the favored ISO setting. The primary reason for this is that night photography has a lot of shadows. Using a lower ISO reduces the chances of image noise creeping into those shadows.
- Aperture. I would say the aperture is going to be tuned you your creative vision for the shot rather than any specific setting. A wide aperture will give you a shallow depth of field and a shorter exposure time letting in more light. A smaller aperture will require a long shutter speed but can be ideal for light trail shots and getting sunbursts on artificial lights. Shooting aperture priority will allow you to decide what’s best.
- Shutter Speed. Your shutter speed will define the image's appearance, mainly if there is motion in the shot. Because there are so many genres of night photography, you will need to adapt your shutter speed to the relevant subject. However, all night photography shots will require a relatively long exposure, usually one second or more. Shutter priority is a useful mode for night photography.
- Shoot RAW. Because we may have multiple color lights, it will be best to shoot your night photos in RAW format. This will give you much better color control in post-processing. Unlike film, a digital camera does not suffer from reciprocity failure, an effect where the color curves in a film cross, leading to all sorts of unpredictable results. Because of these, you can use very long exposure times to capture as much detail as possible without significant color shifts.
- How To Get The Right Exposure. The exposure meter can easily be fooled in night photography. This is because most cameras struggle with multiple lights, plus the general low light levels. The two best exposure modes are, perhaps, matrix metering and spot metering. In matrix mode, the camera will meter from multiple parts of the image to get the proper exposure. In spot metering, you can position the meter point over a bright light and meter for that. This is a good way of avoiding blown highlights in the high-contrast scenes typical of night photography.
Although not the most common setting, aperture priority mode can be useful as a starting point in night photography. This is because it will allow you to get a rough indication of the required shutter speed by setting the aperture that you want.
Avoid any night mode your camera might have. These are often very over-optimized and will not give as good a result as shooting in manual mode. We will look a little deeper at specific settings as we look at different genres of night photography.

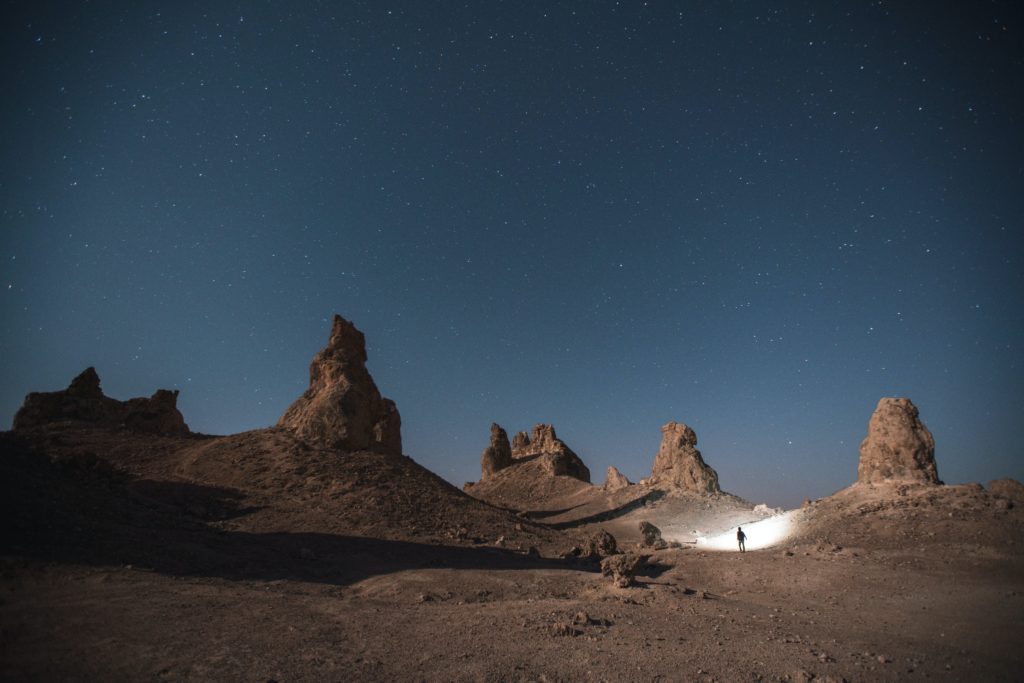
Night Landscape Photography
Landscape photography is often thought of as being shot in the golden hour, perhaps the blue hour. However, you can equally apply landscapes to night photography. How? By using the light of the moon and, to a lesser extent, the stars.
Landscape night shots will require a lot of planning. You will need to know your composition before nightfall—perhaps a pre-visit recce with your camera to shoot some test shots. You will need clear weather and a moon nearing the fullest part of its cycle. You also need an area free of man-made light pollution.
You will need that sturdy tripod to shoot some prolonged shutter speeds to get as much light as possible onto your sensor. A remote will avoid any potential camera shake as you will have the shutter open for long periods of time. Shutter priority or manual mode will be the best options for night landscape photography.
Your primary source of light will probably be the moon. There is one big issue with shooting in the moonlight, and that is that the moon moves. For the long periods that our shutter will be open, if the moon is in the shot, it will create a blurred streak across the image.
We have two options to counter this. The first is sacrificing image quality for noise by shooting at high ISO. The second is to avoid getting the moon in our shot.
Like in daylight landscape photography, we can experiment with different lenses. Try a wide-angle lens for an all-encompassing landscape. Obviously, with a wide angle, you need to be conscious of potential flare from the moonlight. You can also pick off details in the landscape using a longer focal length, such as a telephoto zoom. Long exposures with a telephoto lens can cause more camera shake, so make sure your tripod is well-locked off.
It will also be difficult to get proper exposure under moonlight conditions. The camera struggles in such low light. The best option is to refer to a night photography exposure app and shoot multiple test shots to get the right exposure.
As the night sky constantly moves, you need to consider if you want the stars to produce light trails or to be static points. Static points will require an exposure of 20 seconds or less. We will look deeper at star trail photography later in the article.
Photographing Architecture At Night
Perhaps one of the most common genres of night photography is architecture. In particular, well-lit architecture in towns and cities. These buildings can make fantastic subjects to shoot. Like landscape photography, you can shoot wide angles to get an entire cityscape or go in close using a longer focal length to pick off details of the city at night.
Although you will need slow shutter speeds, it will generally be shorter than landscape photography at night. This is because your primary light sources will be the city lights themselves. This can be quite challenging as you will have areas of high-intensity bright lights and areas of deep shadows. In other words, a very high contrast.
One technique you can use, and I do, is to shoot multiple exposures. This will be a 3 or 5 stop bracket around the correct exposure at ½ to ⅔ stop intervals. You can then combine the shots in post-production. This technique is useful for keeping the highlights under control and still maintaining some details in the shadows.
One technique that is particularly suited to architecture at night is light painting. You use a light source such as a torch and paint the light all over the building you are shooting. Typical camera settings for this style of night photography would be a relatively wide aperture and having the camera set to bulb. Bulb mode is where the exposure starts when you press the shutter button and ends when you press it a second time. The exposure time is entirely your decision. It’s best to shoot in manual mode and to set a manual focus.

When composing for your architectural night photography, it’s essential to avoid any single dominant light. This can make getting the correct exposure settings difficult. A matrix exposure metering mode will probably be the best option. Your shutter speed will tend to be in the ¼ to the 10-second range, depending on your aperture. In some cases, you might want to go for a shorter shutter speed to avoid this.
The aperture setting is probably your primary driver from the exposure triangle when shooting architecture night shots. A wide aperture will lead to a large, shallow, or small depth of field, which is not always ideal in architecture. A smaller aperture can cause the starburst effect on any light source. If you have multiple lights in the scene, this can be distracting. As with all-night photography, experimentation is the key.
Depending on your sensor size, you should keep your ISO as low as possible to reduce noise.
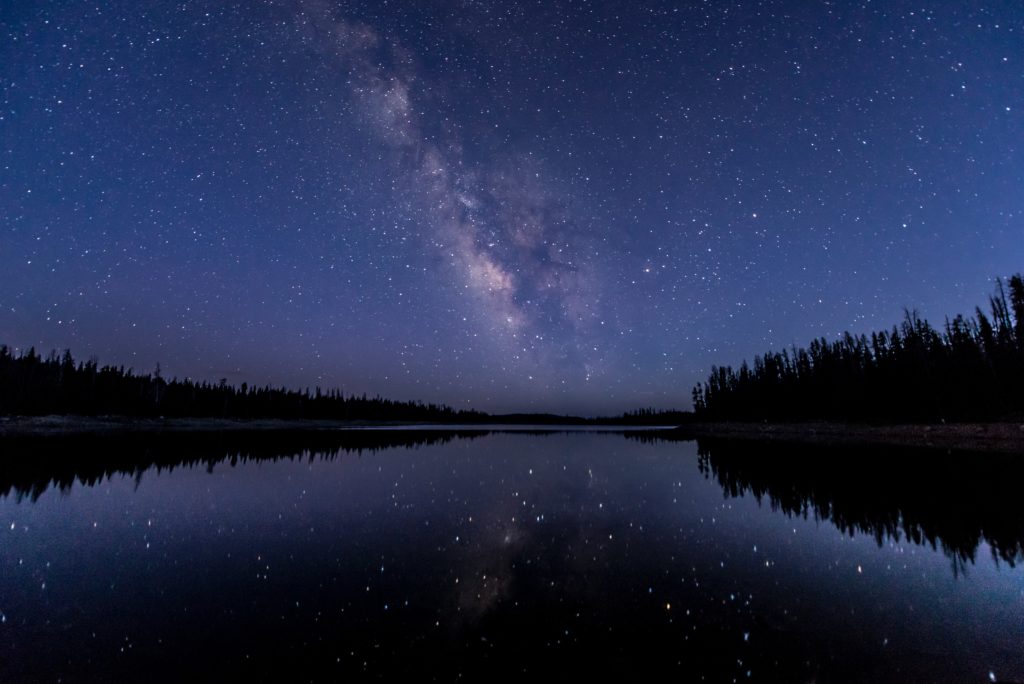
Some Notes On Night Sky Photography
One of the more stunning visual trends in night photography has been the development of milky way shots. Improved sensor technology combined with more powerful post-production techniques has opened the door to all of us for this type of night sky photography. There are some things you are going to need when shooting at night.
- A reasonably fast wide-angle lens
- The ability to manually focus – autofocus will struggle.
- A way to control very long exposures, such as an electronic remote. Setting a slow shutter speed manually.
- Good high ISO capabilities, preferably a full-frame camera
- Access to a good post-processing software
- Look for foreground interest to contrast your milky way
Unlike landscape night photography, it is better to have a moonless night sky and no light pollution. You can use apps and sites such as DarkSky Map to locate ideal places to shoot in your area.
To shoot the Milky Way, you must use a high ISO of around 3200 and a fast aperture wide angle lens. You will need to experiment with your exposure settings, but a good starting point will be an aperture that is as wide as possible. Remember that most lenses are soft at their maximum apertures, so one stop down might be a better option.
As mentioned before, because stars move, we must set a shutter speed short enough to counter that. Fortunately, we can refer to the 500 rule to determine the longest shutter speed possible without star movement.
The “500 rule” calls for you to divide 500 by the focal length of the lens you’re using. So, if you have a 24mm lens on a full-frame camera, you will set your shutter speed to 20 sec. (500/24 = 20.83). If you’re working with a crop sensor camera, be sure to account for the crop factor.
Shooting test shots will be vital to determining the correct exposure settings.
So You Want To Capture Star Trails
Another genre of night photography that has increased in popularity in recent years is star trail photography. In shooting star trails, we apply very similar techniques to milky way photography. The biggest difference is, of course, that we want the stars to be moving. For this reason, we need a much longer shutter speed, so a shooting manual will be the best option.
The key visual element of any star trail shoot is that they revolve in a circle. More importantly, they revolve around a specific star. In the north, that is the Polaris or North Star; in the south, it is Sigma Octantis. While we can try to locate these stars visually, it is much easier to do using an app.
Like with Milky Way photography, a clear sky free of light pollution is vital. Most camera settings, like with all-night photography shoots, are very dependent on the scene.
Typically you might start with a relatively large aperture of f/2.8 or f/4.0. Again manual mode and manual focus will be advantageous. You will need a relatively high ISO of between 800 and 3200. Long shutter speeds will need to be in the region of 20 seconds plus. A remote control with bulb mode may be helpful here. Understanding the exposure triangle and the relationship between shutter speed, iso, and aperture will help you nail the best exposure.
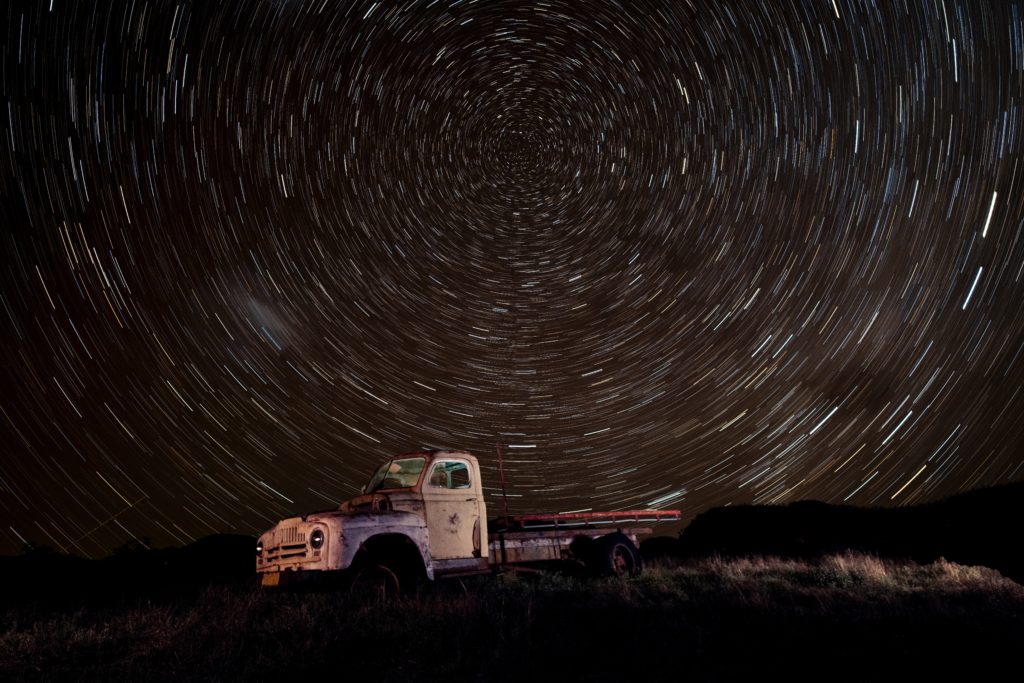
The secret to those excellent circular star trails is stacked images. In other words, you will take multiple images taken in-camera, with each star having moved a little bit, then stack them with post-processing to get the final amazing effect.
We have several excellent tutorial articles at Light Stalking to help you get started.
Photographing Light Trails
One of the most visually exciting aspects of night photography is shooting trails of light. These are shots taken to capture the motion of light through a blue hour or night scene. Typically they will be moving cars in a city, but any moving object with a light is valid. Boats, aircraft, and even painting patterns and shapes onto your sensor with a torch can all be considered light trail night photography. Probably the most common version is the car light trails in a city scene.
Location is important to getting good shots of car trails. You need a busy city area but preferably one where the traffic flows freely. Traffic lights and junctions can cause cars to stop, and this can break the effect of this type of night photography.

Elevated viewpoints are always a good starting point, as they can place you in the middle of the action. Bridges over busy roads are the favorite. As well as the traffic on the road, try to find a viewpoint with an interesting background. The car trails should lead the eye through the image.
Your key camera exposure control when shooting trails will be shutter speed. Generally, a long shutter speed of between 2 and 10 seconds will give the best result. Set your lowest ISO for maximum image quality and shoot RAW. RAW will allow you to correct the white balance in post-processing and give you the maximum dynamic range. A mid-range aperture of around f5.6 to f/11 will be best. This will depend on hour far you are from the light. A standard focal length lens will be the best option, although a telephoto can also be helpful.
For the best results, shoot in manual mode and use manual focus. The constantly moving light can cause problems with autofocus. You will need to shoot several test shots to nail the correct exposure, so get on location early to prepare your composition first.
Why You Should Shoot At Night
Shooting at night is extremely rewarding but can be quite challenging. Night photography requires patience, practice, and enough light to get an image onto your sensor. A keen understanding of the capabilities of your camera is essential.
You will work with low ISO in low light, often shooting moving objects and with a slow shutter speed. When taking pictures at night, it’s best to switch to a manual, both for exposure and focus. However, if you are not entirely comfortable, then aperture priority or shutter priority are good alternatives. One thing is for sure, shooting at night for any period of time will make you a better photographer.
Further Reading:
- 3 Fundamentals For Great Night Photography
- 9 Night Photography Tutorials That Will Have You Setting Up Your Tripod In The Dark
- Quick Tips To Get You Started With Night Photography
- 5 Basic Things You Will Need for Successful Night Photography
- Night Photography Tutorial: A Beginner’s Guide
- Night Photography Tips For Beginners


