We've Got A Photoshop Adjustment Layer Tutorial To Help You
There are so many things you can achieve using Photoshop and the beauty of it is what you can use Adjustment Layers for.
However, sometimes when you're stacking a bunch of adjustment layers in Photoshop, occasionally you feel they aren't working as they should?
Many times this is because they affect a broader range of the image than you think they ought to, and then you wind up stacking on more adjustment layers to compensate for that, and then things get really messy. This can be very frustrating for any photographer!
The issue with adjustment layers is that they can easily get out of control, especially as the number of adjustment layers increases. There are a number of issues that can occur.
Two key things to consider:
- What major problems can you run into?
- How can you avoid or correct them?
Contrast Affecting Color
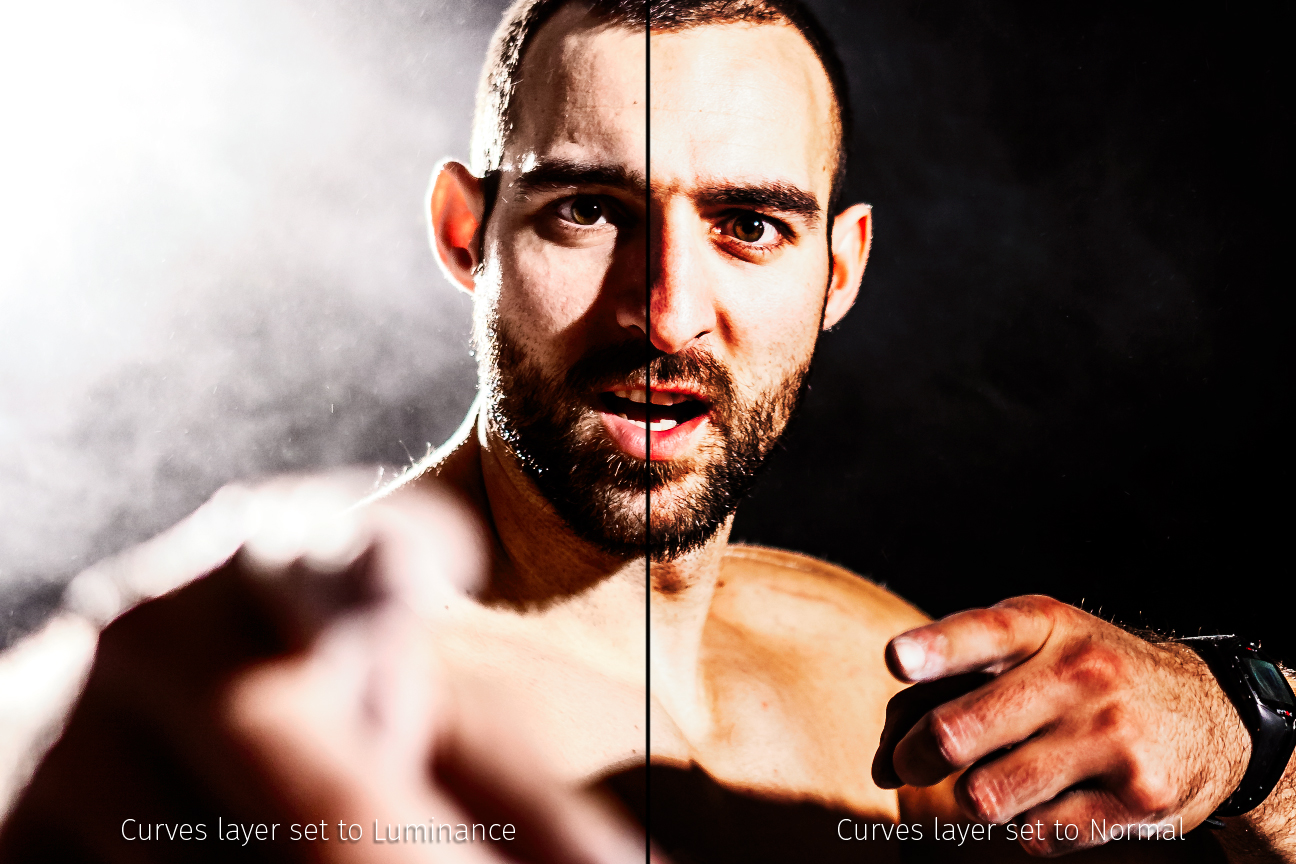
This is the most common issue that occurs when using curves or levels to adjust contrast. When you increase the contrast using curves and/or levels, it tends to bump up the saturation too.
Many photographers just insert a hue or saturation adjustment level and reduce the saturation that way. However, that adds yet another layer which clogs the layer menu and resource requirement that Photoshop has.
Doing this ultimately slows down your workflow. This can be avoided, though, if you set the blending mode on that adjustment layer to Luminosity.
In doing so, the contrast-affecting layer affects only the luminosity but not the color. This is especially useful since no hue or saturation layer counter-adjustment will be as accurate as this.
The saturation problem is basically resolved with two clicks of the mouse!
Color Affecting Contrast
Let's now consider the complete opposite scenario. When you are using curves with the neutral point tool to correct the white balance, it will also alter the contrast of the picture.
Instead of countering that effect with another layer, it is better to set the blending mode to Color. The adjustment layer affects only the color of the image, leaving luminosity intact.
The Smart Way to Affect the Luminosity in Each Channel
In order to selectively affect the luminosity in certain areas of the image, you typically need to create several adjustment layers, then mask where you want them to work, which can be a painstaking task.
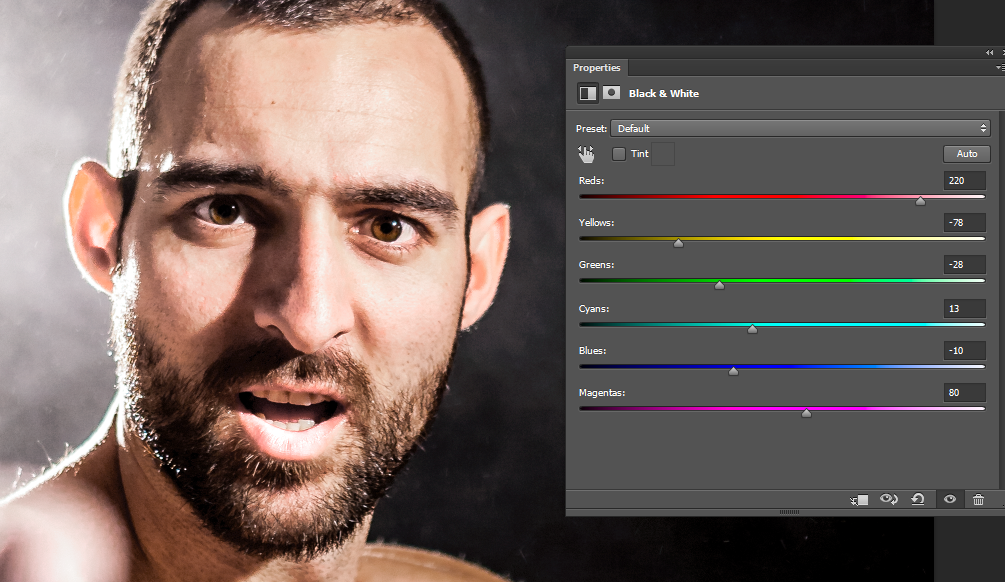
You can affect the luminosity in Lightroom in the HSL section, and the hue and saturation values on each color channel. In Photoshop, you can affect the luminosity of each color channel by creating a black and white adjustment layer, setting the blending mode to color.
The picture won’t be black and white and it will allow you to alter the luminosity of each color channel this way.
Clipping and How to Avoid It
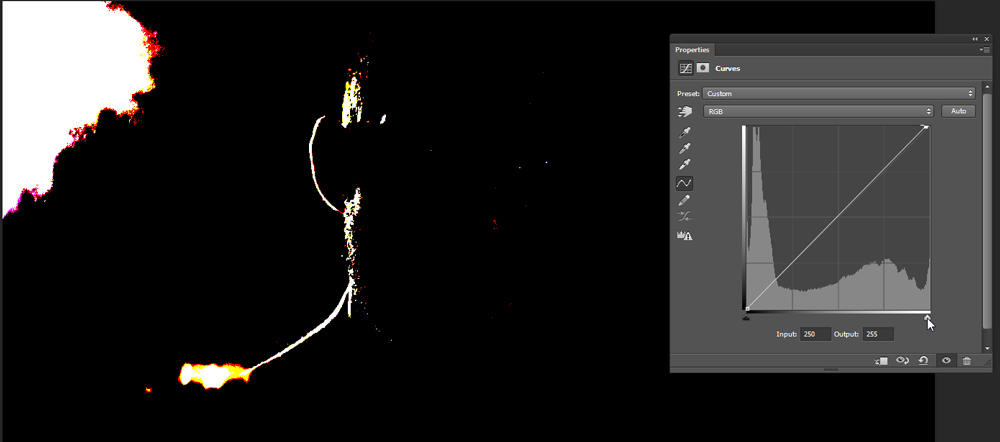
By altering contrast, exposure, and all other values, it becomes dangerously easy to push the whites and the blacks to the point that they clip. Clipping means that there are areas in the image which are completely black or completely white, containing no details at all.
You should keep an eye on the histogram at all times, but you could also set the white and black points using curves layers with the eyedropper tools dedicated to that purpose.
As mentioned before, make sure that the layer is set to Luminosity in order to protect the color. By holding the “Alt” key and pressing on one of the two sliders on the bottom line on the curves adjustment layer diagram you’ll see a mask displaying the areas that are clipping.
In case that doesn't show up, slide the sliders to the left or right to see where the image will start to clip, select the corresponding eyedroppers, and click on one of those areas to select the white and black points.
You can do this with an adjustment layer on top of all layers once you have finished editing the picture.
This can be done in a similar manner with Levels adjustment layer as well. They will both usually give you the same result, the only difference being that Curves gives you greater flexibility and more options when using it.
Blending Modes

Summary
As I mentioned before, blending modes used in conjunction with adjustment layers can save you a lot of time and improve your results dramatically.
So it is wise to learn what each mode does (at least the most important ones) and how you can use them to your advantage.
Adjustment layers used in conjunction with blending modes reduce clutter and save on resources used by Photoshop, thereby increasing the speed of your workflow.
And on top of it all, it is a non-destructive manner of editing, so you can lower any time you want to make changes to the edits you have done.
Do you use adjustment layers in conjunction with blending modes? Share your methods in the comments section below.
Further Resources
- 4 Easy Ways To Transform Your Photos With a Luminosity Mask In Photoshop by Yaopey
- 3 Extremely Useful Photoshop Techniques you Should Know by Jason Row
- How to Have a Non-Destructive Workflow In Photoshop by Dzvonko Petrovski
Further Learning
Want to learn some marketing techniques?
Getting started with your photography blog or business can seem like hard work to begin with, so here are some fantastic eBooks –
The Photography Web Marketing Collection which could really help you out!


2 Comments
You go to bed with a problem and wake up and read Light Stalking and problem solved. One of the best things I did was say yes to have Light Stalking pushed to me every day.
Glad you’re getting some use from our articles, Keith!