If you edit your images in Lightroom, you have certainly noticed the Lens Correction module. It was firstly introduced in Lightroom 5 and it can make the lives of photographers somewhat easier by saving many hours of post-processing time. Lens Correction module is a rather powerful tool – in this article, we’ll briefly explain how it works.

Why Use Lens Profile Correction
All camera lenses are different and have their own optical characteristics, benefits and shortcomings. In fact, the lens profile correction adjustments are built into most raw software packages and their purpose is to remove typical optical issues that lenses create, such as vignetting or distortion.
Vignetting is a darkening of the corners of the image and it is caused by the physical dimensions of a multiple-element lens. Rear elements are shaded by elements in front of them and this results in a gradual decrease in light intensity towards the corners of an image.
Distortion is another common issue and it can be divided into two kinds, barrel distortion and pincushion distortion. These distortions make the image appear as though it has been wrapped around a sphere. Barrel distortion occurs when the magnification of the image decreases towards the edges of the frame (vertical or horizontal straight lines appear as convex curves) and it’s typical for wide-angle lenses. Pincushion distortion is exactly the opposite – straight lines are curved outwards from the center and this is commonly seen on telephoto lenses.

Applying Lens Profile Correction In Lightroom
It’s quite easy to apply distortion and vignetting corrections in Lightroom – it’s simply a matter of ticking a box.
Let’s take a look at how to apply a lens correction profile to an image using Lightroom:
- Select the image you want to apply the lens correction profile to
- Open the Develop module (click on Develop along the top of the screen or simply press the D key)
- On the right-hand side of the Develop module scroll down to the Lens Corrections tab
- Make sure the Profile tab is selected
- Tick the checkbox next to Enable Profile Corrections
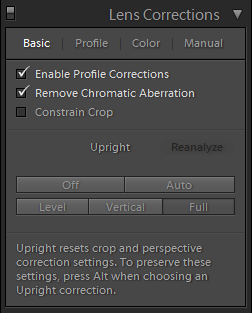
Lightroom has a huge list of lens profiles available. When you tick the box to apply a lens correction profile, Lightroom will read the EXIF information embedded in the image and fix distortion and vignetting.
This adjustment of distortion and vignetting is best applied to RAW files. If you apply lens profile correction to a JPEG file, you may get an undesirable result because JPEG files may already have certain adjustments applied and adding a further lens correction might not work properly. If this happens, it’s better to leave the adjustment off.

Automatic Lens Correction
It’s useful to know that if you shoot with a micro 4/3 camera (like Panasonic or Olympus), those lens profile corrections are applied automatically without your intervention. The same goes for some other cameras such as Leica Q, Fuji X, Sony and some point-and-shoot cameras from Canon.
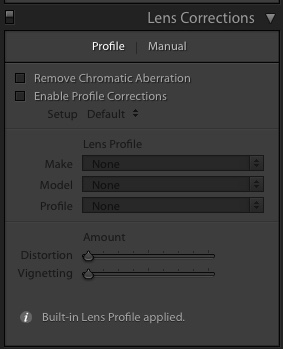
You can easily find out if a lens correction profile has been applied automatically simply by clicking on the information icon within the lens correction tab.
To sum up, the majority of your images will probably benefit from applying a lens correction profile. Sometimes you may want to leave the distortion and vignetting in place for artistic purposes, but that shouldn’t be a common practice.
It's easy to forget to apply the lens profile correction adjustment, so make sure to remind yourself to do that whenever you edit your images in Lightroom.
To learn more about Lightroom tips and tricks, check out the links below!
Further reading:
- 6 Lightroom Tips and Tricks for Every Single Photographer Out There
- Chromatic Aberration – What It Is and How to Fix It
- 5 Lightroom Edits That Will Rock Your Outdoor Photography
- 10 Quick and Easy Lightroom Tricks Every User Should Know
- Lightroom Tips To Improve Your Workflow
- 14 Lightroom Tricks You Need to Know


