Night sky is one of the most fascinating subjects to photograph and if you venture deep into it, there are truly a lot of subjects that you can put your focus on and photograph. We all usually start with the moon, then the stars, the Milky Way, and aurora, then advance further into photographing the constellations, nebulae, star clusters, planets, and so on.

Besides these, the night sky also never fails to surprise us with important and rare celestial events that can sometimes be quite difficult to photograph. One of those very rare subjects or events is the comets as they are quite difficult to spot and photograph and also because of their rare occurrence in the sense of the very small timeframe they are visible to photograph. Taking into account the weather, it can sometimes be pure luck if one gets to witness and/or photograph the comets.
Who would not want to see and photograph a comet? In this article, we will look at what a comet is, how to locate the comet, photograph, and post-process comet images.
What Is A Comet?
Comets are often referred to dusty or dirty snowballs because they are made up of ice particles like frozen gases (methane, carbon dioxide, ammonia), water, rocks, dust, and many more. They are believed to be leftover particles from the formation of our solar system, billions of years ago.
When these comets approach the sun, due to the heat from the sun the comet warms and parts of it sublimate (transition of a substance directly from the solid state to the gaseous state, without passing through the liquid state) leading to a coma and tail. There is some very interesting science behind the evolution and life of comets.

Comets like the planets and asteroids, orbit the sun and most are believed to be in areas called the Oort cloud which is an area far beyond the orbit of Pluto. The comets in the Oort cloud are long-period comets that take more than 200 years to complete an orbit around the Sun.
Besides the long-period comets, there are short-period comets that take less than 200 years to complete an orbit around the Sun. These comets originate from the Kuiper Belt.

From time to time a comet comes into the inner solar system region once every few hundred or thousand years depending on whether it is a long or short period comet. It is a beautiful celestial event to witness and photograph although very rare.
We now know, that when comets get closer to the sun, they get heated up and start to show tails. One tail is made of the dust and gas that the comet itself is made up of and the other one is the ion tail that is formed due to ionization, which is gas molecules getting excited due to solar waves. The tail of the comet can span millions of miles.
When photographing comets, clear sky conditions will help to photograph both the tails of the comet clearly.

Note: Did you hear about the comet C/2020 F3 also called the Comet NEOWISE? Well, it was visible in the sky in the pre-dawn hours for the Northern Hemisphere and is now visible at dusk. It is one of the brightest comets and has been photographed by many across the world!
In May this year, Comet SWAN also called Comet C/2020 F8 was at its best and now we have Comet NEOWISE shining in the night sky.
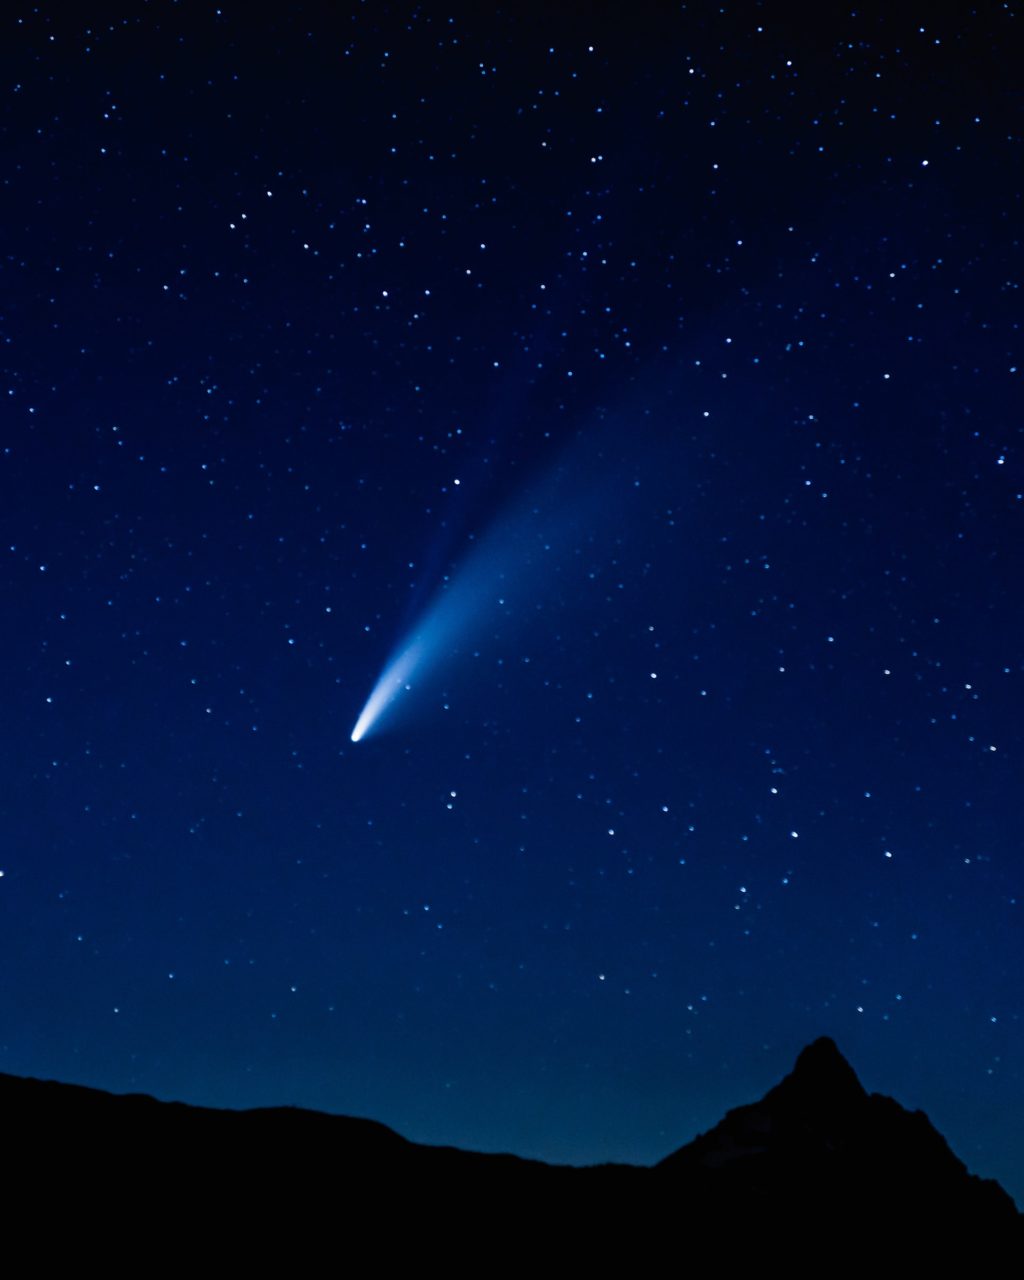
Seeing and photographing a comet is like a “once in a lifetime” experience and so, we will also discuss the comet NEOWISE that is visible right now and being photographed by many.
About Comet NEOWISE:
The comet NEOWISE is one of the brightest comets that have come closer to earth and is now visible in the skies of the Northern Hemisphere. It was recently discovered on March 27, 2020, by NASA's, Near-Earth Object Wide-field Infrared Survey Explorer (NEOWISE), an orbiting space telescope.
Here Are Some Facts About Comet NEOWISE:
- Comet NEOWISE is a long period comet that will not return to our skies for another 6,800 years.
- It made its closest approach to the sun on the 3rd of July, 2020 when it was visible in the skies before dawn.
- At the moment, the comet is visible in the evening skies and can be located if you look in the NW sky just below the Big Dipper or The Plough, which is part of the Ursa Major Constellation. Look for it after sunset, preferably 60 minutes after sunset, so the sky is dark enough for good visibility. The darker the sky, the greater the visibility and chance of spotting the comet.
- Depending on the atmospheric conditions like clouds, haziness, light pollution, and others, the comet may or may not be visible to the unaided eye. Sometimes in a slightly hazy or light polluted area, a long exposure to the comet's location in the sky may reveal the comet.
- The comet is getting higher in the evening sky so it would be best to view it now before it fades away when it moves away from earth.
- Comet NEOWISE will be at the closest distance to earth on the 23rd of July 2020 after which it will move away from earth becoming fainter.

Can You See The Comet NEOWISE?
Since the Comet NEOWISE is brighter comparatively, if the viewing conditions are clear, you can view the comet with unaided eyes which is quite rare with most comets, but a binocular would be great to enjoy the experience. You do not need a telescope to view the comet, but again seeing through a pair of binoculars or a small telescope if you have one will give you a better view and improve the viewing experience.
How Do You Locate A Comet In The Sky?
Comets look like a fuzzy star with a tail and this is due to the fact that as the comets approach the sun, they warm up and the particles they are made up of form a tail. It is usually the dust and gases that form the tail.
You need to be in a dark location as much as possible and with clear conditions for viewing the sky. It is only this way you will be able to see the comet and its tail.
For each comet that you are looking to view, you will need to follow Astro or space news in order to locate them. With the help of some apps, you can easily locate any comet in the sky on any day and time, provided the viewing conditions are favorable in terms of clear skies and the comet's distance to earth.
Note: The comet NEOWISE is seen only in the Northern Hemisphere in the NW sky after sunset just below the Big Dipper or The Plough, which is part of the Ursa Major Constellation. You need clear skies to locate and photograph this comet.
Here is a star chart released by NASA, that shows the movement of the comet NEOWISE across the evening sky from July 15th till 23rd.

Some Helpful Apps To Locate Comets:
If you are new to sky gazing or star gazing and finding it difficult to locate the stars and constellations, there are various star tracking and night sky apps that can point you straight to the direction of the comet. You can even look for future locations of objects in the night sky. If you are an experienced star gazer, then a star chart would suffice.
Also, keep an eye on the recent news updates as spaceweather.com mentions that Comet NEOWISE is beginning to dim but still is a long way before it isn't worth photographing.
Here are some very helpful apps that can quickly guide you to the right location of comets in the sky:
- Stellarium: The desktop application and the web version are free to use on a computer. You need to set up your location and then look for the comet. You can use this app to check the location of the comet for future dates if you want to plan well ahead. It is good to keep the landscape tool on so you get a better understanding or idea of how much above the horizon the comet is located.

- Sky Guide for iOS: This app is not free but is a brilliant astronomy app to study thousands of stars, comets, and satellites. It has a built-in compass, that lets you easily locate constellations and other celestial bodies.

- Star Walk 2 for iOS and Android: This is a free app that helps you to view the real-time positions of planets, stars, constellations, and many more. It also comes with an in-built compass and you just need to point your device to the sky and look for the objects up in the sky at that time.

- CometNEOWISE for iOS: This app helps you to locate Comet NEOWISE in the night sky. Just hold your device towards the sky and the red target marker on the screen will show you where the comet is.
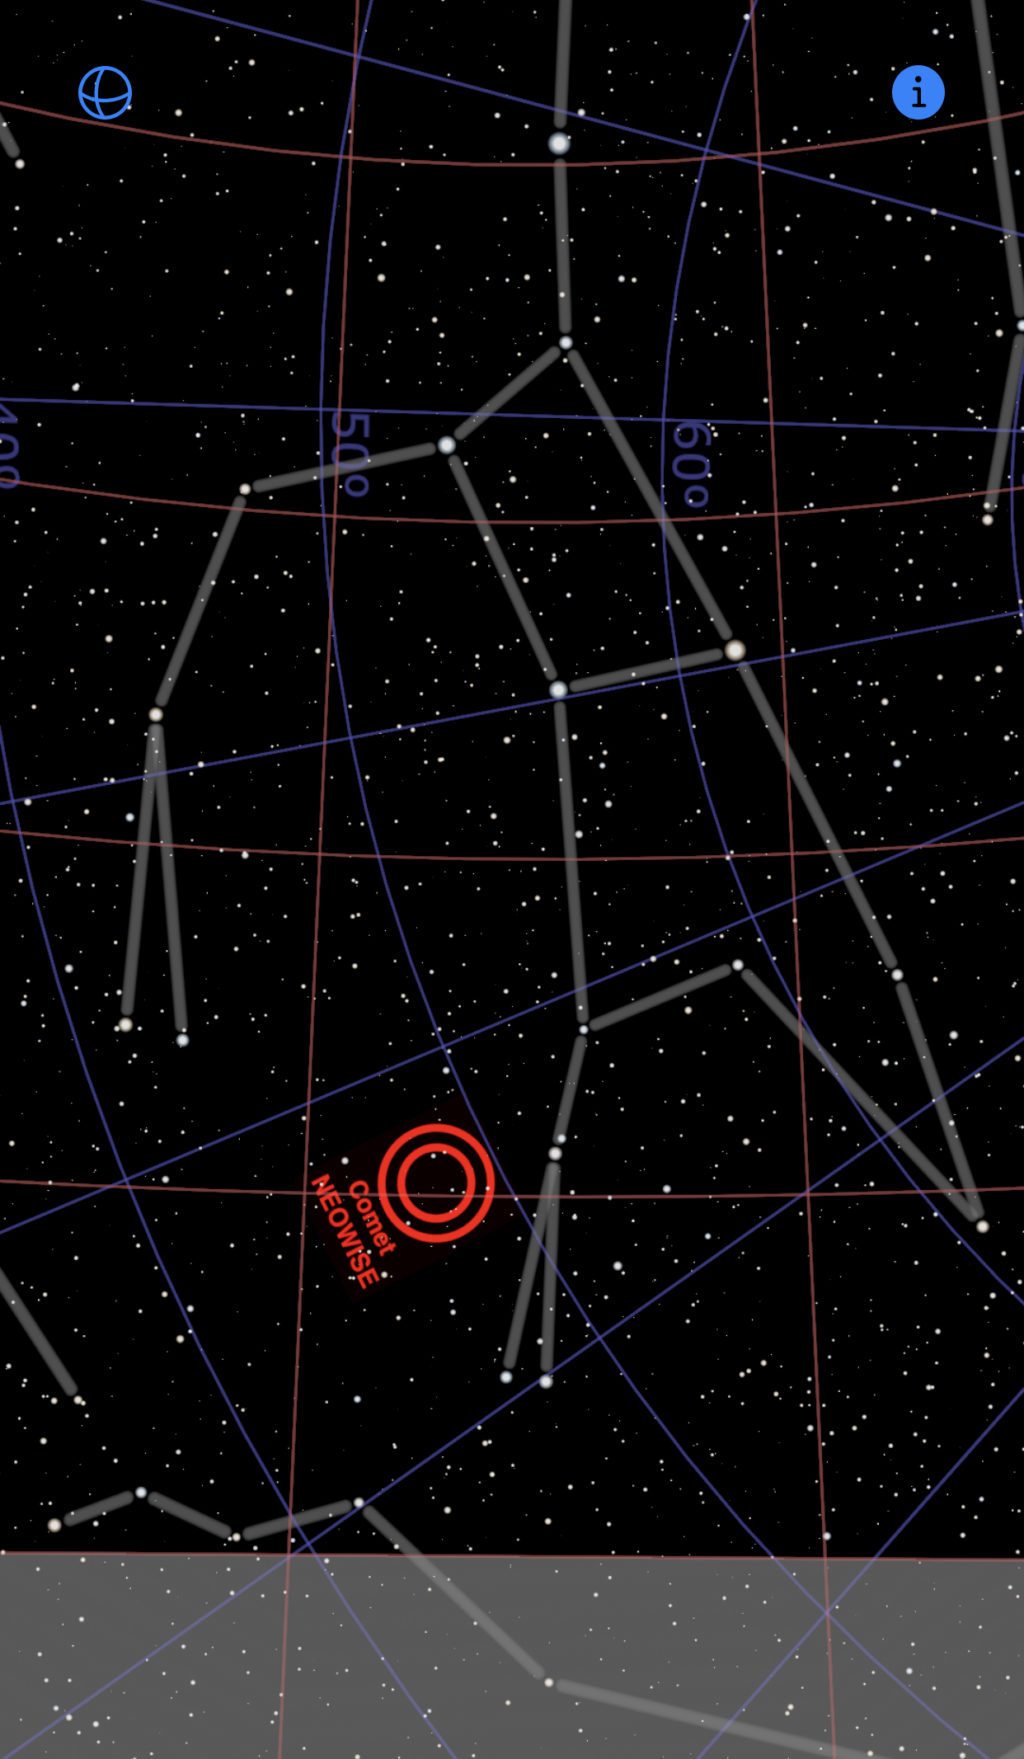
These apps are very simple to use. Just open up the app and tap on the compass. Search for the object you are looking for in the sky, in our case now it is the comet NEOWISE. The app will guide you straight to where the object is in the sky and will tell you when it will rise or set depending on the object's current location.
Check Out The Weather!
If you will be heading to a location away from home to photograph the comet, then you will need to watch out for the weather conditions well in advance. You cannot photograph the comet if it is too cloudy. So use a reliable weather app or a site that reports weather accurately for your location before heading out.
Partly cloudy skies may be fine depending on where the clouds are, but if it is rainy or completely cloudy, you will need to stay in and check again the next day.
Note: Cleardarksky.com will help you with clear sky charts, and light pollution maps, and darksitefinder.com will help you find dark locations near you so you can have a clear view of the night skies.
Choosing A Location To Photograph The Comet:
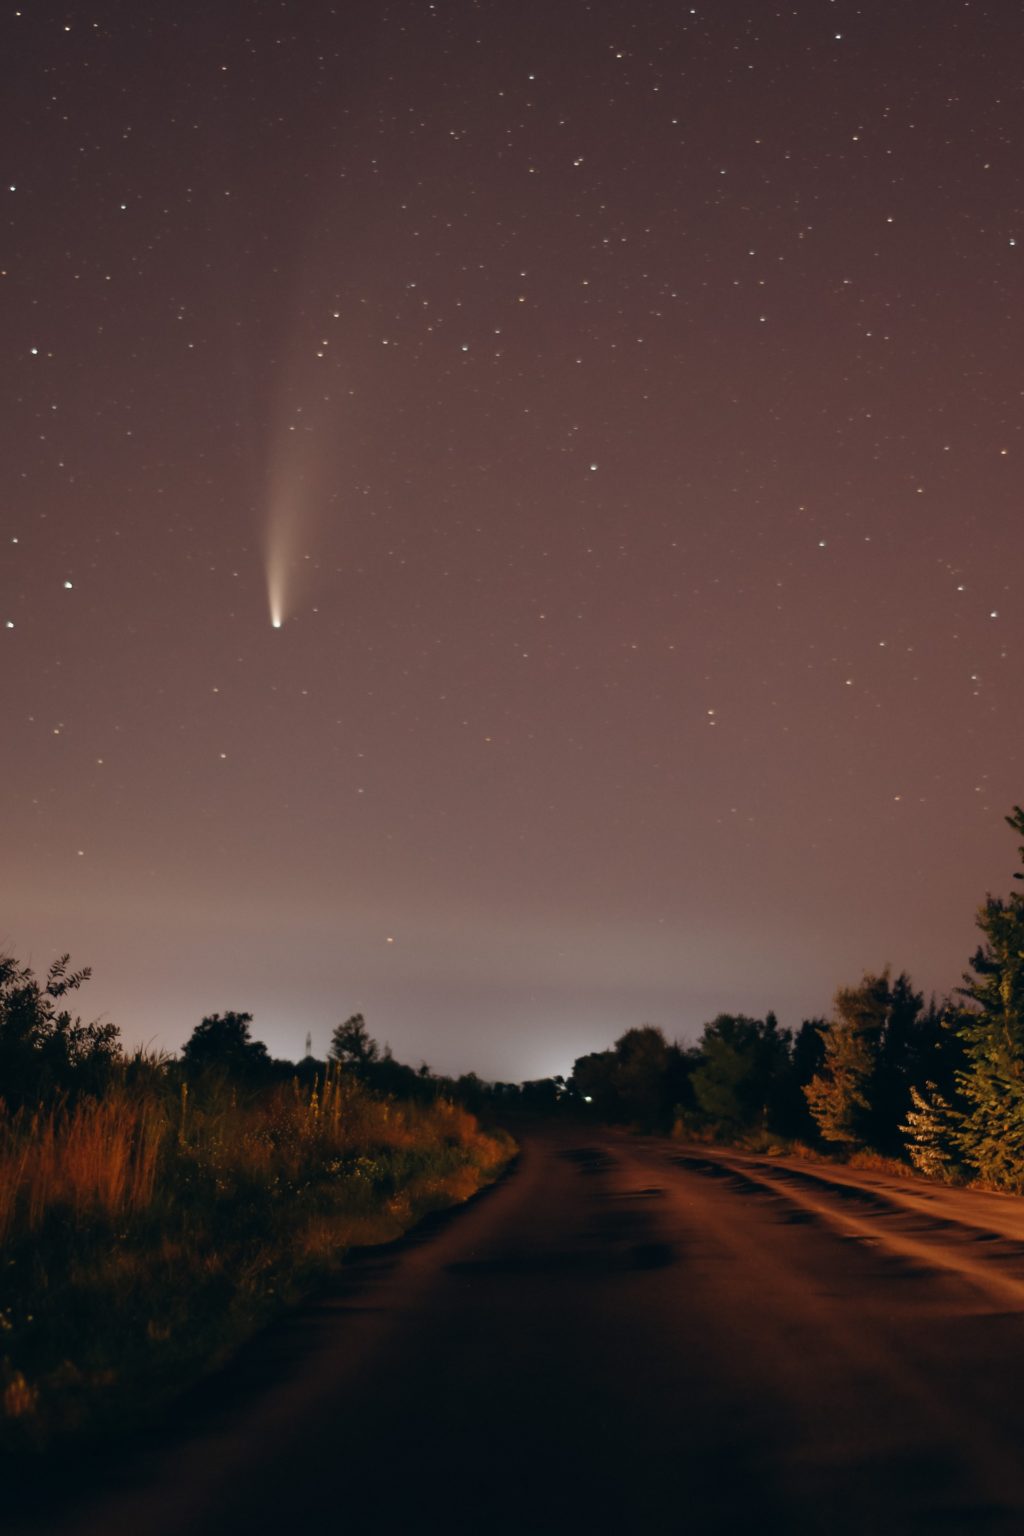
Be in a location away from the bright city lights – at least 10 to 30 miles away if possible for best viewing. Although sometimes you can view the comet from your backyard, it may be very hard to spot and you may not be able to see and photograph all the colors and details because of the light pollution. So it is best to get to a place where there are dark skies so you can also have an interesting foreground when photographing the comet.
Make sure there is a clear view of the horizon in the direction of the comet because the Comet NEOWISE that is visible right now is not very high up in the sky at night. So having a clear view of the horizon will give you greater chances of spotting and photographing the comet.
Note: Locations of comets in the night sky or dawn and dusk skies vary with comets. So keep an eye on space news when photographing other comets in the future.
Historical sites, parks, lakes, meadows, open fields, beaches, etc. are great places to photograph the comet. Stay away from tall trees and buildings as they will obscure the view of a comet that is not very high up in the sky. The best time to shoot comets will be after twilight when the sky is dark enough so the comet is clearly visible.
Let your eyes adjust to the darkness for a few minutes and this will help you locate and see the comet unaided in the night sky.

Compositions:
If you are shooting close up images of the comet, then you do not need to worry much about the composition and foreground information, but, it would be good to photograph both wide angle and close up shots of the comet. Just the comet alone can be interesting if you are photographing really close and looking for great details of the comet's tails, but otherwise, for a wide angle shot, just photographing the comet can sometimes be pretty boring. Incorporating some foreground can help to show scale and tell a story.
Do not keep foreground elements too close to the lens as the focus can be off on either the foreground or the comet. So depending on the focal length that you are using, stay at an optimal distance away from the foreground to get all elements in the frame in focus.
Look for interesting features to add in the frame so you can frame the comet interestingly for a more compelling image. You could try photographing over an important structure, over a distant solo tree, over a field, lake, or over an interesting landscape or water feature. Look around and find a location that is most suitable.

Equipment Required To Photograph Comets:
Many think about astrophotography as something that always requires a telescope (yes some objects can only be seen and/or photographed through a telescope) to photograph night sky objects, but we would like to tell you that some comets and especially the comet NEOWISE that is visible these days in the skies can be seen without any equipment like a binocular (as long as viewing conditions are great) and photographed using a camera and lens that you may already have. Photographing comet NEOWISE is more like photographing the stars in the night sky.
So, here are the gear and accessories that you need to photograph the comet:
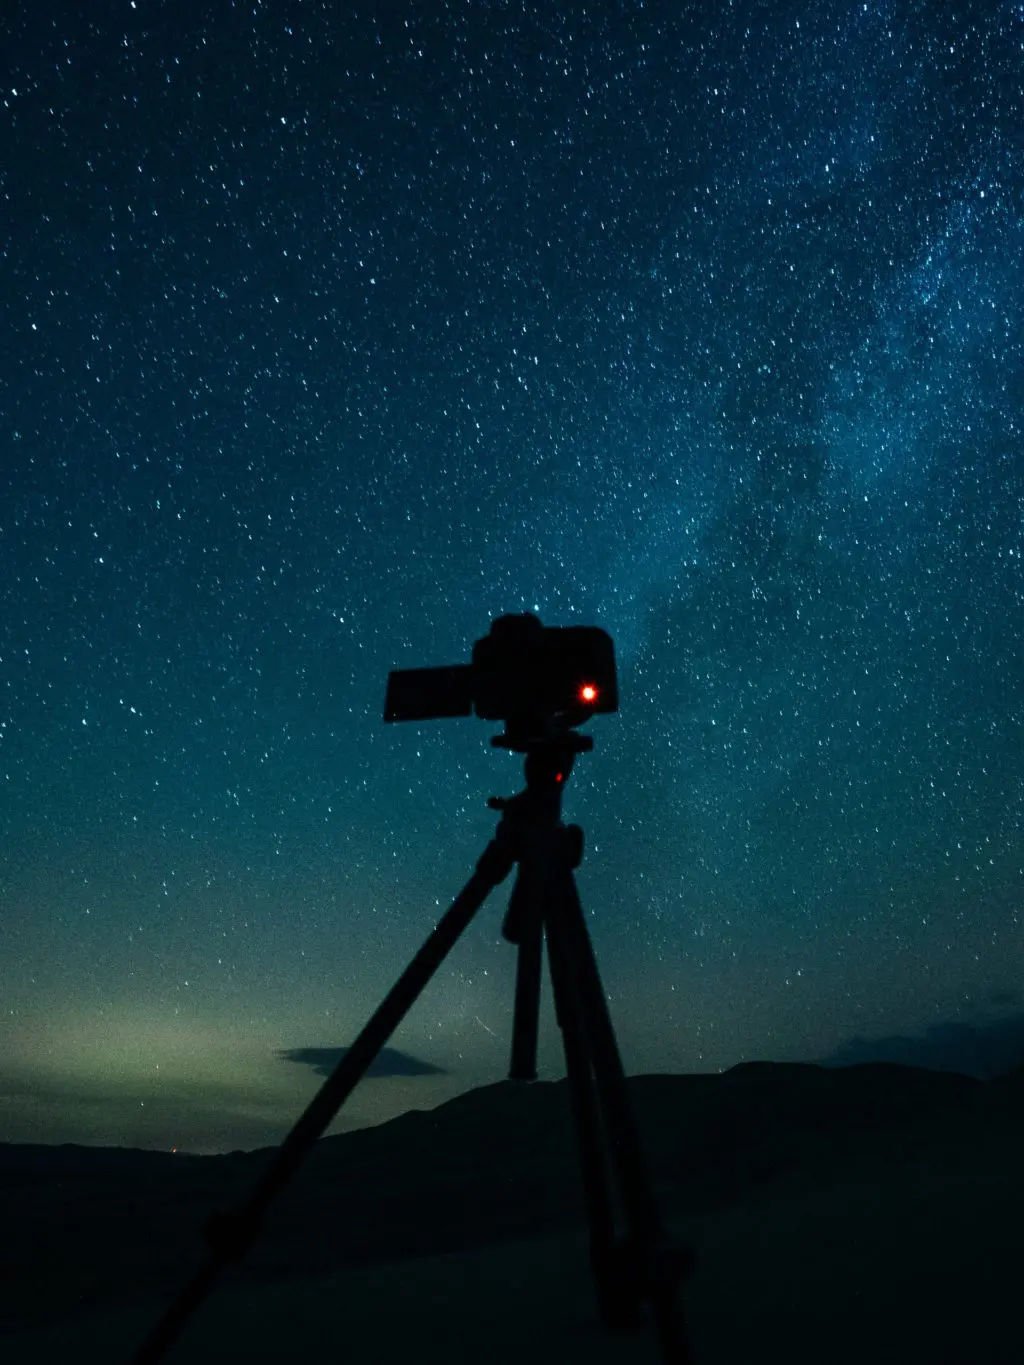
- A tripod
- A cable or remote release
- A night sky app or a star chart
- A camera that will let you shoot in manual mode
- A lens with focal length depending on how you want the photograph.
- Comets with their tails span about 10 to 15 degrees across the sky but it varies with each comet depending on various factors.
- A wide angle lens if you want to photograph the comet along with a lot of foreground details (24mm and above up to 50mm should work well for wide angle shots) but the comet will look very small in the frame when shot at 24mm. With a 50mm lens you can have about 10 seconds exposure time, some comet details and some foreground details.
- A longer focal length, longer than 100mm should be used if you want to get a bit close and photograph the comet details. The longer the lens, the greater the details you'll be able to photograph. You can go up to 400mm or even more depending, and remember, you can still photograph the comet with a distant foreground if you use the 400mm lens, depending on how you frame the scene.

Setting Up To Photograph The Comet:
You have now come to your favorite location, and located/spotted the comet. You now need to set up your gear to photograph the comet.
- Mount your camera on a very sturdy tripod as you do not want any movements due to windy weather conditions.
- Have the lens hood on to avoid stray lights creating strange artifacts or flares in the image.
- If possible, close the viewfinder as well to block the backlight from entering the camera.
Camera Settings:
There are a few settings that you need to take care of when photographing the comets. It is quite similar to photographing the stars in the night sky.
Note: Since we are talking about taking photographs of comets with a camera, lens, tripod, and cable release, we will not take into consideration or talk about any tracking equipment for longer exposure times. The settings discussed below are for photographing untracked images of a comet, so even beginners in astrophotography can try their hands at shooting photographs of the comet.
- Since you are photographing at night or maybe during the blue hour when the light conditions are tricky and low, it is best to always shoot raw so you can bring as many details possible out of the images while post processing.
- Set the camera to manual mode so you have control over the settings. You can play around with the settings depending on the results of the test shots and changes in light conditions.
- Set the lens to manual focus. Be at the location early and focus on a bright star or a distant light manually. You can do this accurately by zooming in on the brightest star or planet on live-view.
- Since comets are not pointed objects and are fuzzy looking, it can be quite tricky to focus accurately on them. So it is best to focus on a bright star or planet in the sky.
- Take a test shot of the stars and check for focus in the resulting image by zooming in at 100%. If there are focus issues, correct focus and test again.
- Leave the focus locked at this point and recompose to frame for the comet.
- Use a cable or remote release to release the shutter. If you do not have a release, use the timer delay in the camera to avoid a camera shake.

- If you are using a DSLR, use the mirror lock-up feature to avoid a camera shake.
- Since you will be mounting the camera on a tripod, turn off image stabilization on the lens and camera if it has that feature.
- You can set the white balance manually or using white balance presets in the camera, set it to daylight. If you are unsure, you can leave it at auto and adjust it while post processing as you will be shooting raw.
- You will also want to avoid star trails in your comet pictures and for this you will need to follow the 500 rule, 600 rule or the NPF rule depending on your camera and what works best for the camera and lens combination that you are using. Set your shutter speed based on this.
- If you have shot the stars or other night sky images, you will know that the longer the focal length, the shorter the exposure needs to be, to avoid trails.
- Use a wide open aperture (the widest your lens can go) so you can gather as much light possible because the far end of the comet's tail can be very faint.
- Set the iso to between 400 to 1000 depending on the lens and camera combination and the light and atmospheric conditions that you are shooting in, also making sure you take a few test shots to get the exposure right.
- Longer focal lengths mean shorter exposure times to avoid trails and you will need to compensate for that by increasing the iso. So use a reasonable focal length, aperture, and iso combination to get a photograph of the comet.
- For example, if you use a 200mm lens, you will only be able to have (according to the 500 rule, 500/200 = 2.5 seconds) or 3 seconds exposure in order to avoid trails. So you will have to use a higher iso and wider aperture to get a neat shot. Start with iso 400, aperture widest possible value, and see what you get. Change the iso values depending on the result. you may have to go up to iso 2000 depending on the light conditions, etc.
- If you use a 50mm lens, you can shoot at lower iso values and have about 10 seconds of exposure. You can also have a decent foreground included in the frame.
- Another good idea would be to bracket exposures so you can later on decide which exposure to keep. Shoot at various iso values and same or different exposure times. Looking at the images in a big screen will help you better decide the best shot.
- You can also try turning on long exposure noise reduction to see if you get better images. This will increase your time between shots.
- If you are someone who has experience stacking milky way or deep sky images, and are planning on stacking the comet images, you will then need to make multiple exposures for a few minutes so you can stack the images later to get more details off the comet images with its two tails and also reduce noise in that process. Stacking will be a preprocessing step with most softwares, and the images are finalised by processing them in other softwares like Photoshop or similar.
Photographing The Comet:
Once you have the above settings ready, compose the image in a way that it looks visually appealing and compelling. Follow the rule of thirds to place the horizon and the comet in the frame. Do not include too many elements as they can take the attention away from the comet.
It is best to avoid distracting lights like distant city lights, street lights, traffic lights, stray tree branches, poles, electric wires, etc. in the frame. Try both landscape and portrait orientations when photographing the comet. These orientations usually change the way the images look and make them more interesting.
When photographing closer shots using longer focal lengths, make sure you shoot wide enough to capture the entire comet including the tail which can span some degrees across the sky. Preview your image to make sure you have not cut off the tail.
If you think that the foreground is blurry when focusing and shooting for the comet, take 2 exposures – one with the foreground in focus and another with the comet in focus and then merge them later when post processing.
Make sure you keep yourself warm by dressing for the weather if you live in colder climate regions, that is in the northern parts of the Northern Hemisphere or in high altitude areas. Pack some spare fully charged batteries and formatted spare memory cards. Have warm drinks and snacks if you will be spending a lot of time outside photographing the skies.

Post Processing Tips and Techniques:
Once you are done shooting your comet images, you will need to post process them to bring all the details out of them. Post processing single images would be similar to post processing night sky images and there is no single way this can be done as images are taken under different light and atmospheric conditions.
Here are some basic adjustments you can make:
- Adjust the white balance if you did not get it right in the camera. Keep it real and do not go for odd colors.
- Apply lens profile corrections if required and remove any vignette.
- Straighten and crop to the desired frame.
- Make basic adjustments like exposure, contrast (if required), highlights, shadows, blacks, and whites where needed.
- You can use the Dehaze tool to enhance some details if there is haziness.
- Adjust levels and curves to get better details from the comet image. You will need to adjust levels in steps and not drag the sliders to the extreme.
- Reduce noise if necessary
- Add some vibrance if required.
- It is best to stay away from sharpening the image as it can introduce more noise to the image.
- If your image has foreground details, you can use the brush and make local adjustments to specific areas to correct details in the image.
Stacking Comet Images:
If you are looking to stack comet images in order to reduce noise, and get great details out of them, there are a few free software that you can try. You will need to take dark, light, and offset frames in that case. Here are some of the free software:
Sequator:
This is free software for Windows and this program can track the stars in multiple images, and align and stack them. This application is best for photographers who want to stack their images but do not have a tracking mount to track the comets or stars in the sky. The resulting image will be one similar to a tracked long exposure shot. Besides the above, this program also detects foregrounds, reduces light pollution, and helps create noise free images.

Deep Sky Stacker (DSS):
DSS is another free stacking software for astrophotographers that helps with registering and stacking stars and other deep sky object images. It has some amazing features like automatic registration of images, automatic detection of stars, automatic use of darks, flats and offsets, comet stacking, etc. It is a pre-processing software and you will need to take the final image to your favorite post processing app to make final adjustments.
When using DSS, in the stacking settings, you will need to select “Comet” when you are stacking comet images without stars. If you have stars in the background, you do not want them to trail. So it is wise to select the “Stars + Comet” stacking option.

Conclusion:
We have had a few comets visit the night sky and there are more comets being discovered each day. We do not know when we will have the next comet visiting us – it could be any time, so watch out for Astro or space news for new discoveries and comets visiting our skies. Also, keep an eye on the weather and if you get a chance to see and photograph a comet, which would be Comet NEOWISE right now, then do not miss the chance – photograph it.
Have you photographed a comet before? If so, please share any tips you may have in the comments section below. Also, if you photograph a comet, please share the image with our community here as we would love to see it!


_on_Jul_14_2020_aligned_to_stars.jpg)
2 Comments
Wondering what’s the next comet that I can practice taking photo on
You will need to keep an eye on the space news for information regarding the next comet. The NEOWISE is still visible faintly in the sky and you can get a photograph of it if you point your camera in the right direction. It is quite close to Arcturus a very bright star in the evening sky right now. Hope this helps! 🙂