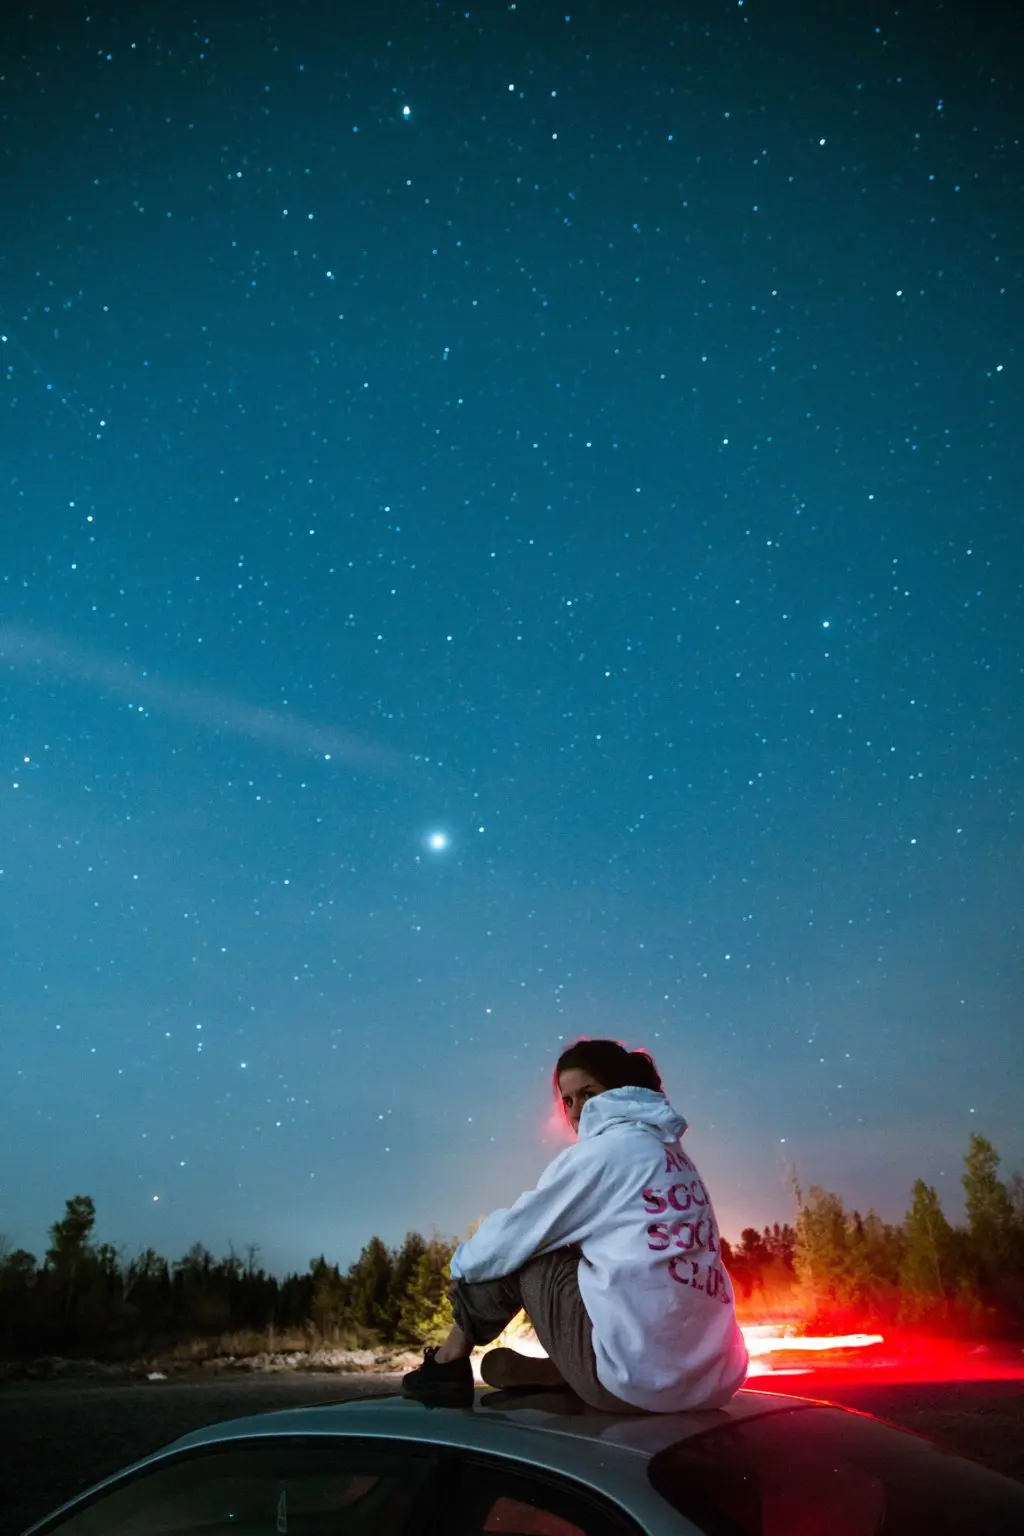
A lot of photographers are still not confident about night sky photography simply because they think that the process is way too complicated or that their camera will not be able to capture the night sky perfectly. If you look at night sky images on social media, you will be amazed at how popular night sky photography has become in the recent years and how almost any camera is capable of capturing night sky in good detail. To be honest, capturing photographs of the night sky is more like an adventure and the more you observe, the more addictive it becomes and you can capture different starscapes during different seasons of the year.

Earlier astrophotography was done purely with the help of telescopes and specialized cameras, but in recent times, most photographers predominantly start astrophotography with a mirrorless or DSLR camera and lens mostly without a tracking mount they have in hand and then move on to specific Astro imaging equipment when they wish to take their astrophotography to the next level.
In this article, we will be covering the basics of untracked astrophotography with links to a lot of resources that we already have on the site. These links have in-depth information and step-by-step procedures on how to go about photographing each event or object in the sky. All links talk about untracked astrophotography with a camera and lens, which means you initially do not need to invest in a tracking mount.
What Is Astrophotography?
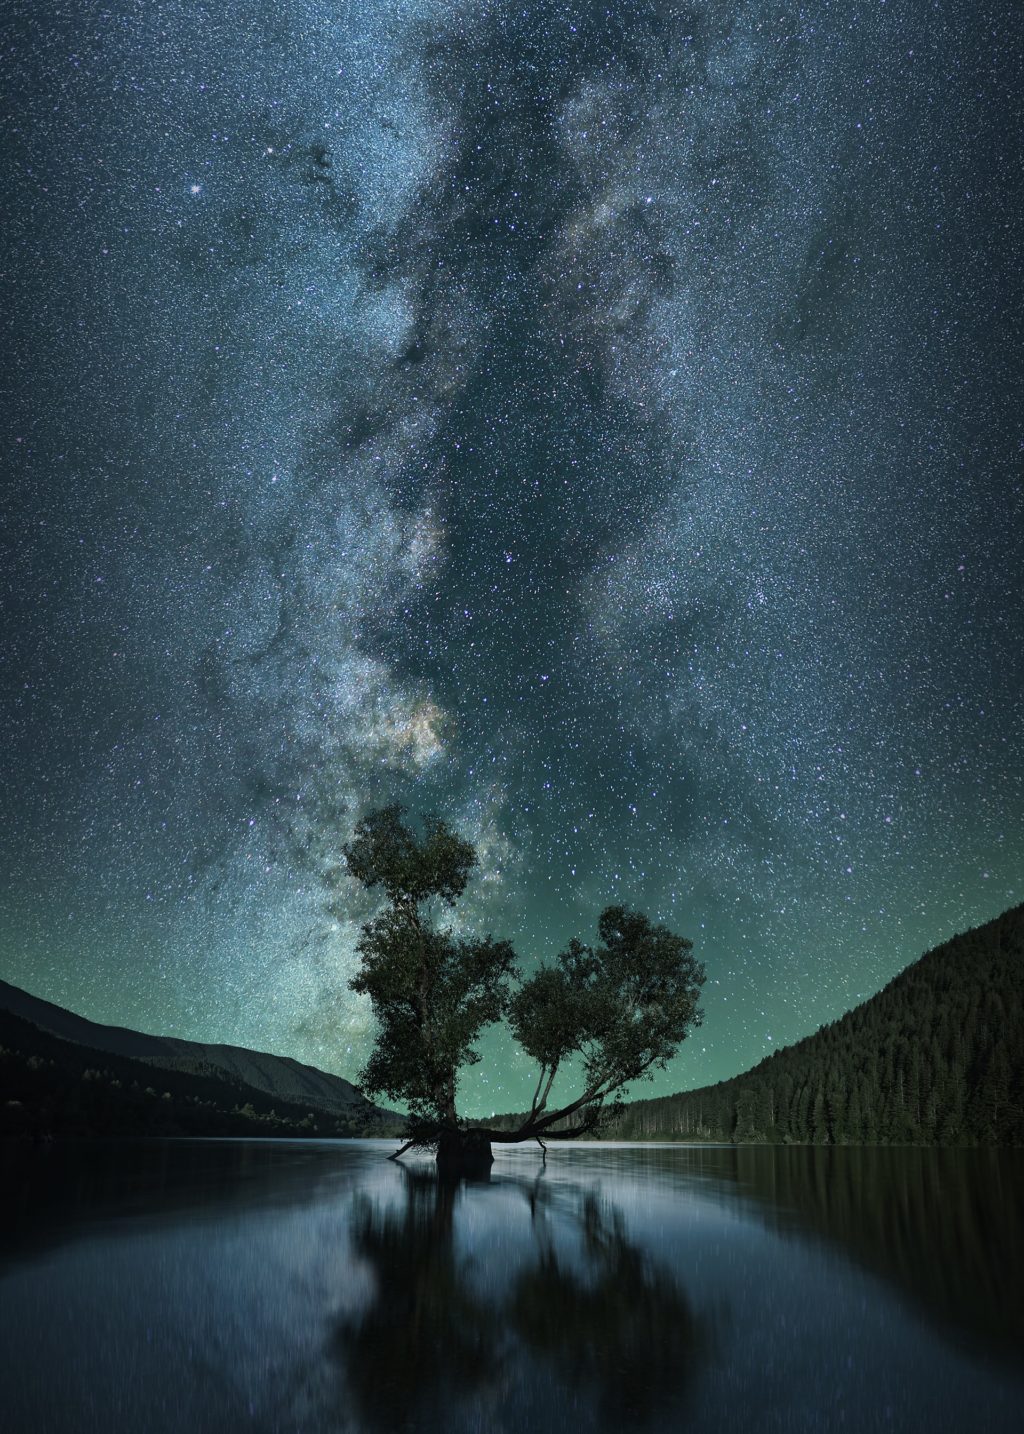
Astrophotography also called astronomical imaging is a genre of photography, where you photograph astronomical objects (like the moon, sun, planets, galaxies, nebulae, star clusters), the night sky, and parts of the night sky, celestial events, etc. Astrophotography can be a photograph of a landscape with the night sky or deep-sky photography. For example, photographing the milky way, the moon, a solar eclipse, a transit, star trails, a comet, the Orion nebula, are all astrophotography.

Basic Information On Astrophotography
The night sky is full of wonders some of which can be observed through the naked eyes, but if you have astro binoculars, a spotting scope, or even a telescope, don’t miss the opportunity of observing these cosmic wonders through these instruments because no photograph can give you the joy of observing something through your eyes. Even the moon and planets that you observe on a day-to-day basis, if looked through one of these instruments can help you observe impressive closeup details.
While our eyes are very good at observing many night sky objects, we will not be able to see the many tiny details that a camera will be able to record for us. For example, When we look at the Orion nebula or the andromeda galaxy, it is visible as a faint cloud in the sky but a camera is able to gather more light and as a result more details of the nebula when making long exposures. Similarly, under not very dark skies, we are able to see the Milky Way as a faint band in the sky, but the camera lets us photograph a lot more details than what is visible to the eyes.
With astrophotography, do not expect to capture or process images that would look like one taken by the Hubble space telescope or by large observatories. Start where you can and even if the photo is not great, you have the satisfaction that you took it. With more learning, experience, and post-processing experience, you can proceed further and upgrade your gear and techniques.
Check out “Astrophotography for Beginners: Start Your Journey Here” to get a quick overview of astrophotography if you are just starting with this genre. If there are local astronomy clubs near your location, it can be a great place to start where you can gain a lot of knowledge relating to astronomy, astrophotography, and beginner astrophotography tips.

Skills Required For Astrophotography
As with any type of photography, astrophotography requires some specific skills that will help you quickly make some calculations, set the camera and finally process your images. It may not seem so quick and easy as it sounds, but once you get the hang of it, it can be easy to set up and photograph. Do not worry too much about technical skills that most astrophotography blogs or videos suggest as difficult, as they are easy even with a DSLR camera or a mirrorless. If someone can do it, you can do it too!
Here are some skills that are required to get a good photograph of the night sky:
Exposure Settings
Exposure to untracked astrophotography can vary depending on the object that you are shooting. For example, exposure settings will vary when shooting the moon, different phases of the moon, the planets, or the stars. Similarly, exposure settings will also vary based on the focal length and aperture value used. Also based on atmospheric conditions and light pollution, you may need to make adjustments to exposure.
Exposure is to control the amount of light falling on the sensor of your camera. Aperture, shutter speed, and ISO are the most important factors that control exposure. Without a tracking mount, one has to move the camera every few minutes to keep the object in the frame. If you have a tracking mount and will be using that, then you may need to work around your exposure settings differently.
- Aperture – In order to let in more light, and have the iso at the lowest possible, it is always recommended to have the aperture open to the widest value. Most lenses do not perform their best at the widest aperture and can result in artifacts, chromatic aberration, vignetting, etc. So if you are using a lens with a maximum aperture of f/1.4 or f/1.8, it is advisable to stop down to about f/2 for sharp and neat images.
- Shutter Speed – Shutter speed dictates how to pinpoint the stars and how sharp the other objects are in the image. The earth rotates, the moon rotates and as a result, longer exposures of stars can lead to star trails and the moon can turn out blurry. There are various rules that you can take into account to calculate the shutter speed based on the focal length, camera type, and other factors, so you can get sharp images. These are discussed along with detailed resources as you go further down this article.
- ISO – We generally want to keep this at the lowest possible. There is no set value for iso, but you will need to make a few test shots to find the optimal value for a given event, camera-lens combination, and also depending on the atmospheric conditions and light pollution. Also, if you are shooting a deep sky object with a longer lens, then you will need to use high iso values because of comparatively short exposure times.

- The Exposure Triangle And How It Affects Your Photos
- The Rule Of Equivalent Exposure
- A Guide To Reciprocity In Photography
- This Is Why The Exposure Triangle Will Make You A Better Photographer
Focus
Focusing in the dark that too at a distant object in the night sky can be quite tricky. Here is what you can do to get perfect focus.
- Autofocus: Autofocus is generally not recommended for night sky photography, but if you are confident enough, it can be used to focus on the moon. Sometimes, it is good to autofocus on a distant bright star or the moon and then change the focus to manual, so the focus is locked. Make sure to zoom in on the image to see if this focus is tack sharp.
- Manual Focus: This is the most recommended for night sky photography. Set your lens to manual focus and point your camera at a very bright star in the sky. Zoom in, on live view, and rotate the focus ring till you get a point sharp image.
- Focus Peaking: Some cameras come with a focus peak assist feshoot rawature that you can use to ensure the subject is in focus. Make sure to zoom in on live view when using this feature so you know that the focus is tack sharp where you want it to be.
Reposition The Camera
Untracked astrophotography means you will have your camera and lens combination mounted on a fixed tripod. Because of this, your object in the sky is not automatically tracked using a mechanical or electronic tracker. To keep the object that you are photographing, constantly in the frame, you will need to readjust the camera's position every few minutes (the frequency depends on the focal length used) so the object is in the frame. For longer focal lengths, you will need to readjust more frequently compared to shorter focal lengths.
Rules For Astrophotography
In order to get sharp stars and to record other celestial objects like the moon tack sharp without causing blur, there are a set of rules for reference. The 500 and 600 rules can be used if you are capturing night sky images for the web or blog. But if you want to print the image on a large canvas, then you will need to use a more accurate rule called the NPF rule which will not show a star trail even if you have a large print of the image.
- 500 Rule – The 500 rule refers to camera settings that need to be used to get a good exposure of the stars and the Milky Way without causing star trails. You divide 500 by the focal length, taking into account the crop factor, and use the result as shutter speed. Here is a detailed article on the “500 rule.”
- 600 Rule – The 600 rule is similar to the 500 rule where you have to divide 600 by the focal length taking into account the crop factor of the camera. Here is a detailed article on “How to use the 600 rule to get perfectly exposed night sky photographs.”
- NPF Rule – The NPF rule takes into account the aperture, pixel density, and focal length to calculate the exposure time. You can manually do the calculation or use an app called PhotoPills to do the calculation for you. There is also another free calculator called the qDslrDashboard that is free to use. Here is a detailed article on “The NPF rule and how to use it for brilliant star photography.”
- Looney 11 Rule – This rule is a great way to get sharp images of the moon. Just set the aperture to f/11 iso to about 100 and shutter speed to about 1/100th of a second. The iso and shutter speed will vary depending on the focal length used and whether you are hand-holding the camera or mounting it on a tripod. Here is a detailed article on the “Looney 11 Rule” and on “How To Photograph The Moon” with some great examples.
Long Exposure
In Astrophotography, you will most of the time be dealing with long exposures when capturing details of the night sky. It is good to get a good idea of how long exposures work and how the exposure triangle works so you can quickly make some adjustments to get the shot.
When you do not use a tracking mount, you will need to make sure that the long exposure is just right enough so there are no trails. For any astrophotography other than star trails, you need sharp photos of the stars and the night sky objects without any trails.
Here are some resources:
Pre-Processing Astro Images
Pre-processing is a very important step when you are stacking images of the night sky or the moon. This process helps with calibrating the images so they are aligned and ready to stack. A lot of the noise is rejected in this process. This process is very easy and we have added a lot of resources later in this article, that you can refer to, for step-by-step demonstrations along with images.
A lot of factors add noise to deep sky images and in order to eliminate these, you need to shoot calibration frames. Calibration frames are dark frames, bias frames, and flat frames, besides the light frames that contain the image of the deep sky object. Besides improving the signal-to-noise ratio, they also help with removing dust specks, vignetting, etc.
Post-Processing Astro Images
Once you have stacked the images, if you look at the final output, you will see a dull image with not many details. In order to bring out the details and colors, it is important to post-process the images. Stacked deep sky images have a longer post-processing method that needs to be done in small steps for a clean output. We have added links to all the resources in this article further down where you will be able to easily follow the step-by-step process involved in post-processing stacked images of the moon, sun, and deep-sky objects like the nebula.
Exposure Times For Astrophotography
Exposure times are of prime importance when it comes to untracked astrophotography because depending on the subject that you are photographing, you will need to choose the exposure time.
Moon And Sun
When photographing the moon and the sun, the exposure times need to be such that you do not record the movements due to rotation. So slightly faster shutter speeds are used and this also depends on the focal length of the lens used.
Point Stars
For point stars, use one of the exposure rules like the 500 rule, 600 rule, or the NPF rule depending on how you will be using the final image. Also, make sure you manually focus on a bright star by zooming in on the live view.
Star Trails
With star trails, you do not need to worry if there are slight trails in the images. You can either do a single exposure star trail or multiple exposures star trail. More details along with resources are found later in this article.

Gear/Tools Required For Astrophotography
The gear required for astrophotography can be specific if you are looking to do only astrophotography, but if you are someone who would like to have cameras that you can use for almost all genres of photography, then you need to be looking for certain things like long exposure time and high iso or low light performance.
Some may suggest owning a ton of expensive gear for astrophotography which is not true unless you are looking to image objects that are hard to image with a DSLR camera, another digital camera and no filters or if you are looking for some advanced astrophotography.
Do not be turned off by what you see on the internet about expensive gear, filters, tracking mounts, etc. Most basic photography gear, like your digital camera, lens and tripod will help you get some Astro shots just in your backyard or a nearby location where you usually enjoy the night sky.
- You need a camera that will allow you to shoot in manual mode so you have full control over the exposure settings.
- You need an interchangeable lens camera so you can work with a range of lenses with different focal lengths.
- When exposed to the sky at night, depending on the focal length and aperture that you use, you will need to adjust the exposure settings, and most often it is a long exposure shot unless you are photographing the moon or the sun. During the long exposure time, the sensor heats up and this shows up as thermal noise on the resulting image. This is more evident in low-end cameras.
- Similarly, as the focal length increases, for example, when shooting close up of the Milky Way, nebulae, other distant galaxies, and star clusters, you may be shooting between 200 and 600mm, which means, you will need to have a high iso value to shorten the exposure time in order to get sharp stars. If you are stacking the images, then noise can be reduced in that process, but for single exposures, you need to be looking at a camera that has great low light sensitivity or performs really good at high iso values.
- You should be looking for a fast lens, preferably f/2.8 or f/1.8, but if you are just starting and you have only the kit lens in hand, then by all means use it. There are a lot of enthusiastic photographers who have made brilliant untracked astrophotography images using the kit lens.
- When it comes to focal lengths, a lens with a focal length between 10 to 12mm and 24mm is the best for wide-field or wide-angle shots like nightscapes where you will be including the landscape as a foreground for effective shots. For deep-sky objects like nebulae and distant galaxies, I personally think the 135mm to 200mm is the best range depending on your subject because with a wide field of view, you will be able to hardly see any nebula details. You can use longer focal lengths once you have some experience and knowledge shooting and post processing astro images.

- It is good to have a cable release handy for astrophotography, especially when you will be photographing a series of images or hundreds of images, so you can flexibly focus on the other aspects of photography and avoid camera shake due to shutter release. Using the inbuilt timer for a huge number of shots may not work well and can be frustrating, but can be used for a few shots. You could also see if your camera has an app that can be used to trigger the shutter release.
- Have enough fully charged batteries and spare batteries so you can continue shooting through the night or the entire session. Sometimes cold weather conditions can drain the battery faster than you think.
- Another important accessory is the memory card. Have a few spare formatted memory cards if you are photographing a lot of images, especially time-lapse photography, meteor showers, or deep sky imaging.
- Have a flashlight or headlamp in hand because you will be working in the dark and will be in need of it sometimes.
Camera Settings For Untracked Astrophotography
Night sky photography requires long exposure times and you definitely need a tripod to stabilize the shots. Here are the camera settings for night sky photography.
- Set your camera on a tripod and make sure you use a sturdy one that can withstand strong winds. Even the slightest shake can ruin the images.
- Turn off image stabilization on both camera and lens.
- If using a DSLR camera, use the mirror lockup feature.
- Set the camera to manual mode.
- Turn off any in-camera noise reduction features like high iso or long exposure noise reductions.
Here is a very useful resource on in-camera noise reduction: Should You Turn Noise Reduction On Or Off For Astrophotography
- Set the camera to shoot raw, and this is very important to get all details possible out of your raw file.
- You can choose a specific white balance, but leaving it on auto is ok as you will be shooting raw and it can be adjusted when post-processing. If you are using a preset, tungsten or daylight should work fine.
- Choose the widest aperture value, iso about 1600, and calculate the shutter speed using one of the exposure rules discussed above. If you are using older crop sensor cameras, you may need high iso values like 3200 and even 6400 depending on the camera's performance and lens used.
- Make a test shot and increase or decrease the iso depending on the resulting image to get the right exposure.
Capturing Astro Photos
Once you have the camera set up, you need to locate an object in the night sky and point your camera at it. It could be the moon, the planets, the milky way, the nebulae, galaxies, star clusters, or anything that interests you. Once you have decided on your subject, depending on what you shoot, you may want to include a foreground subject or not.
If you are photographing the moon, the planets, or a bunch of stars, along with the landscape, it will be nice to include a foreground to add scale, meaning, and a story to the image. This again purely depends on you because the stars or the night sky on its own looks brilliantly beautiful.
Frame your image and follow the relevant resource in this article that we have provided further below to get the shot and post process it.
Smartphones For Astrophotography
Smartphones may sound a little funny for astrophotography, but in recent years, many smartphones and smartphone apps make use of AI that helps to capture good astro photos. Although they cannot be used to take DSLR quality images, they can be used to photograph a wide-angle shot of the Milky Way Galaxy, the constellations, etc. Close-up images can be captured if the smartphones are attached to a telescope.
You can see some astro images taken with a smartphone here – Orion Constellation captured with a Huawei P40 Pro Plus, NEOWISE with Google Pixel 3, another shot using Samsung Galaxy S4, this image using Oneplus 6, another one using a Huawei phone, NGC 6910 using iPhone 4s, Hyades and Pleiades using Google Pixel 2, a different one using an iPhone, and another using Vivo v15 Pro, Orion Nebula using Samsung S4 zoom and iPhone 4s.
Here are some images I captured with a smartphone:

The apps below, allow you to have manual control over your camera settings so you can make long exposures. Make sure to mount your smartphone on a tripod or a gorillapod and use a remote shutter release or timer delay to release the shutter.
- Nightcap Camera
- Slow Shutter Cam
- Cortex Camera
- LongExpo Pro
- Nightcam
- Northern Lights Photo Taker
- Camera FV-5
- Open Camera
- Night Mode Camera, and more
What Type Of Astrophotography?
With good cameras that are available in the market these days, basic untracked astrophotography has become a relatively easier genre and affordable for most photographers. There are various types of astrophotography that vary from beginner to advanced because some are easier to capture and post-process than others. Here are some of the types of untracked astrophotography that can be done easily with a mirrorless or DSLR camera and a camera lens.
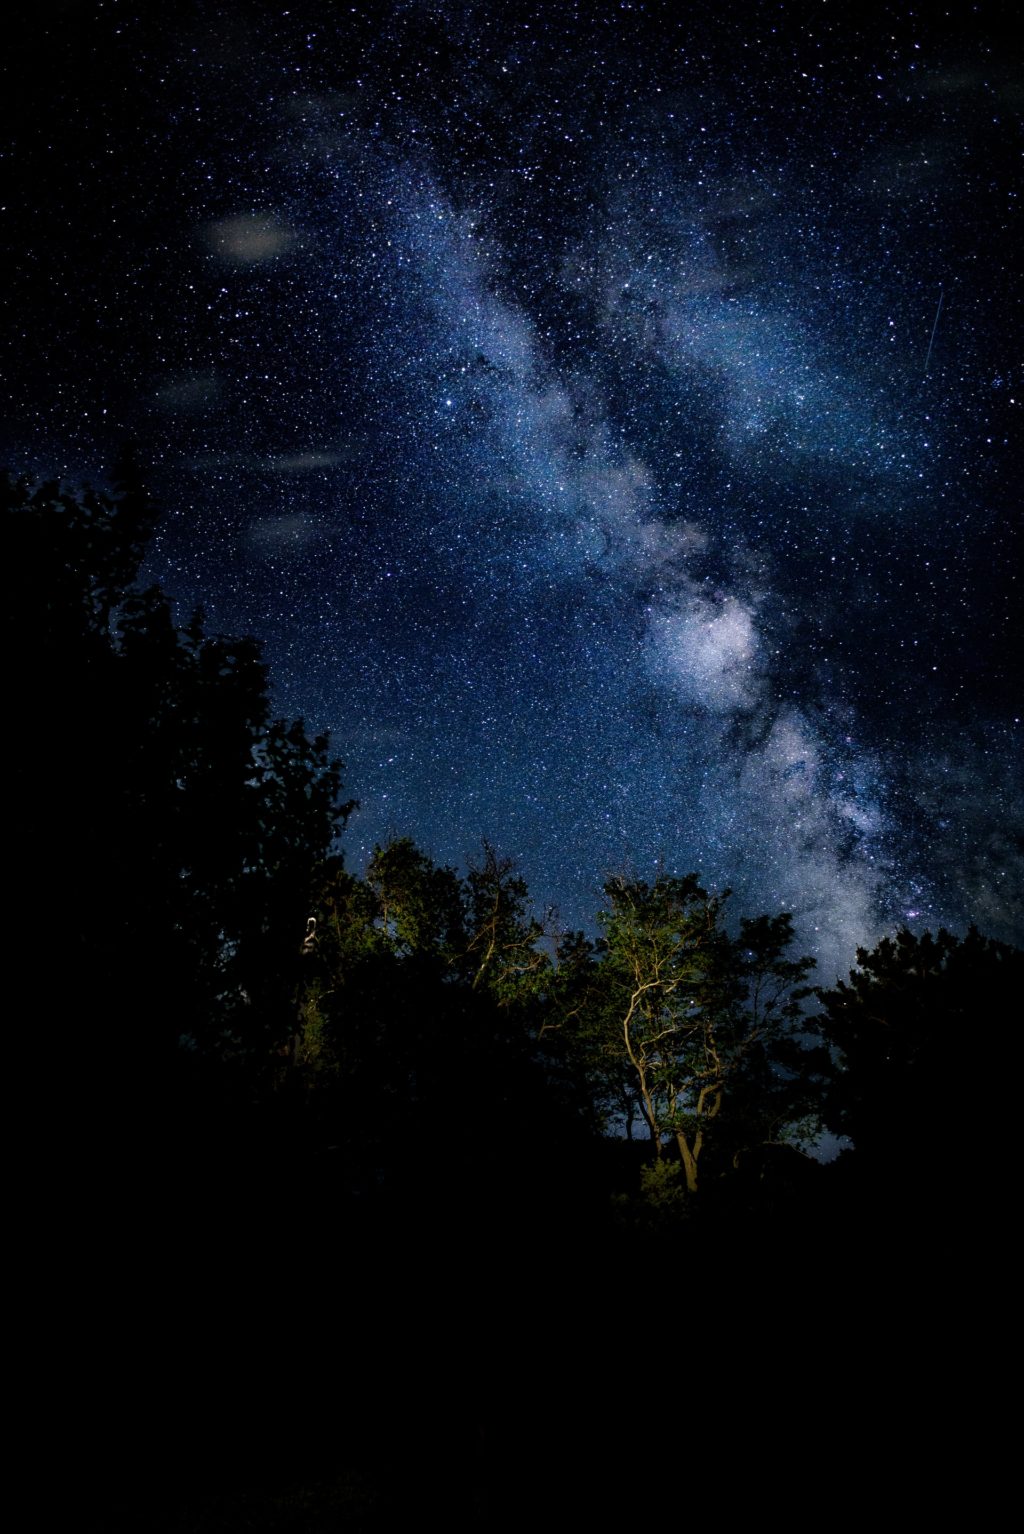
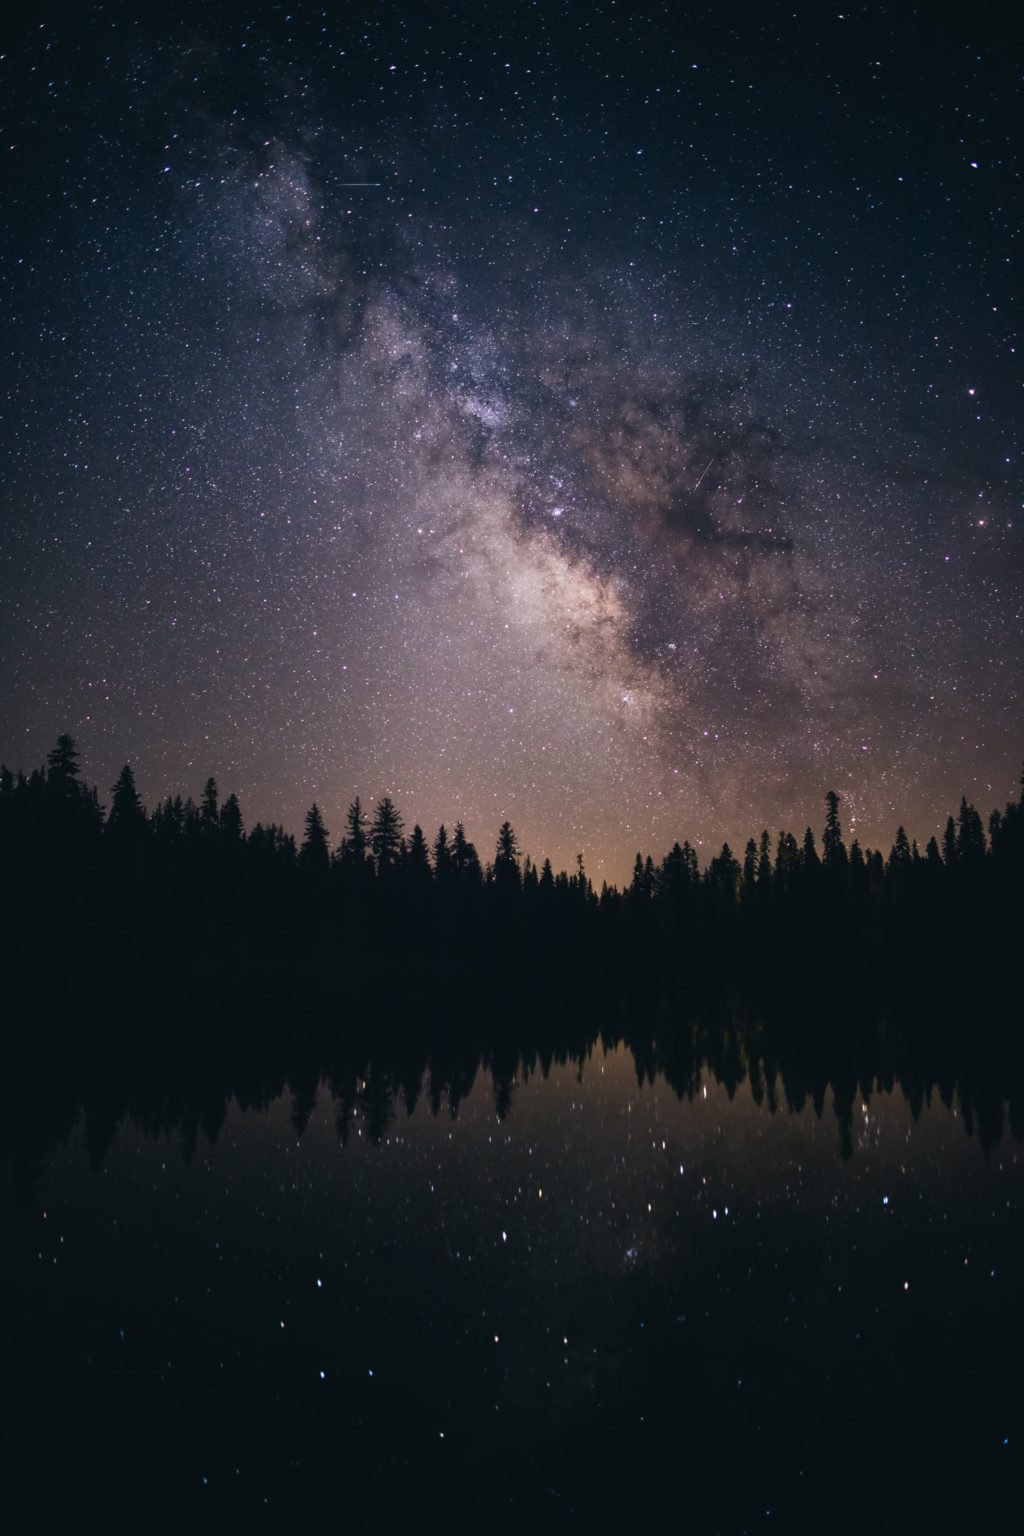
Nightscapes
In this type of astrophotography, one includes the landscape as the foreground when photographing the night sky with a wide field of view. This type of astrophotography can also be called landscape astrophotography, astro landscape photography, Night landscape Photography, etc. This type of astrophotography usually requires a wide-angle lens with focal lengths somewhere between 10 and 35mm but this does not mean you have to restrict yourself within these focal length limits.
Other than photographing the night sky along with landscape foregrounds, this type of photography also includes time-lapse of the night sky along with landscape, light painting in a nightscape, and drone light painting. If a nightscape does not have any star details in the sky due to reasons like light pollution, weather, or due to short exposure time, then it cannot be classified as astrophotography.
- How To Use Moonlight For Night Time Landscapes
- How To Photograph Moonscapes
- 3 Tips For Capturing A Perfect Moonrise
Nightscapes can also be combined with light painting techniques where you can paint the foreground with light during the long exposure time, so you can illuminate darker areas of the foreground. You can also add a light painting pattern as a center of interest under the night sky. Drones can also be used for light painting taller structures, high hill/mountain areas and even to create light patterns in the sky.
Here is an article that talks about light painting night landscapes using a drone.
Starscapes
Capturing a grand view of the stars without any foreground land or other details can be classified as starscapes. This will however not make use of a telephoto lens but will have a wide view of the sky to include various constellations, globular clusters, planets, and deep-sky objects as tiny details and not a close-up view. This type of photography is especially done when you wish to include a view of the sky in a particular direction, during a particular season, or to capture a map of the sky at night for a given date and time. A wide-angle lens of focal length between 14mm to 35mm is the best for this type of astrophotography image.

Here is a useful article with amazing information to photograph point stars.
Here are some resources to photograph the Milky Way:
- How To Photograph The Milky Way In 12 Steps With 18 Epic Examples
- Bite Size Tips: How To Photograph The Milky Way
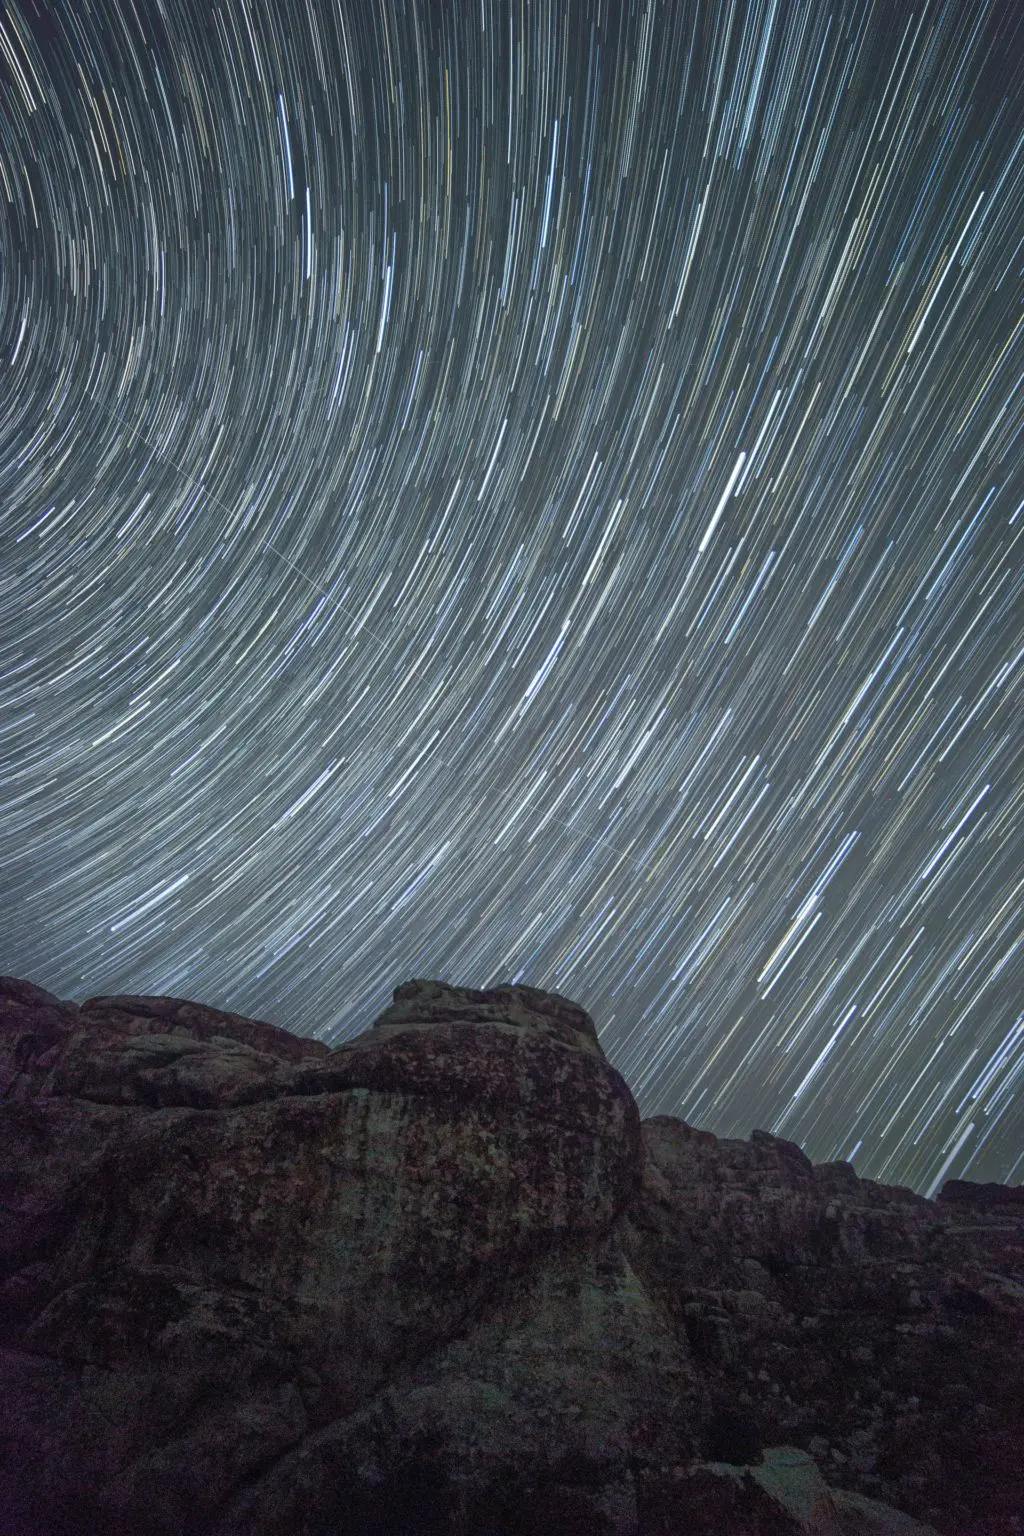
Star Trails
Star trails are interesting to photograph and can be done throughout the year as long as you have a few hours of dark nights to get a good output. If you are looking for beautiful circular star trails, then you should locate the North Star if you are in the Northern Hemisphere and the Southern Cross or Sigma Octantis if you are in the Southern Hemisphere. These stars can be easily located using an app like Sky Guide or Star Walk 2 as they accurately show the location of the stars in the sky.
Star trails can be photographed by two methods:
- Using one very long exposure where you keep your iso very low, a slightly narrow aperture, and longer shutter speeds of 10 to 15 minutes to an hour or more to get decent trails.
- Taking short exposures and stacking – this is an easier method where you take short exposures of a few seconds each and then stack them to get a star trails image.
Here are two detailed articles on photographing star trails:
- How To Photograph Star Trails: The Ultimate Guide
- How To Setup Your Camera To Capture Perfect Star Trails
Close Up Of Celestial Bodies
When we say celestial bodies, it includes the moon, sun, planets, stars, asteroids, comets, etc. With a DSLR camera or a mirrorless, it is possible to get a close-up image of the sun and the moon easily. For other planets, comets, etc., you will need quite a long lens and huge cropping to get some good details. A telescope will be the best option if you wish to get close images of the craters and other features on the lunar surface, but we will limit this article to how beginners can photograph celestial bodies. Here are some useful resources below:

- How To Photograph And Edit A Mineral Moon
- A Moon Photography Primer
- How To Photograph The Moon With 10 Great Examples
- Photographing The Moon: 6 Useful Tips To Help You Capture A Unique Shot
Planetary Imaging
Capturing images of planets has become pretty easy these days but the skill lies in processing the raw files to get the details out of those images. One needs to take hundreds or thousands of images to later stack for the final output. This will require a very long lens and some of the planets that can be imaged easily are our neighboring planets – Venus, Mars because they are the closest to earth, then Jupiter and Saturn because they are huge planets. From personal experience, I would not recommend untracked DSLR cameras or mirrorless with the lens for planetary imaging because the chances of getting a very good image are quite faint.

Note: I have imaged the planets, mainly Saturn, Jupiter, and Venus with a DSLR camera untracked, and have got acceptable results for a start although not great.
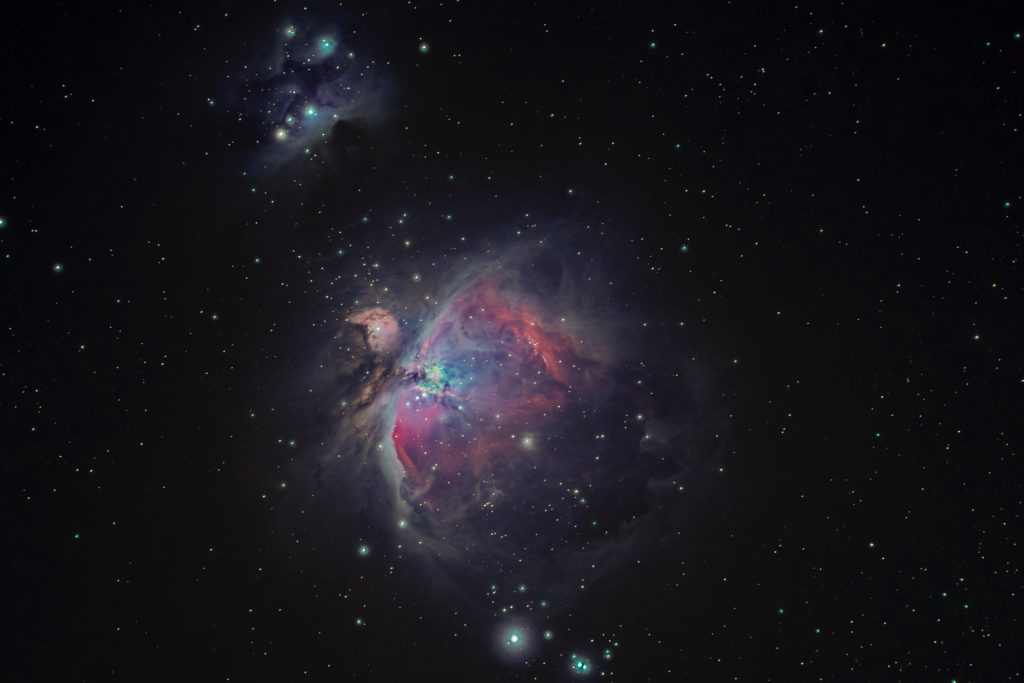
Deep Sky Astrophotography
Deep sky astrophotography or imaging would usually benefit from using a telephoto lens as you will be imaging deep sky objects or far away objects like nebulae, galaxies, star clusters, and comets and you would want to photograph a closer view of the objects. A tracking mount and a telescope is usually helpful for deep sky astrophotography, but are not mandatory for a start.
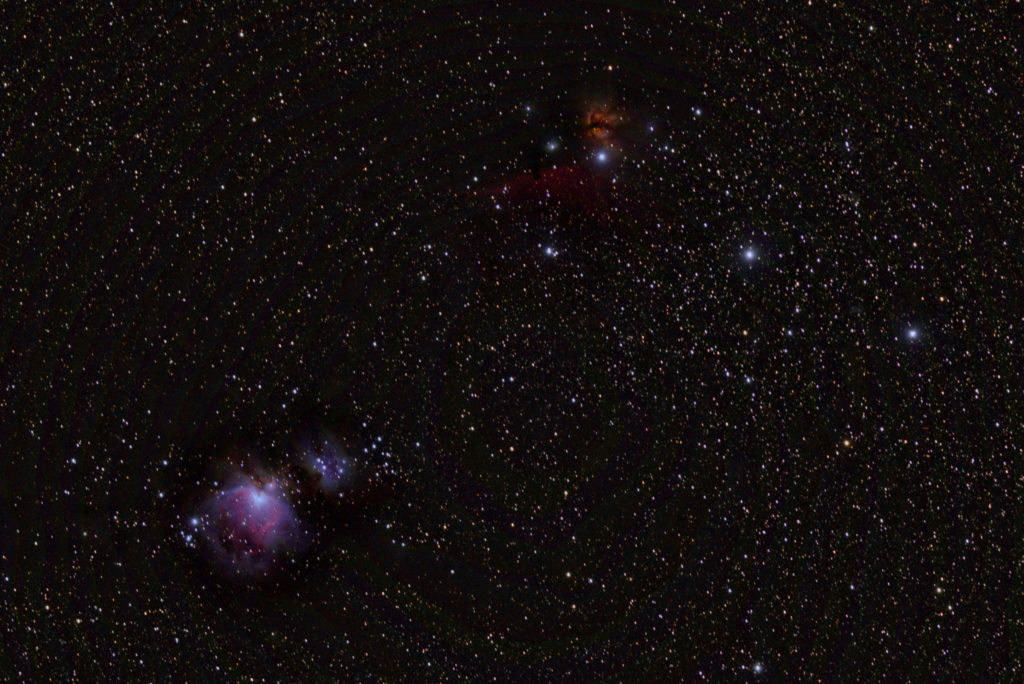
Take a look at how deep-sky objects can be imaged with DSLR cameras or mirrorless and lens, without a telescope and/or tracking mount, in the article below. The object discussed in this article is the Orion Nebula and the same process can be used to photograph other nebulae, galaxies, globular clusters, cloud complexes, etc.

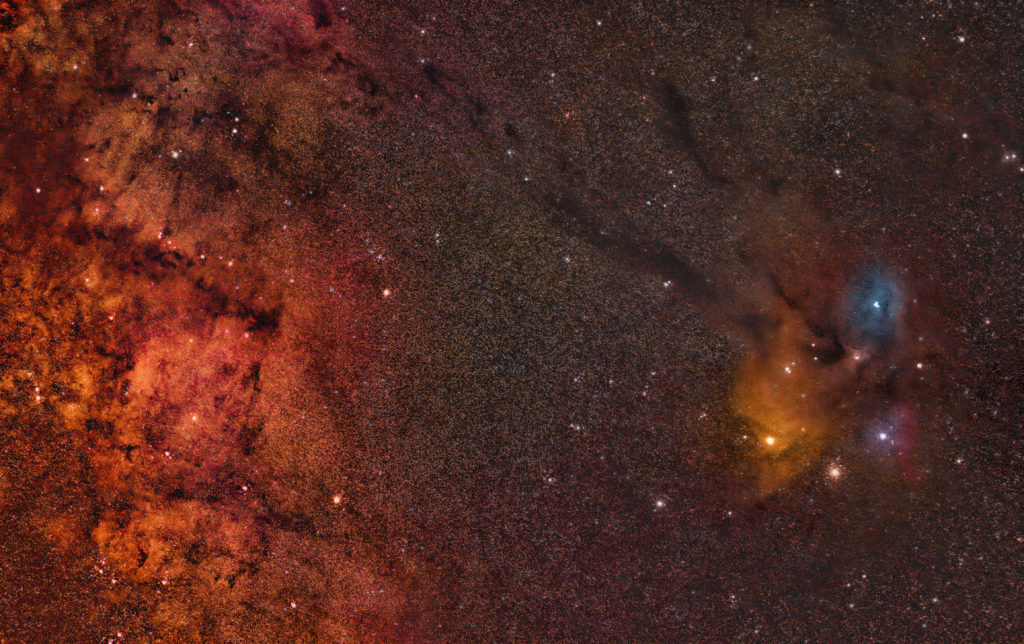
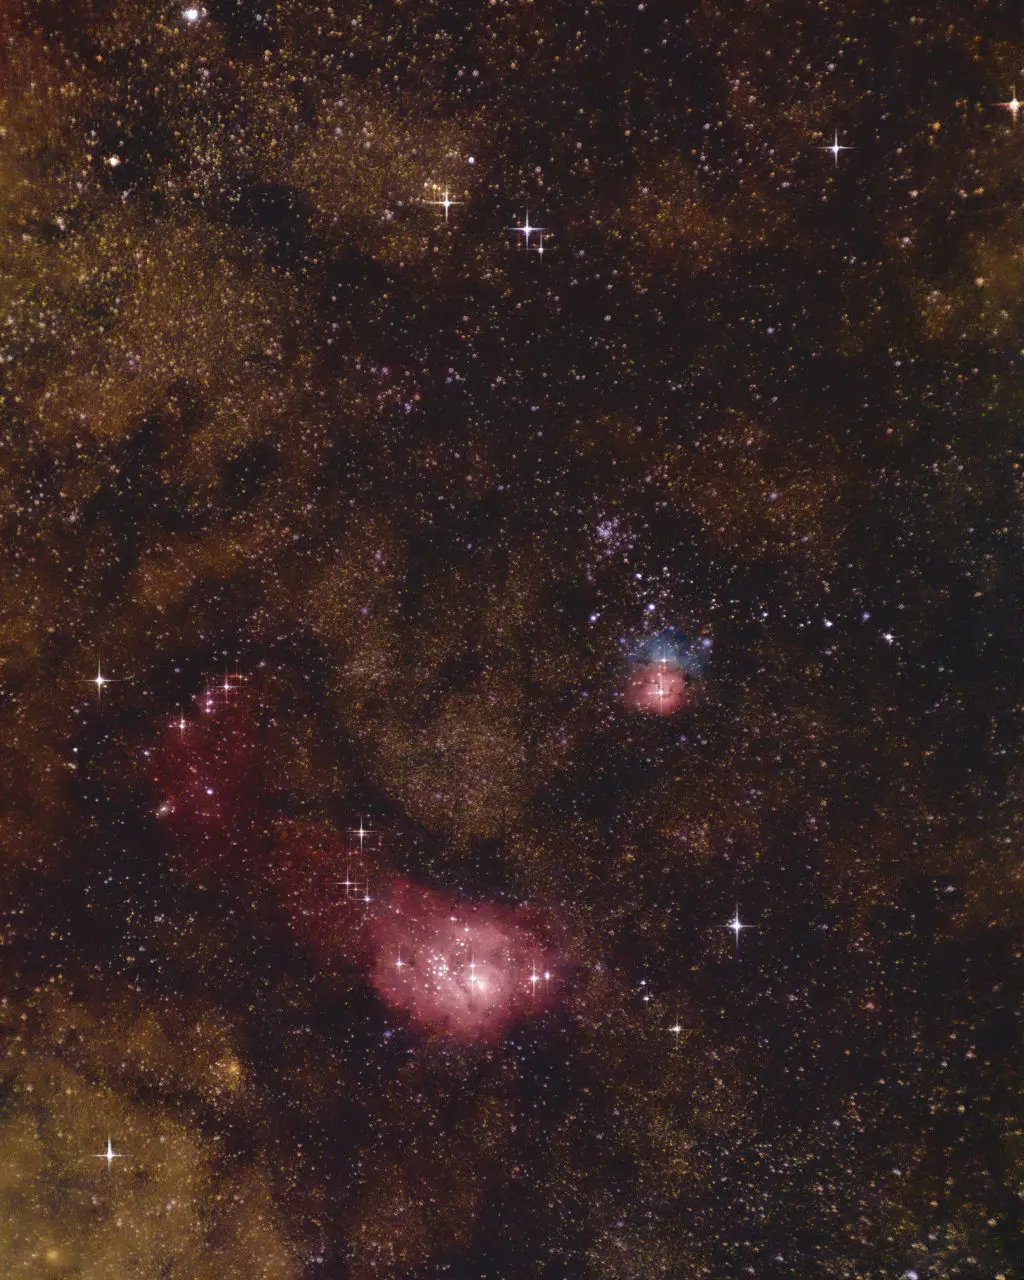
I followed the same method above to photograph the Lagoon and Trifid Nebulae, the Andromeda Galaxy, and the Rho Ophiuchi Nebular Complex. Please see the images at the end of this article. This can be applied to many deep-sky objects making deep sky astrophotography with a camera and lens a worthy start, especially for beginner astrophotography candidates.
Astronomical Events
Astronomical events are events such as eclipses, planetary conjunctions, and alignments, oppositions, transitions, sunspots, comets, meteor showers, aurora, etc. In order to photograph astronomical events, you need to follow certain precautions and procedures depending on the event you are planning to shoot. We have a number of resources on how to photograph various events in the sky and they are listed below.
- How To Photograph A Total Lunar Eclipse
- How To Photograph A Solar Eclipse – A Comprehensive Guide
- How To Safely Photograph And Process Sunspots
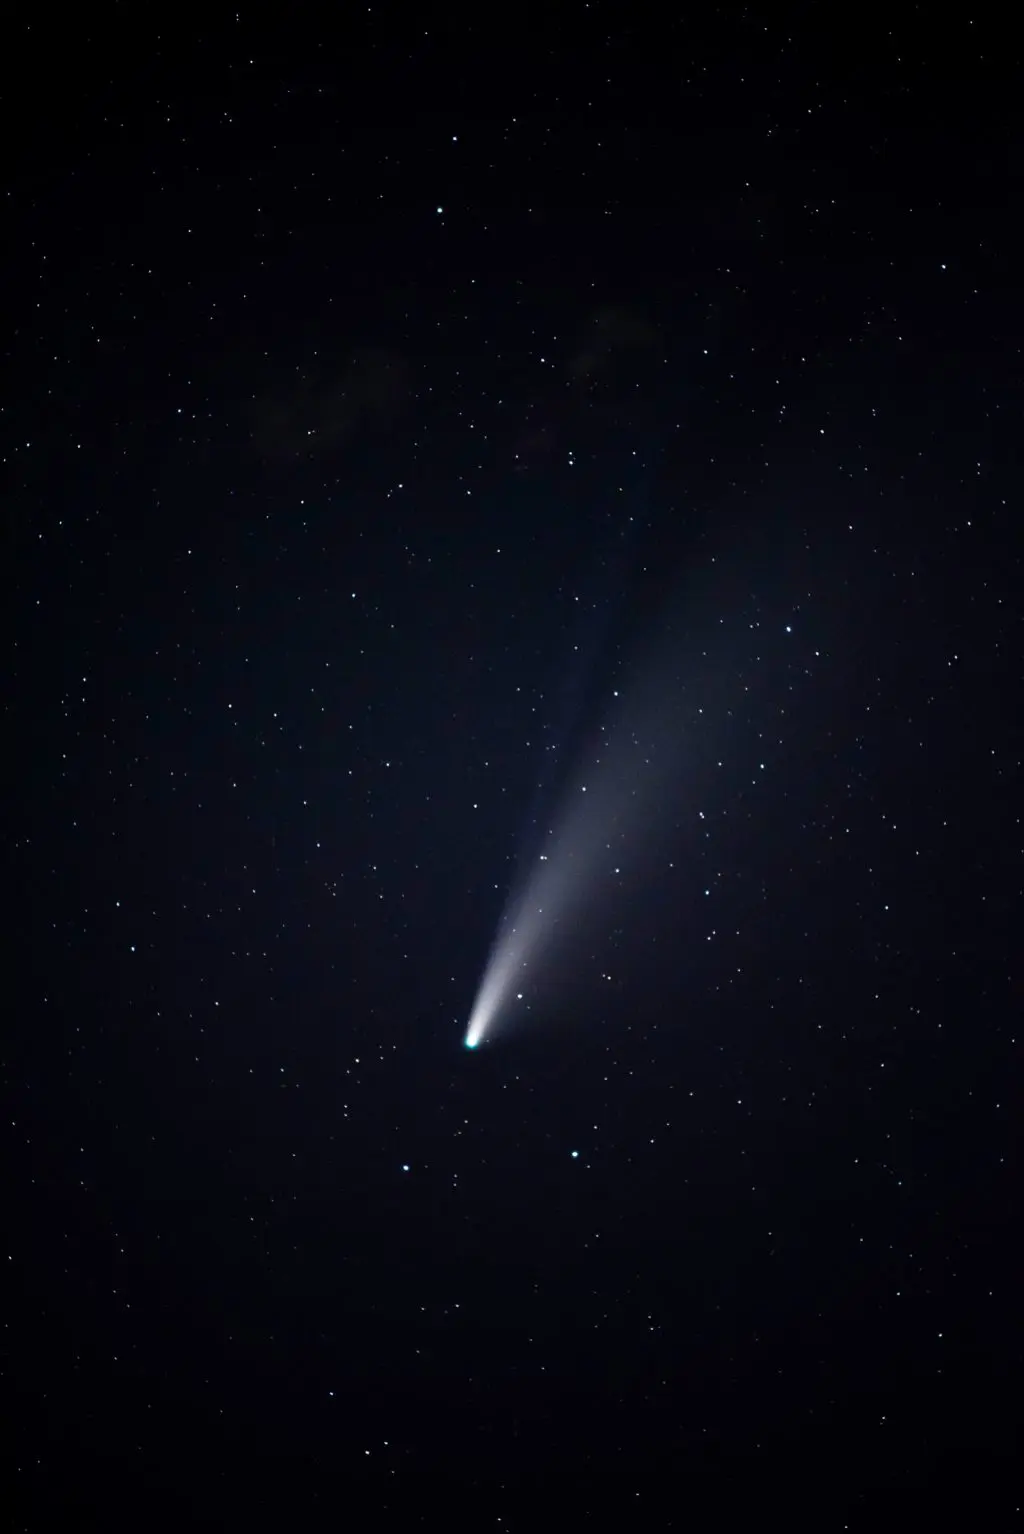
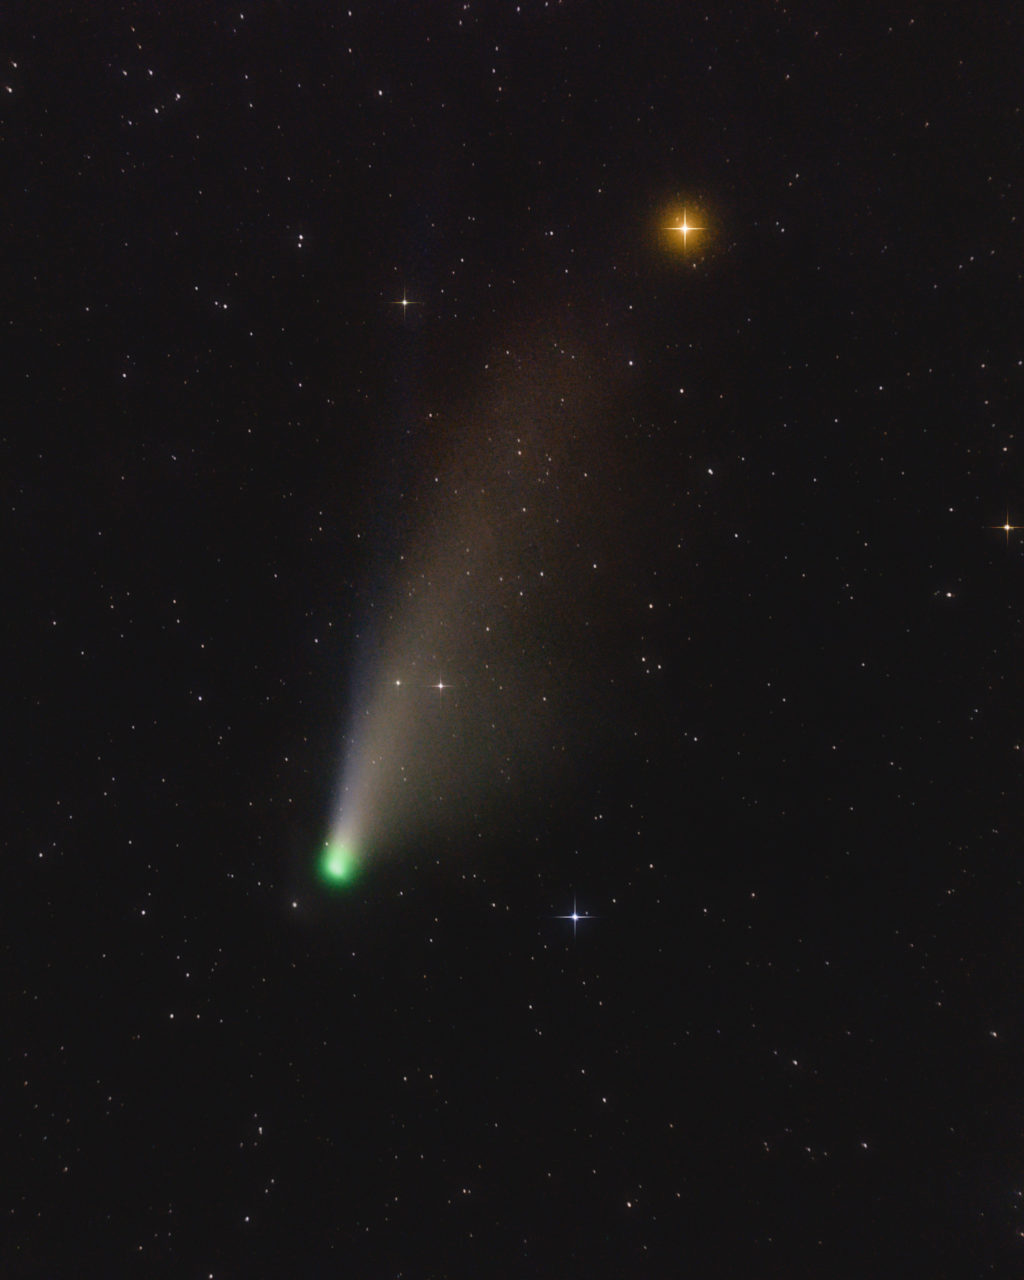
- How To Photograph A Comet
- How To Photograph A Meteor Shower
- Aurora Photography Guide For Images That Are Out Of This World
Location For Astrophotography
For the best results in astrophotography, you need to be in locations that have very clear and dark skies. If you are in a dark sky area, you will be able to see most of the deep sky objects clearly with your own eyes, for example, the milky way, the andromeda galaxy, the Orion nebula and various other star clusters, constellations, nebulae, etc. This will enable you to capture images that do not have the interference of light pollution and areas like these are ideally 20 to 70 miles away from the city depending on how large and how light-polluted the city is.
Note: If you are unable to travel to a perfectly dark sky area, it’s ok. If you will be stacking astro images, noise can be greatly reduced during the stacking process because you will be capturing dark frames, flat frames, and bias frames besides the light frames.
Mountains are one of the best places for astrophotography and in general, photographing the sky at night. As the altitude increases, the decrease in water vapor in the air and the lack of light pollution make mountains one of the best dark sky environments for astrophotography.
To locate dark places and skies, check out Light Pollution Map, Clear Dark Sky, Dark Site Finder, International Dark Sky Places, and the Dark Sky Finder.
Weather Conditions
For astrophotography, you need to look for days when there is a forecast for clear skies. When observing the sky from earth, we are affected by various factors like clouds, humidity, light pollution, atmospheric turbulence, and many more.
Clouds can ruin astro images, especially when you are looking to stack your images. The software will not be able to preprocess your images accurately if there are even slight patches of clouds moving across the frame.
If you are photographing single exposures, then a stray patch of cloud every now and then should be ok, as you can wait for the cloud to pass and capture the frame. Sometimes night sky photographs look good with slight patches of clouds with stars in between, or if you are photographing a time-lapse of the starry scape, then slight cloud movements can add interest and drama to the frames.
Time Of The Year
Astrophotography can be done all year round because the season changes and there is something in the night sky that you can watch and photograph. Besides these, there are celestial events like conjunctions, transits, eclipses, comets, meteor showers, etc., happening that can keep you motivated to capture astrophotographs all year round.
Besides events, you can photograph stars, star trails, various phases of the moon from a full moon to half-moon, and then the crescent moon, planets, constellations all through the year. When photographing the sky at night, also look for days when the moon is not in the sky or is less than 25% illuminated as its brightness can wash away the details of the night sky.
Here is a quick overview of what to look out for in the night sky during various seasons:
- Milky Way – For the Northern Hemisphere, the months between April and October are the best times with July and August the peak season when the Milky Way appears as a band across the sky. For the Southern Hemisphere, it will be October to April with January and February being the peak months.
- Aurora – The start of the fall season till early spring is the best time to photograph auroras both in the Northern and Southern Hemisphere because the nights are longer. The summer season can have longer days in higher latitudes where auroras are visible and the nights can be quite bright as well. The best months to photograph the aurora is September to March for the Northern Hemisphere and March to September for the Southern Hemisphere. Keep an eye on space news to see when the auroral activity is high.

- Moon And Sun – These celestial objects can be photographed all year round provided the sky conditions are clear. For the moon, you will need to watch out for the phases, and then the moon rising and setting times, so you can plan the shoot well in advance.

- Eclipses – Eclipses are rare astronomical events and on Earth, we have two types of eclipses – the solar eclipse (moon moves between the sun and the Earth) and lunar eclipse (when the Earth’s shadow falls on the moon). These can be partial or total and the total eclipses are the most spectacular events and are very rare. Make use of apps to check for future eclipses and check timeanddate.com for future eclipses for your location.

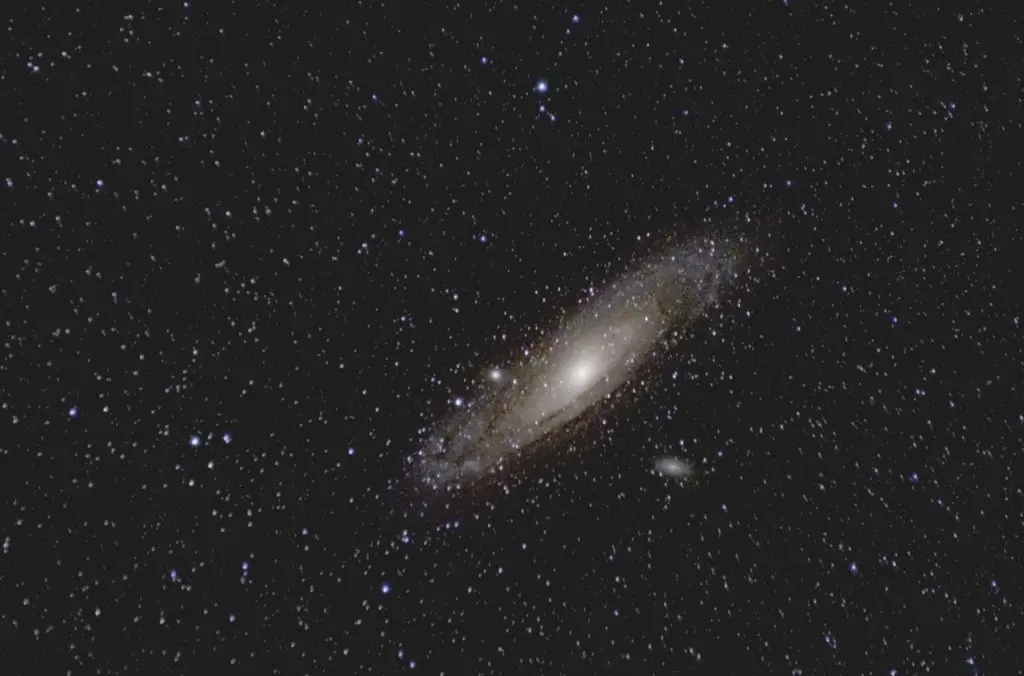
- Galaxies – Galaxies are spectacular objects that can be viewed and photographed in the night sky. The Andromeda Galaxy is visible to the naked eye from dark sky areas and can be photographed easily with a camera and lens and the summer season in the Northern Hemisphere is the best time. Along with it, you can also capture two of its satellite galaxies. Check the night sky apps to see what other galaxies are in the sky in a particular season, so you can photograph. The Triangulum galaxy, the Bode’s, and Cigar galaxy can also be photographed using a camera and lens. If you are in the Southern Hemisphere, look out for the Magellanic clouds as they are spectacular objects to photograph.

- Nebulae – Nebulae are interstellar clouds of dust and gas in outer space and also act as nurseries for new stars. They are truly beautiful with their vibrant colors and there are many that you can photograph. The most popular and easy to photograph is the Orion Nebula in the Orion constellation. The Winter season is the best time to capture the Orion Nebula in the Northern Hemisphere and in this area you can see a lot of other nebulae like the running man nebula, horsehead nebula, flame nebula, etc. During the Milky Way Season, you can see and photograph the Trifid and Lagoon Nebula. Besides these, there are a lot of nebulae like the California nebula, Witchhead nebula, and many star clusters that can be searched on the night sky app and photographed.
- Sunspots – Sunspots are darker or cooler areas on the Sun’s surface that have a temperature slightly lower than the surrounding areas. This is a process as a result of magnetic fields and can be observed and photographed during Solar cycles when the activity of the Sun is at its maximum. During other times, you will occasionally be able to see spots every now and then. Photographing and observing sunspots requires protective filters and precautionary measures. One of the best ways to keep track of sunspots is to follow Spaceweatherlive.com and follow the solar activity there.

- Meteor Showers – Meteor showers happen many times in a year and this is due to the earth passing through dust and debris trails left by comets and asteroids. Meteor showers are named after the constellation from which the meteors appear to be coming from. Keep an eye on the meteor calendar or app to keep track of various meteor showers. MeteorShowerCalendar for iOS and Android displays a list of the upcoming meteor showers along with notifications.

- Besides the above, occasionally we have comets and asteroids that visit the Solar system and come very close to the Earth during which time they can be photographed. Make sure you keep an eye on space news to learn about each comet that comes close to the earth and at what time and date they are visible in the location where you are.
Important Apps For Astrophotography
This section goes into detail about the important apps you will need for a stress free astrophotography sessions.
Locating Objects In The Night Sky
If you want to pursue astrophotography, you need to have a genuine interest in that genre, and also having some basic knowledge and understanding about the night sky would help you along the way. You will know where to look and where to point your camera.
If you are very new and are still learning the basics, there are a lot of helpful and useful apps that can help you with a variety of tasks and make astrophotography easier for you when you are out on location. These apps help you to locate anything in the night sky, they come with labels for each object sometimes with a short description, and also alert you of important celestial events happening based on your location.
Here are some apps that I have personally tried and used for astrophotography:
- Stellarium – this is an online program that helps you to locate the stars and other objects that are in the field of view in your location including satellites, telescopes, space stations, etc. It also helps to see the moon phases and light pollution levels for your location.
- Sky Guide – This app is available for iOS and gives an accurate location of all objects in the night sky including their rising and setting times. You can even go further and check the position of the object for a future date and time so you can plan the shoot well in advance.
- Sky View Lite – If you are looking for a free app, Sky View Lite is a good app for iOS and the Sky View is free for Android.
- Star Walk 2 – This is another good app that alerts you of astronomical events and news. It even alerts of ISS rising time before a few minutes so you can be ready with your camera set up to capture the event. It is free for Android.
- Space Weather Live – Space weather live is a website that provides real-time data on solar activity, solar flares, aurora forecast, auroral activity, and others. They also have a free app for iOS and Android, that alerts you of auroral and solar activity.
- Photopills – PhotoPills is like an all-rounder app that can be used for various purposes like planning for an outdoor shoot, sun details including golden and blue hour times, moonrise and set times including moon phases, calculator for exposure, depth of field, hyperfocal distance, meteor shower calendar, exposure times for spot stars, star trails, time-lapse, and each of these come under a pill that you can open to exploring a lot more details in depth. It is available for both iOS and Android.
- Eclipses – To keep track of future Solar and Lunar eclipses, make use of apps like Solar and Lunar Eclipses, Eclipse Guide, Eclipse Calculator.
- Solar Watch – This app also allows you to check for sun and moon positions, and events for that year.
- Meteor Shower Calendar – Meteor shower Calendar is an app for iOS and Android and gives complete information on current and future meteor showers.
- Meteor Active – This is another app for iOS to keep track of current and future meteor showers. These apps also notify you of peak meteor shower activity.
- Tracking Weather – Dark Sky Weather for iOS and Hyperlocal Weather for Android are apps that provide local weather information so you can plan your shoot well in advance. Clear Outside is another weather forecast app available for both iOS and Android. It also gives information on clouds, visibility, fog, humidity, etc. Besides these, you can also make use of other trusty weather apps for your country and location.

Software For Processing Astro Photos
There are various pre and post-processing softwares available to process astro photos. When stacking photos for deep sky astrophotography, you will need to pre-process the files before you post-process them. Here are some simple apps that I have personally used. All the resources have information on how to process astro photos using these apps.
Pre-Processing
Pre-processing is an important step before post-processing planetary images, deep-sky objects, stacked images of the moon, sun, etc. Here are some free applications that perform really well for pre-processing images taken with a camera and lens.
- Planetary Image Pre-Processor (PIPP) – This is a Windows application that is designed to pre-process moon, sun, and planetary images before stacking them. It helps to crop each image and center them in the frame. It also selects the best frames in terms of image quality.
- AutoStakkert – Autostakkert is another stacking software that can be used instead of Registax if you have trouble with the images being aligned perfectly in Registax. I mostly use this when stacking images for sunspots.
- Registax – Registax is a powerful software that is free to use and is available for Windows only. It is used to stack the planetary or sun and moon images that were cropped and centered using PIPP. Wavelet adjustments help to bring out surface details from the stacked objects.
- Deep Sky Stacker (DSS) – DSS is a powerful software for stacking deep sky images like nebulae, galaxies, star clusters, etc. During this process, the light frames are calibrated using dark frames, flat frames, bias frames, and stacked thereby improving the signal-to-noise ratio and maximizing details in the final image.

Post-Processing
Once you have pre-processed your images, you need to post-process them to adjust white balance and bring out details and colors in your astro photos.
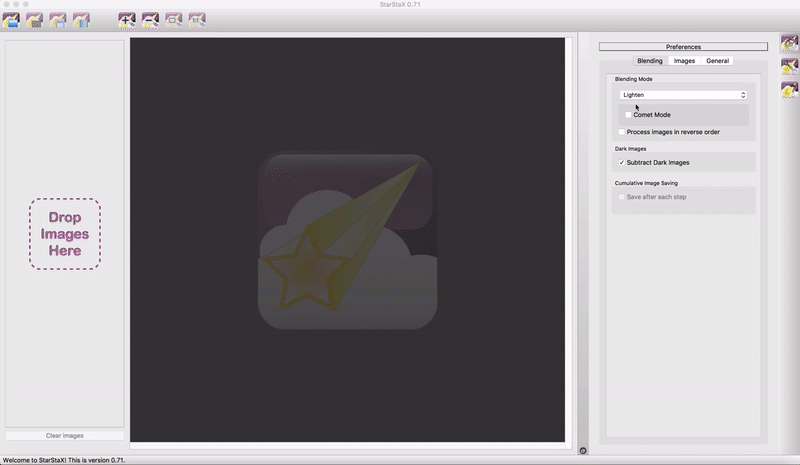
- StarStax – This is a very quick and easy app that can create stunning star trail images in a matter of a few seconds to minutes depending on the number of files used for stacking.
- StarTrails – This is freeware for Windows and Mac to create star trail images and time-lapse movies.
- Image Stacker and Deep Sky Stacker – These apps can be used to produce stunning star trail images.
- Lightroom and Photoshop – Once you have stacked your images in the pre-processing step, you can use Lightroom, Photoshop, or any other application of your choice to make basic adjustments and for color grading.
Post-Processing Astrophotos
There is no fixed process or rules for post-processing astrophotography images. You need to play around with the sliders till you get the desired results. Since photos are taken under various light and atmospheric conditions, each individual will have to follow their own process to post-process astrophotos.
Here are some of the basics you need to take care of:
- Crop and straighten the image to get the desired composition.
- If you think that the white balance requires adjusting, make changes to temperature and tint.
- Adjust exposure and increase the contrast a bit or more as required.
- Make adjustments to highlights and shadows.
- Whites and blacks need to be adjusted to your preference.
- You will want to increase the clarity a bit for star images, but if you are shooting the distant galaxies or nebulae, use this sparingly as it can cause weird artifacts in the image.
- If there was light pollution and/or atmospheric haze, it is good to use the dehaze tool to get some contrast in the image.
- Vibrance can be increased a bit to add a pop to the image.
- With regards to saturation, I like to use the HSL panel to individually make adjustments to different colors in terms of increasing or decreasing saturation or Hues. Once all the edits are made and if you still think that the image lacks saturation, use the saturation slider slightly to improve colors.
- Use the sharpening tool wisely to make the stars look a bit sharp.
- If there is evident noise in the image, increase color noise to about 25 to see if it helps. If that does not help, then apply noise reduction till you get a neat image. This is for single-exposure images. If you are stacking images then noise will be considerably reduced during the stacking process.
Note: Bringing out details during the post processing step for stacked images of deep sky objects are a bit different and they are discussed in the resources provided.

Some Useful Resources:
- The Keys To Minimising Noise in Your Photographs
- A Beginner’s Guide To Reducing Noise In Post Production
- How To Reduce Noise By Shooting Multiple Exposures
Dos And Don'ts For Astrophotography
Here are some general tips for astrophotography that include what you should and should not be doing.
- Make use of apps and websites when required to plan the shoot. Choose a location that suits you and do not be intimidated or too worried about perfectly dark skies.
- Make sure there are no nearby lights shining into the place where you are shooting as this can greatly affect the photographs.
- Location scouting is good if you are including landscapes in your shot.
- Unless you are shooting the moon or moonscapes, it is better to shoot on a moonless night or when the moon is a thin crescent so the star details are not washed away.
- Keep a checklist of the settings, accessories, and gear required, so you do not miss out on anything if you are shooting in a location away from home.
- Do not use narrow aperture values as you will need to expose them for longer periods of time and it can lead to star trails and introduce thermal noise. Use the widest aperture when possible unless you are using an f/1.4 or f/1.8 lens.
- Do not keep shutter speed longer than required based on the rules for astrophotography, because it can lead to trails due to the earth’s rotation.
- Manual focusing is always better if you want a perfectly sharp focus.
- If you are including foreground details, it is good to focus one-third into the scene to get everything in the scene in focus.
- Choose the right rules to calculate exposure times based on the purpose of the image you are shooting.
- When shooting the aurora, use faster shutter speed to capture details of the aurora patterns.
- Keep yourself and the camera lens setup warm in cold weather conditions to keep away fog.
- Do not use any form of noise reduction features in cameras.
Here Are Astro Images Shot With A Camera And Lens:
I do astrophotography at the moment without a tracking mount and these untracked astrophotography images were shot in a city with high light pollution interference conditions and sometimes very hazy skies. Stacking helped with reducing noise and the effect of light pollution. These were shot with either a DSLR or a mirrorless and lens, untracked. Without a tracking mount, you can get a few decent deep sky images.
The stacked comet, nebulae, cloud complex, and galaxy images require light frames, dark frames, flat frames, and bias frames in order to improve the signal-to-noise ratio.


Astrophotography can be very addictive once you start photographing the night sky. The night sky is full of wonders and you will be surprised to see what you are able to photograph.
Do you photograph the night sky and deep sky objects with a camera and lens, that is untracked astrophotography? What is your experience and what objects have you captured? Leave a comment below as we would love to know!
Further Resources:
- How To Photograph And Edit A Mineral Moon
- How To Photograph A Total Lunar Eclipse
- How To Photograph A Solar Eclipse – A Comprehensive Guide
- How To Safely Photograph And Process Sunspots
- How To Photograph A Comet
- How To Photograph A Meteor Shower
- Aurora Photography Guide For Images That Are Out Of This World


1 Comment
WOW, I only can say wow. Such superb star images.
Best regards
Bernhard