Deep sky astrophotography is one where deep sky objects like galaxies, nebulae, clusters, etc., which are stellar bodies, are photographed and one of the most famous and more often photographed deep sky object is the Orion Nebula. In this article, we will discuss how to photograph the Orion nebula and the entire post processing steps for stunning results.

Most of us think deep sky astrophotography can be quite expensive and require specialized gear. If you know where to look and make use of your existing gear, then you will be able to photograph a few stellar bodies (not all) with the gear that you have in hand right now! Well, the images will not be of very high quality like the ones made with dedicated astrophotography gear, but they can still be quite impressive and good for a start. You can decide for yourself after looking at the images used to demonstrate the entire process of capturing, stacking, and post-processing in this article.
Note: If you are wondering how you can shoot deep sky images without a telescope and other dedicated astrophotography gear, a telescope is nothing but a huge lens. So without a telescope, the magnification factor and light gathering capability is reduced but the number of objects you can shoot with a standard lens is huge!
This article speaks about deep sky astrophotography without a telescope and a tracker so you can use the gear that you have to get out at night and shoot some deep sky objects. All you need is a camera that has a manual mode, a lens that can shoot at about f/4 or faster (it is ok if you do not have a fast lens too!), a tripod, and a cable release. Even the pre-processing application is free to download and the post processing can be done using free applications like GIMP.
What Is A Nebula?
A nebula (Latin word for cloud) is a cloud of dust and gases like hydrogen, helium, and other ionized gases in space. Some nebulae are formed as a result of a dying star, whereas other nebulae are regions where new stars are beginning to form. Most nebulae are quite huge with a few hundred light-years in diameter.
The Orion Nebula
The Orion Nebula also called the M42, is an emission nebula and one of the brightest nebulae in the night sky that, if you are in a clear dark sky area, you will be able to see it with naked eyes, sometimes even in moderately light polluted areas with dark skies. It is an interstellar cloud with a magnitude of 4. It is part of a large nebula system or molecular cloud complex that extends throughout the Orion constellation.
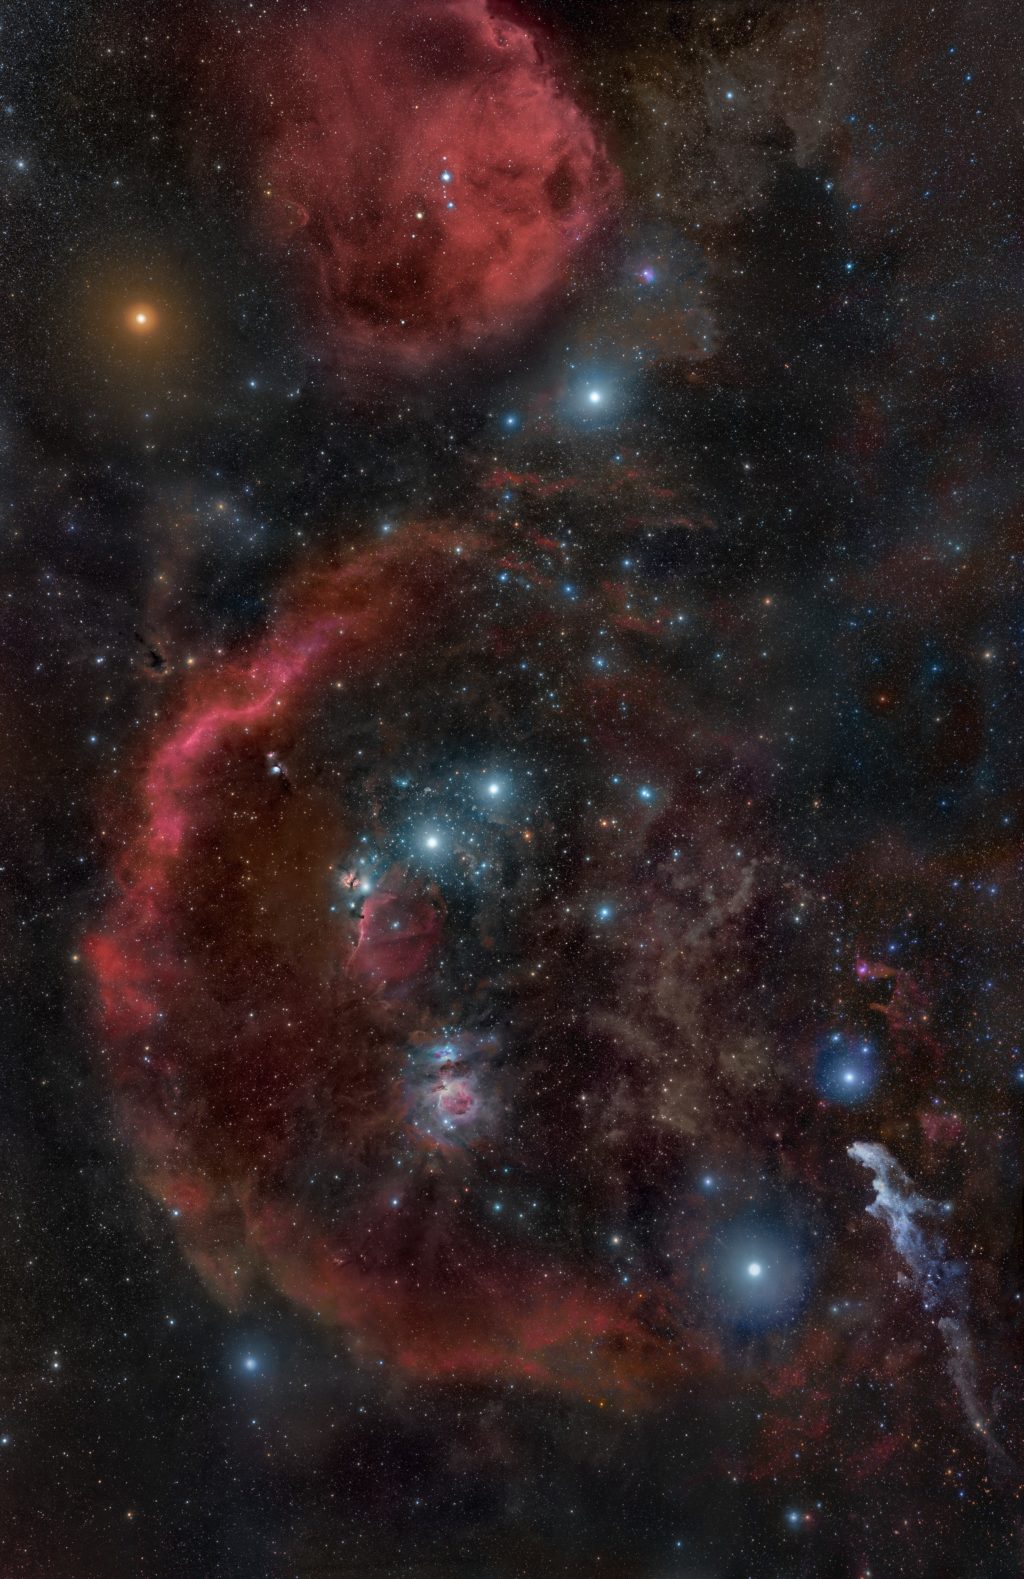
There are other objects like the running man nebula, flame nebula, Horsehead nebula, Barnard's loop, witch's head nebula, etc. that make up this system called the Orion Molecular Cloud Complex and when photographing the Orion Nebula, you are likely to photograph the nearby nebulae and other features of the Orion constellation depending on how clear the atmospheric conditions and light pollution are.
When Can You See The Orion Nebula?
Just like how we have the Milky Way season every year, the best time to shoot the Orion Nebula or the constellation is from Fall through to the Winter season in the Northern Hemisphere. During this time from about October through to April, the core of the Milky Way Galaxy will not be visible, but you can instead photograph the beautiful show put on by the Orion constellation.
In December, Orion is high up in the sky at about midnight. You could even photograph the Orion Nebula when it rises or sets, along with some beautiful foregrounds.
Basics On Photographing The Orion Nebula
Deep sky objects are quite faint and as a result, one would require very long exposure times to collect enough light or details to get decent images. Moreover, just like the stars, they move across the sky due to the earth's rotation. So without a tracking mount, one has to move the camera every few minutes to keep the object in the frame.
Since we are going to talk about untracked astrophotography with a camera, lens, and tripod, let us quickly look at how fixed tripod astrophotography works!
Without a tracker, if you expose the night sky for a very long time, it will cause star trails in the image.
So here are some very important things to keep in mind:
Reduce Exposure Time: In order to avoid star trails, you will need to reduce the exposure time. Based on the 500 or 400 rule, calculate the exposure time for the focal length that you are shooting on. With longer focal lengths, this will give a very short exposure time – for example, applying the 500 rule, a 200mm lens will give an exposure time of 500/200 = 2.5 seconds. So with a single image, you will hardly be able to gather any details required for a decent image.
To overcome this, we need to take multiple short exposure frames and then combine them into a single image through a process called stacking.
Now the exposure times are shorter you need to maintain proper exposure in the image to record the details without underexposure.
Here is how to overcome this situation:
Increase ISO Values: With longer focal lengths for example 200mm and exposure times of 2.5 seconds, if you go for the normal iso values for astrophotography, you will end up with a very underexposed image with no details at all. Moreover, with deep sky objects being very faint, these iso values will not record any details at all, and the image will look plain black.
In order to overcome this situation, you need to choose an appropriate ISO value so the camera can record the details of the deep sky objects. Be warned that this will also increase the amount of noise in the image but with untracked astrophotography, this becomes a necessity.
With a series of images that need to be taken for a longer period of time and the camera fixed on a tripod, the object that you are trying to photograph will move out of the frame.
So here is what you need to do!
Reposition The Camera: Untracked astrophotography means, you will have your camera and lens combination mounted on a fixed tripod. By the word untracked we mean that it is not automatically tracked using a mechanical or electronic tracker. To keep the object that you are photographing, constantly in the frame, you will need to readjust the camera's position every few minutes (the frequency depends on the focal length used) so the object is in the frame. For longer focal lengths, you will need to readjust more frequently compared to shorter focal lengths.
Requirements To Photograph The Orion Nebula
Location: As with all astrophotography, you need to be away from light pollution and need clear dark skies. If you are unable to get to a location where there are perfectly dark skies, then as much as possible, try to be away from bright lights with the least amount of light pollution. This will help with better photos and easier post-processing.
You can use DarkSiteFinder and Light Pollution Maps to plan your shoot.
Note: Deep sky can be photographed from moderately light polluted locations, but the quality of the image will surely deteriorate.
Weather: As with all night sky and astrophotography requirements, you need clear skies to photograph the Orion Nebula. When making single exposures, you can get away with patchy or occasional clouds, but when it comes to stacking, the stacking application looks for points in each image so it can align the images before stacking. As a result, it is important to not have any clouds that can confuse the stacking software leading to a ruined final stacked image.
Gear Required
Camera: You do not need sophisticated gear for photographing the Orion Nebula – your DSLR or the mirrorless will do just fine. Some astrophotographers may use a modified camera that has the IR filter removed so they can gather the red hydrogen alpha emission that is characteristic of most emission nebulae, but you can shoot with the camera that you have. The images I will be using in this article was shot with a Nikon full-frame DSLR.
Lens: You can use any lens with a focal length between 50mm and 500mm. If you have longer focal lengths, you can use that too, but then, the exposure times will be greatly affected. Typical focal lengths for the Orion Nebula would be 135mm and 200mm but if you want to photograph the entire constellation with all the different features in it, you can use the 50mm or 85mm lens.
Tripod: You need a sturdy tripod that can withstand breezy conditions. Slight movements can ruin the photos, and since you will be taking a few hundred photos, go for a really good tripod with a good head.
Cable Release: Since you will have to continuously take many shots in succession, it is best to use a cable release, so you can avoid any blur due to camera shake. For long exposures, the shutter is left open for a longer period of time and you need the camera to be perfectly still during this time. Even a small shake can ruin the image, so if you do not have a cable release, use the inbuilt delay timer along with the camera's inbuilt intervalometer.
Other Accessories: Have a few spare batteries and formatted memory cards.
Before photographing the Orion Nebula, you need to know how to locate it in the night sky. It is quite easy if you follow one of the methods below.
How To Locate The Orion Nebula
Orion nebula is located in the Orion constellation which is one of the easiest constellations to be found in the night sky. The Orion's belt comprises of three bright stars in a row and is one of the most striking features of this system. You could also look for Betelgeuse which is a very bright red star, then Rigel a bluish-white star, Saiph and Bellatrix which are the nearest brightest stars of this constellation.
If you have experience with stargazing, then finding Orion's belt is very easy. Once you see Orion's belt, then the Orion Nebula is just next to it. It is near the galactic anti center (outer edge) which is opposite the core of the Milky Way (180 degrees from the core).
The easiest way to locate the Orion Nebula is by making use of apps like Sky Guide, Star Walk (iOS and Android), or SkyView (iOS and Android). Make sure the compass is calibrated. In the search tool, type in “Orion Nebula” and choose it. The app will guide you to where it is located in the night sky. Moreover, if the nebula is not in the sky yet, the app will tell you the rising and setting time. You can also plan well ahead using the time feature in the app.
Stellarium is another tool that can help you to plan your shoot by showing the location of Deep sky objects at a specific date and time. Orion is visible in the night sky from October till April. The best times will be from end of November till March when you will have some time to collect data when the Orion constellation will be up in the sky for quite a long time.
Once you have located Orion, point your camera towards that direction and set up your camera. You need to be in a dark sky area, avoid moon in the sky and avoid all light pollution. Nights closer to the new moon are the best or nights when the moon rises late or sets early.
Gear Setup
Setting up the gear to photograph the Orion Nebula is very similar to how you would set up your camera for night sky photography, for example, the Milky Way or other night sky photography to photograph the stars. Here is a quick setup guide!
- Set your camera on a tripod and having a sturdy tripod is a must for night sky images. A tripod with a ball head will be a better option as it will allow you to point your camera up in the sky and towards any direction.
- Use freshly formatted memory cards as you will be taking a few hundred images in sequence and you need space to fit in many raw files.
- Shoot using manual mode.
- Turn off image stabilization on both lens and camera.
- Shoot only raw.
- Use live view to zoom in on a bright star in the sky and manually focus till you get point sharp focus. Take a test shot, zoom in 100%, and check for sharp focus. Make adjustments if necessary to get point stars. Try these settings for a start:
- Manual mode
- Manual focus
- Live-view
- The aperture between f/1.8 and f/4
- Exposure time about 20 – 30 seconds (this is not your exact exposure, but a trick to see some stars in the screen in live view so you can set sharp focus)
- ISO between 1600 to 8000 (increase till you see some stars)
- White balance – auto or daylight
- Zoom in at the maximum possible
- Use these settings to find a bright star (Betelgeuse, Sirius, Rigel, etc) and focus on it. Once done, you will need to dial back the settings when you actually shoot the Orion nebula. Follow the settings below.
Camera Settings
Shoot Raw: Always shoot raw for astrophotography because you need many raw details in your files to work with.
White Balance: Choosing the right white balance depends on a few conditions like light pollution, ambient light creating an atmospheric glow, etc. So if you are shooting from an urban area, keep your white balance between 3400 and 3900K because light pollution can cause a warmer glow. If you are in an area with dark skies, you can go for 4000K. If you are using one of the presets, for a dark sky area, you can use the “Daylight” preset.
- Make sure you take a test shot and make adjustments from there in increments/decrements of 100. If unsure, you can leave it on auto or if you did not get it right, in camera, you can make adjustments while post processing as you will shoot raw.
Noise Reduction: Turn off long exposure noise reduction and high iso noise reduction. Read to know why?
Image Stabilisation: Turn off image stabilisation since your camera is on a tripod.
Aperture: Since we are doing untracked astrophotography and we are limited with the exposure time, I would recommend shooting at the widest aperture your lens can go, for example between f/1.8 and f/4. If you think the image quality would be bad at the widest aperture and cause serious aberrations, you can close down the aperture by a stop or two. This will help get sharper images.
Exposures And Sub-Exposures: When doing deep sky astrophotography, we do not capture a single exposure, and then post process it for a final image. Instead, we capture a series of exposures, that are then stacked together to get the final output. So what we are doing here is, making a lot of sub-exposures, and then combining or stacking them all to get the final exposure or total integration. The purpose of this process is to gather as much light or details from the deep sky objects and also reduce the amount of noise in the final image.
In order to get sharp stars and the nebula itself, you need to calculate an accurate exposure time, which we will discuss below in the shutter speed section.
Shutter Speed: Shutter speed here is the length of each sub-exposure that we will be making. We want the stars to be pinpointed and not trails. In order to achieve this, you can use the 500 rule to calculate the shutter speed taking the crop factor into consideration if you are not using a full-frame camera. But, the 500 rule is not always accurate and the exposure time for point stars varies with the sensor's pixel density, declination of stars, and a few other factors.
In order to calculate the exposure time accurately, it is better to use the NPF rule. You can either calculate it manually or use an app called PhotoPills that will do the job easily for you. Here is a detailed article on the NPF rule and how it can be used to calculate exposure time for photographing point stars.
ISO: This will vary depending on the aperture value and shutter speed you have chosen above. Start from ISO 1600 and make a test shot. Review the image to see if the stars are sharp and the Orion nebula is visible in the frame. Based on this, you will need to make adjustments to ISO to get the exposure right. Do not worry much if you need to increase the ISO because we will be using the stacking technique that helps to reduce noise.
Noise Reduction: Turn off long exposure and high iso noise reductions as we will be reducing noise in the stacking process. Moreover, turning these features “ON” can cause a huge delay between shots based on the exposure time.
Should you turn noise reduction on or off for astrophotography? Read the discussion here!
Take a test shot to see what you get. Make sure the stars are pin-points with no trailing and that they are sharp. Make sure the Orion nebula is in the frame. A single exposure will not reveal many details, but you can still see the Orion nebula in there.
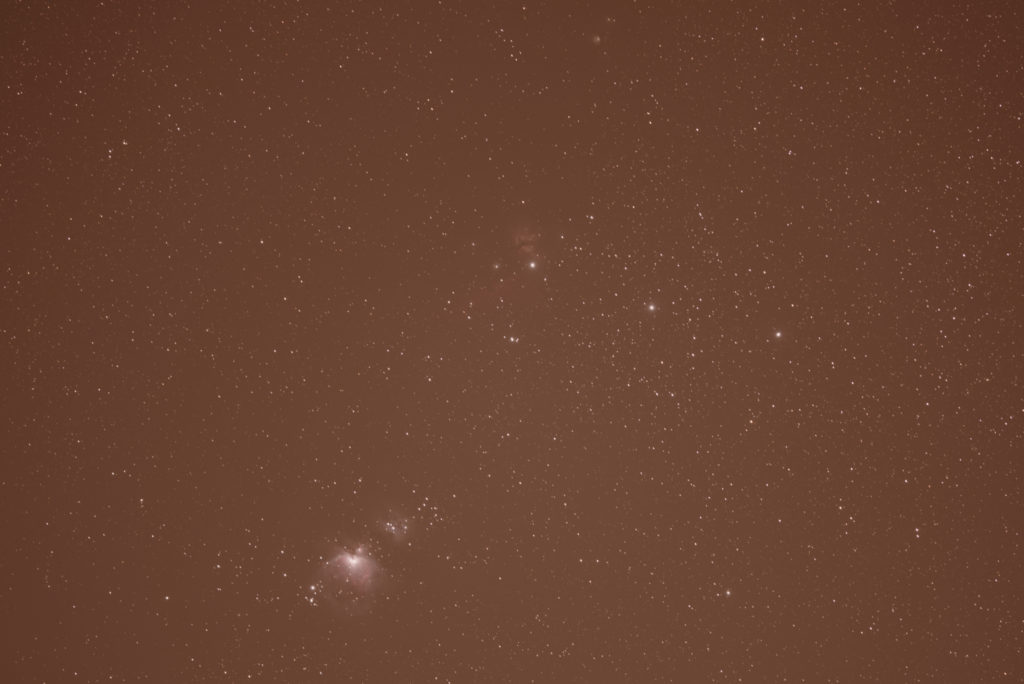
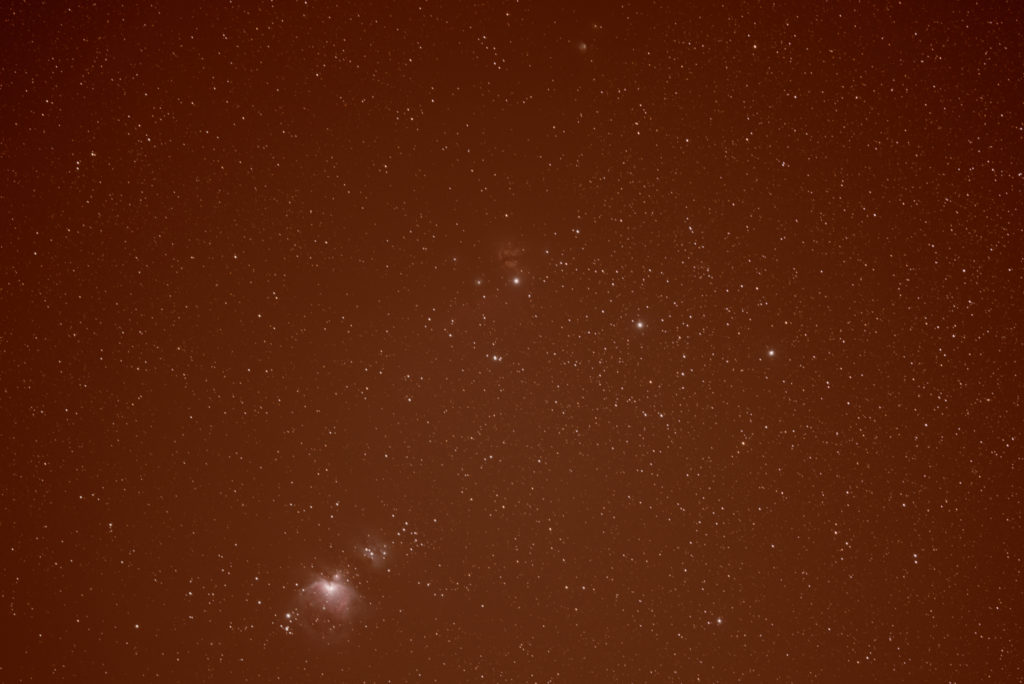
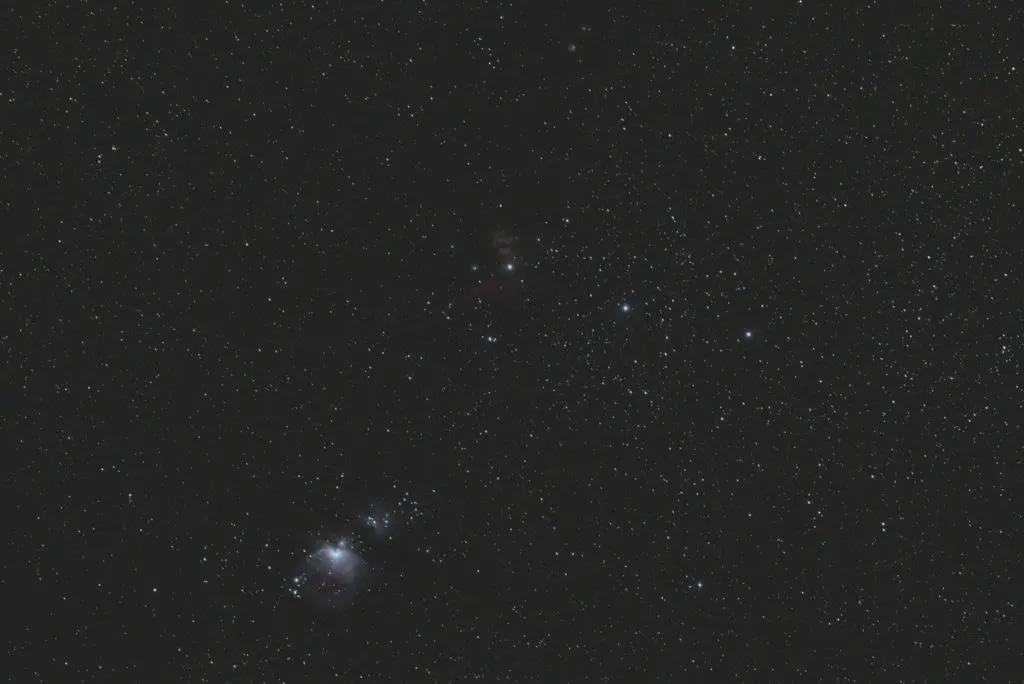
Here is a single exposure from my shoot – the image looks dull without much nebulosity details, but still reveals some colours. The image below was shot at 135mm at f/2.0, ISO 2500 and 3 seconds exposure. You can see the three stars of the Orion's belt and the bright spot is the Orion nebula.


Here is a another single exposure using a different lens at a different focal length. Shot at 440mm at f/6.0, ISO 10000 and 1.6 seconds exposure.


If there is too much light pollution in your area, then there will be an orange glow in the atmosphere that will be recorded in your image. Don't worry much as this can be corrected while post-processing.
The Shooting Process
Once you are on location, and the sky has become very dark (usually 60 to 90 minutes after sunset or before sunrise), you need to locate the Orion constellation. It is one of the easiest constellations to find in the night sky using live view especially with the 3 bright stars in Orion's belt and then the nearby bright stars like Rigel and Betelgeuse. You can easily use an app to locate it as well.
Follow the camera settings and set up above and once you get the above settings right, you need to plan the shooting process. There are a few different things you will need to do to get a good output.
Framing
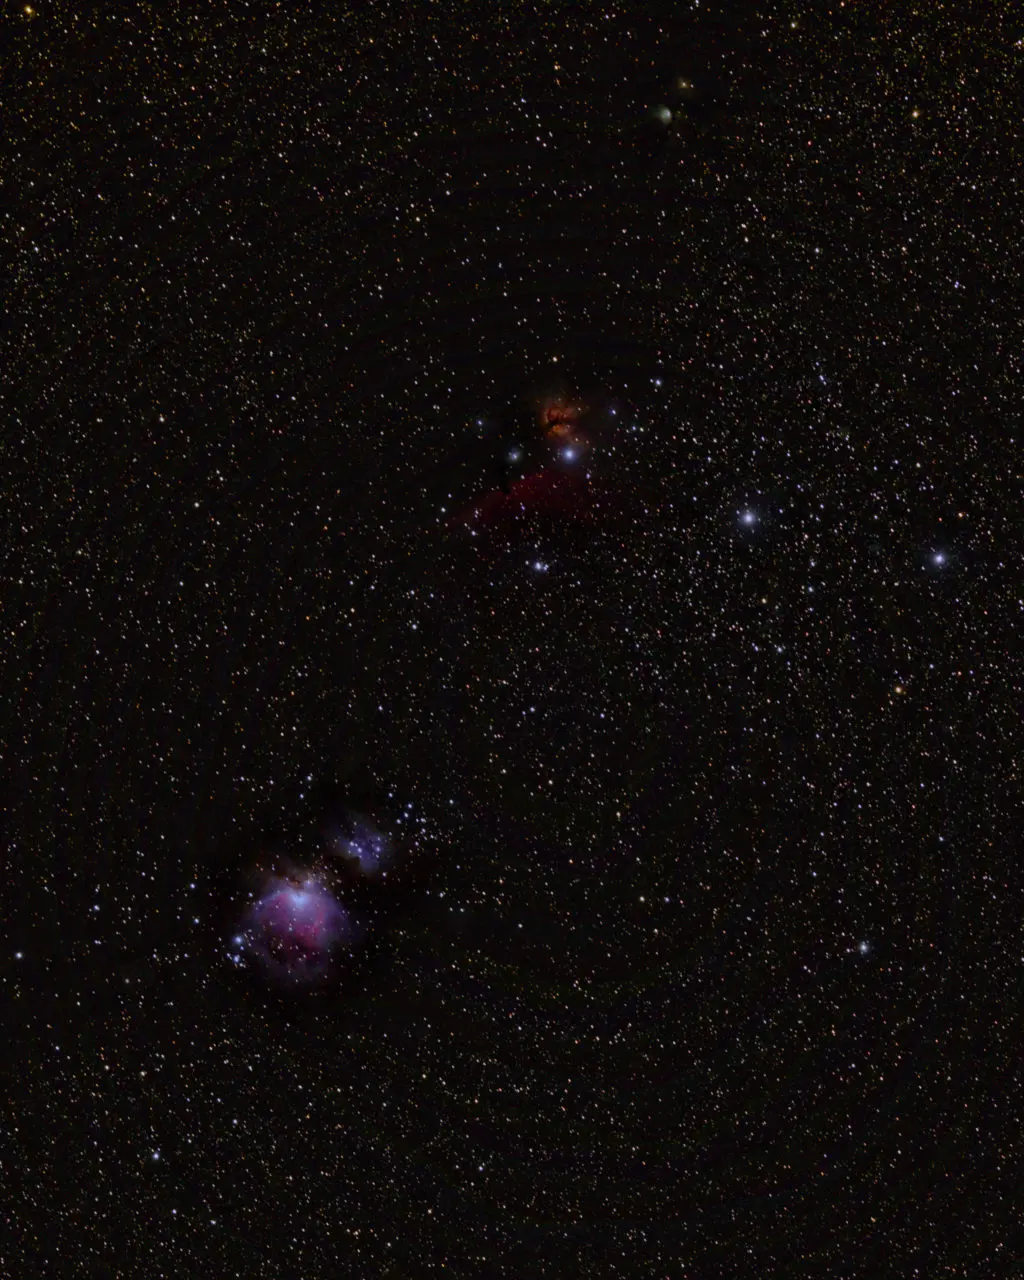
Frame the Orion Nebula in a way that you can take a few exposures before it moves across the frame and out of the frame. Do not frame it towards the edge. Centered or slightly off-centered is the best so you do not have to reframe often because the nebula was moving out of the frame too quickly. Also, to get a decent final frame of the Orion Nebula you will need to avoid framing the nebula towards the edge of the frame. Keeping the nebula centered in the frame will also allow you to gather information from the nearby objects like The Running Man Nebula, Horsehead Nebula, Flame Nebula, Barnard's Loop, etc.
Setting The Intervalometer
Before shooting, if you are using an intervalometer, you will need to make the adjustments there in advance.
- Set the delay time for the first shot (could be 2 to 10 seconds), then the exposure time for each shot (the shutter speed), interval between each shots (could be 2 to 3 seconds and this gives time for the camera to settle between shots if you are not using mirror lockup on a DSLR), then the number of shots you want to take (100 or 200 depending).
- You will want to reposition the camera when Orion moves towards the edge of the frame. So depending on the focal length you are using, set the number of shots to either 100 or 200 after which you have to reframe and shoot again.
- If you are using a basic cable release, you can just keep the shutter pressed and locked till you take a few shots, then reframe and shoot again.
- If you are using the camera's inbuilt intervalometer, then dial in the settings for the intervalometer in there.
Shooting Process
Shoot the Orion Nebula using one of the above methods. When Orion moves slightly towards the edge of the frame, reframe and bring it to the center and shoot again. Make sure the focus is perfect.
Capture as many images as possible – the more the better as it will help to gather all the details and colors emitted by the nebula as well as reduce noise in the final image. About 10 to 20 minutes of exposure at least will be helpful to get a good final image of the Orion Nebula. This is where the intervalometer comes in handy, set it up to continuously take a few shots while also keeping an eye to see that your subject has not moved towards the edge or out of the screen.
Note: Remember that there are a lot of factors that add to noise when it comes to deep sky astrophotography depending on the location and environment that you are shooting in.
- Noise from the subject
- Noise due to light pollution
- Noise due to atmospheric conditions
- Thermal noise
- Noise due to higher iso values
In order to reduce or eliminate these, you need to shoot calibration frames.
Calibration Frames
Calibration frames are useful to make corrections in the raw files, for example removing noise that we discussed above and also to remove dust specks, vignetting, etc. In this process where we photograph and post-process the Orion Nebula, we will be taking three types of calibration frames – the dark frames, the flat frames, and the bias frames.
The images you capture of the Orion Nebula are called the “light frames.” Besides the light frames, you will also need to capture the dark, flat, and bias frames. So, here is what you need to shoot!
- Light Frames: Light frames are the images that contain the information of the object that you have photographed – in our case, it is the Orion nebula that we have captured. These are the images that we will be stacking, so you need to follow the shooting process above and capture as many frames as possible so you are able to extract details from the final stacked image. In this particular time, I captured about 218 light frames before the Orion moved out of my field of view.
- Dark Frames: You need to shoot the dark frames straightaway when the ambient temperature is still the same as when you shot the light frames. A dark frame is a photo taken at the same exposure, iso, and temperature as a light frame, but with no light hitting the sensor. So have the lens cap on when performing this process. When iso is increased, more noise is generated. Added to this is the thermal noise that is generated when the camera sensor heats up. In order to overcome this situation and reduce noise in the final image, we need to shoot dark frames.
- Shoot dark frames with the same exposure settings that you used to shoot the light frames. The only difference is that you have the lens cap on!
- You need to take at least 25 to 30 frames, but if you have space, you can take between 40 to 50 frames.
- Flat Frames: A lot of people may get away by not shooting the flat frames but without flat frames, you will not get a true representation of the Orion Nebula. Flat frames are pictures of an evenly illuminated subject and help with removing the vignetting issues, they also help fix issues in brightness levels of the image and any dust if there is on your lens. Just put a white cloth over the front of the lens and secure it well so that no light leaks in.
- Take 25 to 50 frames of these just like you did for the dark frames.
- Bias Frames: You can take the bias frames at any time and the temperature of the camera does not matter for this set of frames, but I do it immediately because it takes just a minute.
- Set your camera on manual mode and set the shutter speed to the fastest – some cameras allow up to 1/4000s while some allow 1/8000s and this may vary with the camera. Set the iso to what you had for the light frames. You do not want any light hitting the sensor, so have the lens cap on when taking these frames.
- Bias frames help to subtract the pattern noise from the sensor when we pre-process the deep sky images.
- Take about 25 to 50 frames similar to the dark and flat frames.
Importance Of Calibration, Integration, And Post Processing
When you capture the image of the Orion Nebula, you will see very few details in a single exposure, on that raw file. Especially if you are shooting from an urban location, it can be a bit disappointing. When the data that you capture is pre and post-processed correctly, you can reveal the beautiful details in it and this is the reason why we shoot many shots.
Processing The Images
Once you have captured all the data required, back up your data and put them in relevant folders so it is easier for you when processing them. The best way to organize the files is to create four folders and put the captured data into them.
This is how I name the Folders. I create a main folder called “Orion Nebula Photos” and put in the subfolders inside that. You can add date or something in the main folder so you can easily look for them later when you search for images from a particular month or date.
- Orion Nebula Photos
- Light Frames
- Dark Frames
- Flat Frames
- Bias Frames

The next steps are,
- Pre-processing
- Calibration
- Registration
- Stacking
- Post Processing
Stacking
This is a very important process when it comes to deep sky astrophotography where you will need to stack multiple long exposures because deep sky objects are very faint. Moreover, a lot of the details are not quite clear because of sky glow and light pollution. This also helps to improve the signal-to-noise ratio and maximize the number of details in the final image.
In this article, we will be looking at how to use Deep Sky Stacker (DSS) to stack the images and this process is also called pre-processing. When pre-processing, we calibrate the light frames with the dark, flat, and bias frames, then we register the lights where we match frames based on star patterns so they are all aligned and easy to stack into one image. In this process of calibration and stacking, a lot of the noise gets rejected.
We will now look at how to use Deep Sky Stacker (DSS) to calibrate, register and stack the images. DSS is a free program for Windows and is a very efficient tool to stack deep sky images. Here is the process in detail:
- Open up DSS – I used the 64 bit version.

- On the left panel, choose “Open picture files” and navigate to the folder containing the light frames.


- Select all (Ctrl + A) and click “Open” This will import all the light frames into DSS.
- Click “Check all” in the left panel so all the light frames are selected.

- You can see that it shows the number of light frames on the top of the column.

- Now on the left panel click “dark files” and navigate to the folder containing the dark frames. Select all (Ctrl + A) and click “Open” This will import all the dark frames into DSS.


- On the left panel click “flat files” and navigate to the folder containing the flat frames. Select all (Ctrl + A) and click “Open” This will import all the flat frames into DSS.


- On the left panel click “offset/bias files” and navigate to the folder containing the bias frames. Select all (Ctrl + A) and click “Open” This will import all the bias frames into DSS.


- We now have all the light, dark, flat and bias frames in DSS. You can see how many of each you have imported on top of the column.

- On the left panel, now click “Register checked pictures“.

- This will open up the “Register Settings” window. This window has two tabs – Actions and Advanced.

Actions Tab:
Make sure it shows “darks, flats and offsets/bias checked“.

- Leave “Automatic detections of hot pixels” option checked.
- You can also choose to leave the option “Stack after registering” checked which will start the stacking process automatically after registering the images. Choose what percentage of the pictures you want to use for stacking.
Advanced Tab:
- In the advanced tab, the “Star detection threshold” is by default at 10%.

- Click “Compute the number of detected stars.” For 10% you can see that there are a lot of stars, about 1147 in this case.

Set “Star detection threshold” to about 20% and press “Compute the number of detected stars.” It has detected about 619 stars now.

Check how many stars are detected and adjust the threshold from there. The lower the threshold, the higher number of stars detected. Keep this value between 5% and 50% depending on how many stars you need to keep in the frame.
Note: Setting the threshold to a lower value will detect many hundreds of stars and this will lead to much more data to process for star registration leading to a greater chance of misregistration. Aim for about 100 stars and no more than about 400 stars or so.
In this case I am leaving the “Star detection threshold” at 35% and it detects about 351 stars.

Recommended Settings:
- Go on to Recommended settings to see what is recommended there.
- Anything that is set will be shown in green.
- Check to see if there is any warning or recommendation that needs to be taken care of. Anything that is a warning or needs taken care of will show in red. You can set the recommended settings for those by clicking on the recommended setting under the warnings.
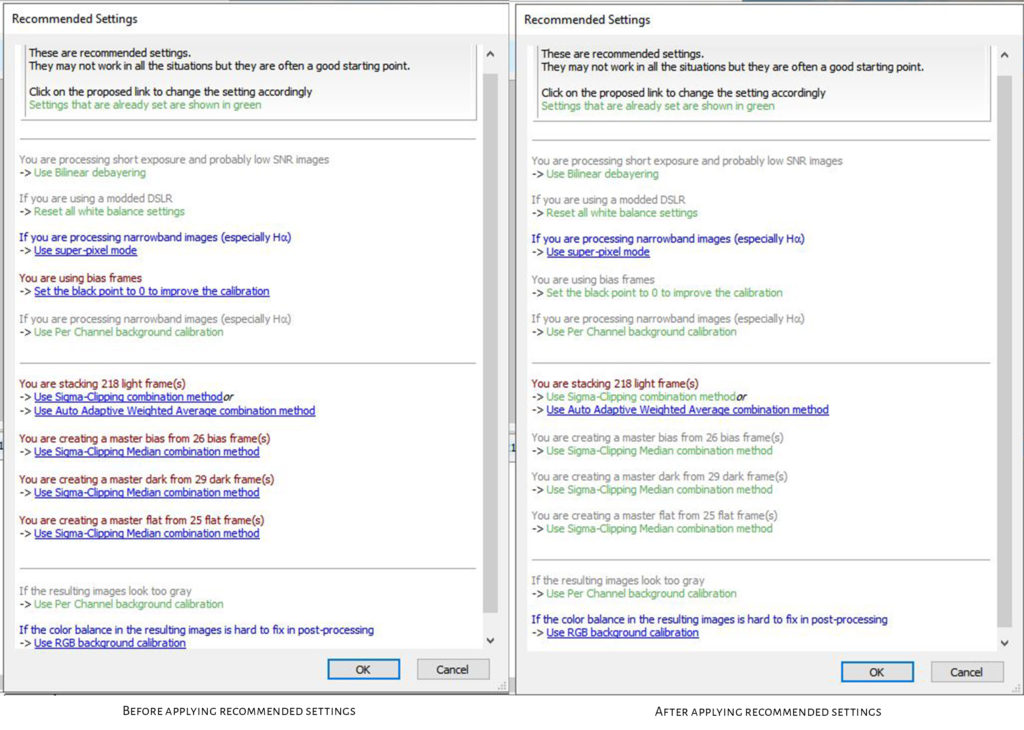
- If no warnings, click “OK” move on to stacking parameters.
Stacking Parameters:
- Dark Tab: You can hover over the different stacking modes to get an idea of what they do. If there was a recommendation by DSS in the “Recommended settings” and you set it, you can see that here.
- Similarly move on to the “Flat” tab, “Bias/Offset” tab, and “Intermediate Files” tab to see if everything has been set right. Select the output file to be saved as a “TIFF” file.
- If everything looks ok, then click “OK“.
- Now press “OK” again in the “Register Settings” window.
- This will now start creating the “Master calibration Frames” for dark, flat and bias frames, starting with bias frames, the darks, and then the flats.
- It then computes all the frames and registers the checked pictures together. The time taken depends on the number of frames you have shot and the number of processors used in the computer.
- See below the screenshots of some processes that happen.
Creating Master Offset Or Bias Frame


Creating Master Dark Frame


Creating Master Flat Frame


- Once the Master frames are created, the Light frames are registered where bias frames and dark frames are subtracted, flat frame is applied and hot pixels are detected.

- Once this process is done, you need to choose the best light frames for the final registration process and then stack all the files together.
The Stacking Process:
- Sort the images in the bottom panel by “Score.” Just click on the “Score” column and DSS will sort it for you.
- DSS gives each image a score. Sorting by score will bring the image with the highest score on top. The top score in this set here is 1623.53 and DSS has detected this frame to be the best in terms of best details.

- Right click on that image and choose “Use as reference frame.”

- Once done, you will see an asterisk next to that file.

- In the left panel, under “Registering and Stacking” click “Stack checked pictures.”

- This will bring up a window to show the “Stacking Steps.” It will show the total exposure time, any warnings, errors, etc. In this case, the total exposure time is only 10 mins and 54 seconds because there are only 218 frames with an exposure time of 3 seconds each.

- Click on “Stacking Parameters” and it will open the “Stacking Parameters” window.

- I choose the “Standard Mode” that gives a stacked result based on the reference light frame.
- Go through the various tabs to confirm all the settings are right.
- Click “OK“.
- Now choose “Recommended Settings” scroll through to see if there are any recommendations or warnings.
- Make sure you have a lot of disk space because the stacking process temporarily uses disk space based on the number of files you are stacking. The amount of space required will be shown in DSS during the Stacking process. In this case, we can see that it requires temporarily 32.6 Gb space.

- Click “OK” and DSS will start the stacking process.


- Once the stacking process is complete, you will see the final calibrated, aligned, and stacked image, but will not see much details in there. DSS will have applied some settings like contrast, color, etc. to this image for display purposes and not to the original file itself, which can be adjusted in there, but these adjustments are better when done in an advanced application like Photoshop.

- DSS will automatically save the file as “Autosave.tiff” in your “Light Frames” folder but it is important for you to save the file manually by clicking on “Save picture to file” in the left panel although some photographers prefer to work with the Autosave file. The file that we save manually is of better quality compared to the autosaved file.

- Choose a location to save the file. Make sure you give a file name, choose “TIFF Image (16 bit/ch)” as type and also choose the option “Embed adjustments in the saved image but do not apply them” and save the file.

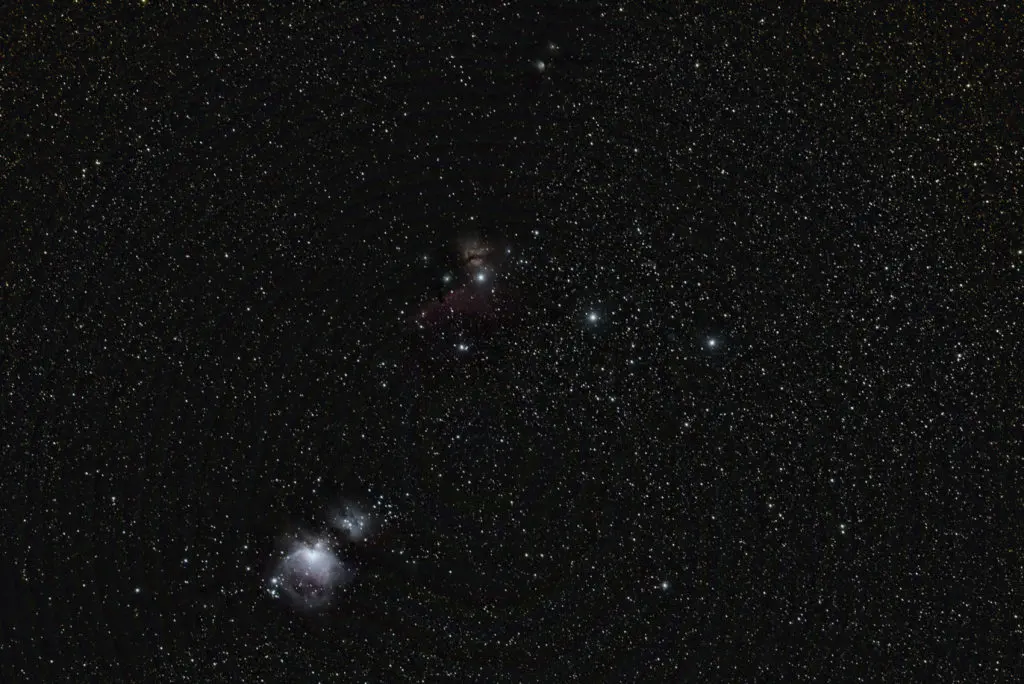
- This is the file we will be using when post-processing. Here is how the stacked and saved image looks.
Post Processing
After the stacking part is complete, we need to bring the file into a post processing application to bring out as much details as we can of the Orion Nebula. The application that we will be using here is Photoshop, but you can follow the same process in your post processing application as long as it has similar features like Photoshop that we use in this process.
- Go to File -> Open and Open the Saved TIFF file in Photoshop.

- Duplicate the background layer by pressing Ctrl + J (Windows) or Cmd + J (Mac).
- We are now going to stretch this image to bring out the details in it. So you can name this duplicate layer as “Stretch 1“.

- To stretch the image, go to Image -> Adjustments -> Levels or press Ctrl +L (Windows) or Cmd + L (Mac).

- In the “Levels” window, you can see that all the information are squeezed to the left hand side. We need to bring it further to the middle or “stretch” it.

- In order to stretch, drag the middle slider a bit to the left and press “OK”
- Now again open “Levels” window. You can see that the information has started to move towards the middle. Drag the middle slider a bit to the left and press “OK“.
- Make sure you do this in gradual steps and do not clip any details.


- During this process, the image will start to have a grey shade, but it is ok. You will start seeing details of the Orion Nebula and the nearby nebulae popping up.
- At this stage, open “Levels” window and now drag the left slider towards the right a bit making sure you do not clip any details.


- Repeat both the above processes in gradual steps (dragging middle and left sliders) and you will see the levels spread out, rather than being a spike as it was at the start.
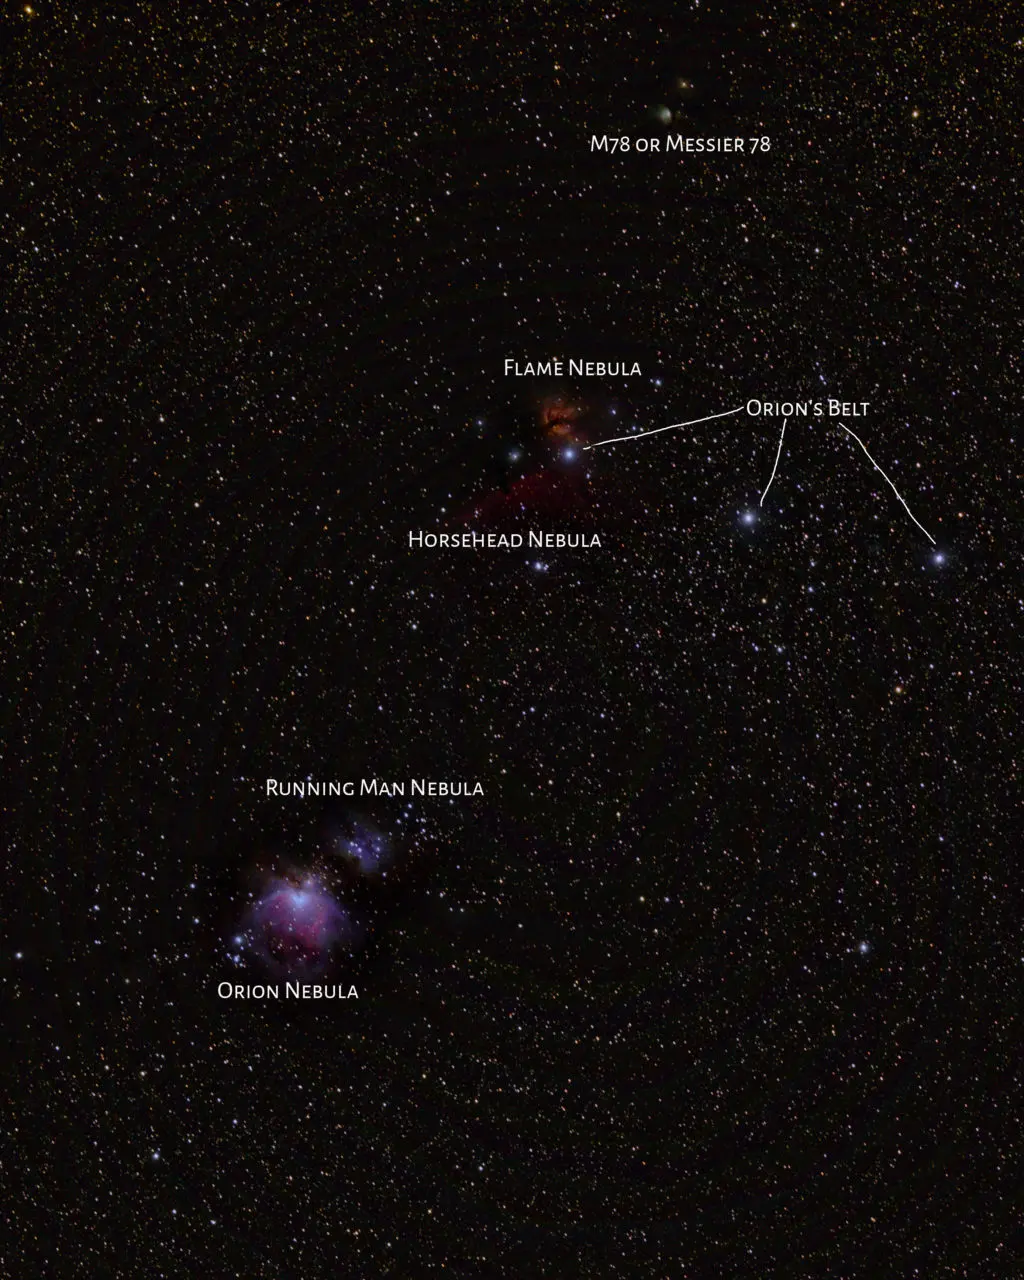
- When you look at the image now, you can see that the details are quite prominent. You can see the Orion Nebula, the Running Man Nebula, the Horsehead Nebula, the Flame Nebula, etc.
- If you used the Autosave file, chances are that your image is in 32 bit, change it into a 16-bit file. Go to Image -> Mode -> 16 Bits/Channel to convert it to 16 Bits. If you saved it manually, it should be 16 Bits.
- We now need to remove the color casts due to light pollution and other unwanted artifacts in the image. For that process, duplicate the layer “Stretch 1” by pressing “Ctrl + J” on Windows or “Cmd + J” on a Mac. Give a name of your choice. I have named it “Background Works“.

- Now select and copy that layer – Ctrl or Cmd + A and then Ctrl or Cmd + C. You then need to paste it on to a new document. So, press Ctrl or Cmd + N or got to File -> New. It will create a new document with the same size as the layer of the copied file. Give it a name and make sure it is 16 bit and press “Create“. I have named this layer as “Background.”


- Press Ctrl or Cmd + V and paste the copied file. It will go on as a new layer. You can now delete the “Background” layer.

- Use the dust and scratches filter to get rid of everything except the gradient in the background. It will then be subtracted from the stacked image so we can get rid of the light pollution that is causing the orange glow.
- To do this, go to Filter -> Noise -> Dust & Scratches.

- Adjust the radius to a slightly higher value so the details of anything less than that radius will get filtered. In this case I have set it to about 75. You will need to set a value relevant to your image.

- Any white areas that you see like the Orion nebula and the stars on Orion's belt will need to be removed using the spot healing brush (J) or use a clone stamp if required .

- Once all patches of light are removed, you will get a clean image like the one below. Save this file as “Background.psd.”

Remember, we have two documents in Photoshop now. One is the stacked file where we were doing the stretching work and the other is the Background.

- We are now going to remove the background from the stacked image. Whatever we have in the background file like the orange color cast due to light pollution, we will be removing those details from the original stacked image so we can see more details of the nebula itself. In order to do that:
- Go back to the original document that has the nebula details.
- Image -> Apply Image
- The “Apply Image” window opens.
- Under “Source” select “Background.psd“, and under “Blending” select “Subtract” and set an offset value till you get a slightly greyish shade. I have set it to 30 in this case. Make sure shadow details are not clipped.


- Rename the layer to indicate that background has been removed. You can now see that the awkward colour casts are gone and the image looks neat with natural colours.

- Duplicate the layer again by pressing Ctrl or Cmd + J and call this “Stretch 2.” Like we did stretching before, work with levels to bring more details in the nebulae by dragging both the middle and left sliders.


- You will now need to bring out the colors in the image. Let us duplicate the layer again for saturation adjustments. Name it “Saturation“.
- Go to Image -> Adjustments -> Hue/Saturation.

- Work on the colors looking at your image zoomed in a bit. You may want to increase saturation based on how your image looks, but overdoing it may cause the noise to show up in the image as well. I have in this case, set the saturation to 50 and slightly adjusted Hue as well.

- You can also use layer masks and specifically make saturation adjustments to specific areas of the image where the nebulae are. I took the image into Camera Raw and made some specific adjustments to colors in the HSL panel and slightly adjusted the White Balance as well.

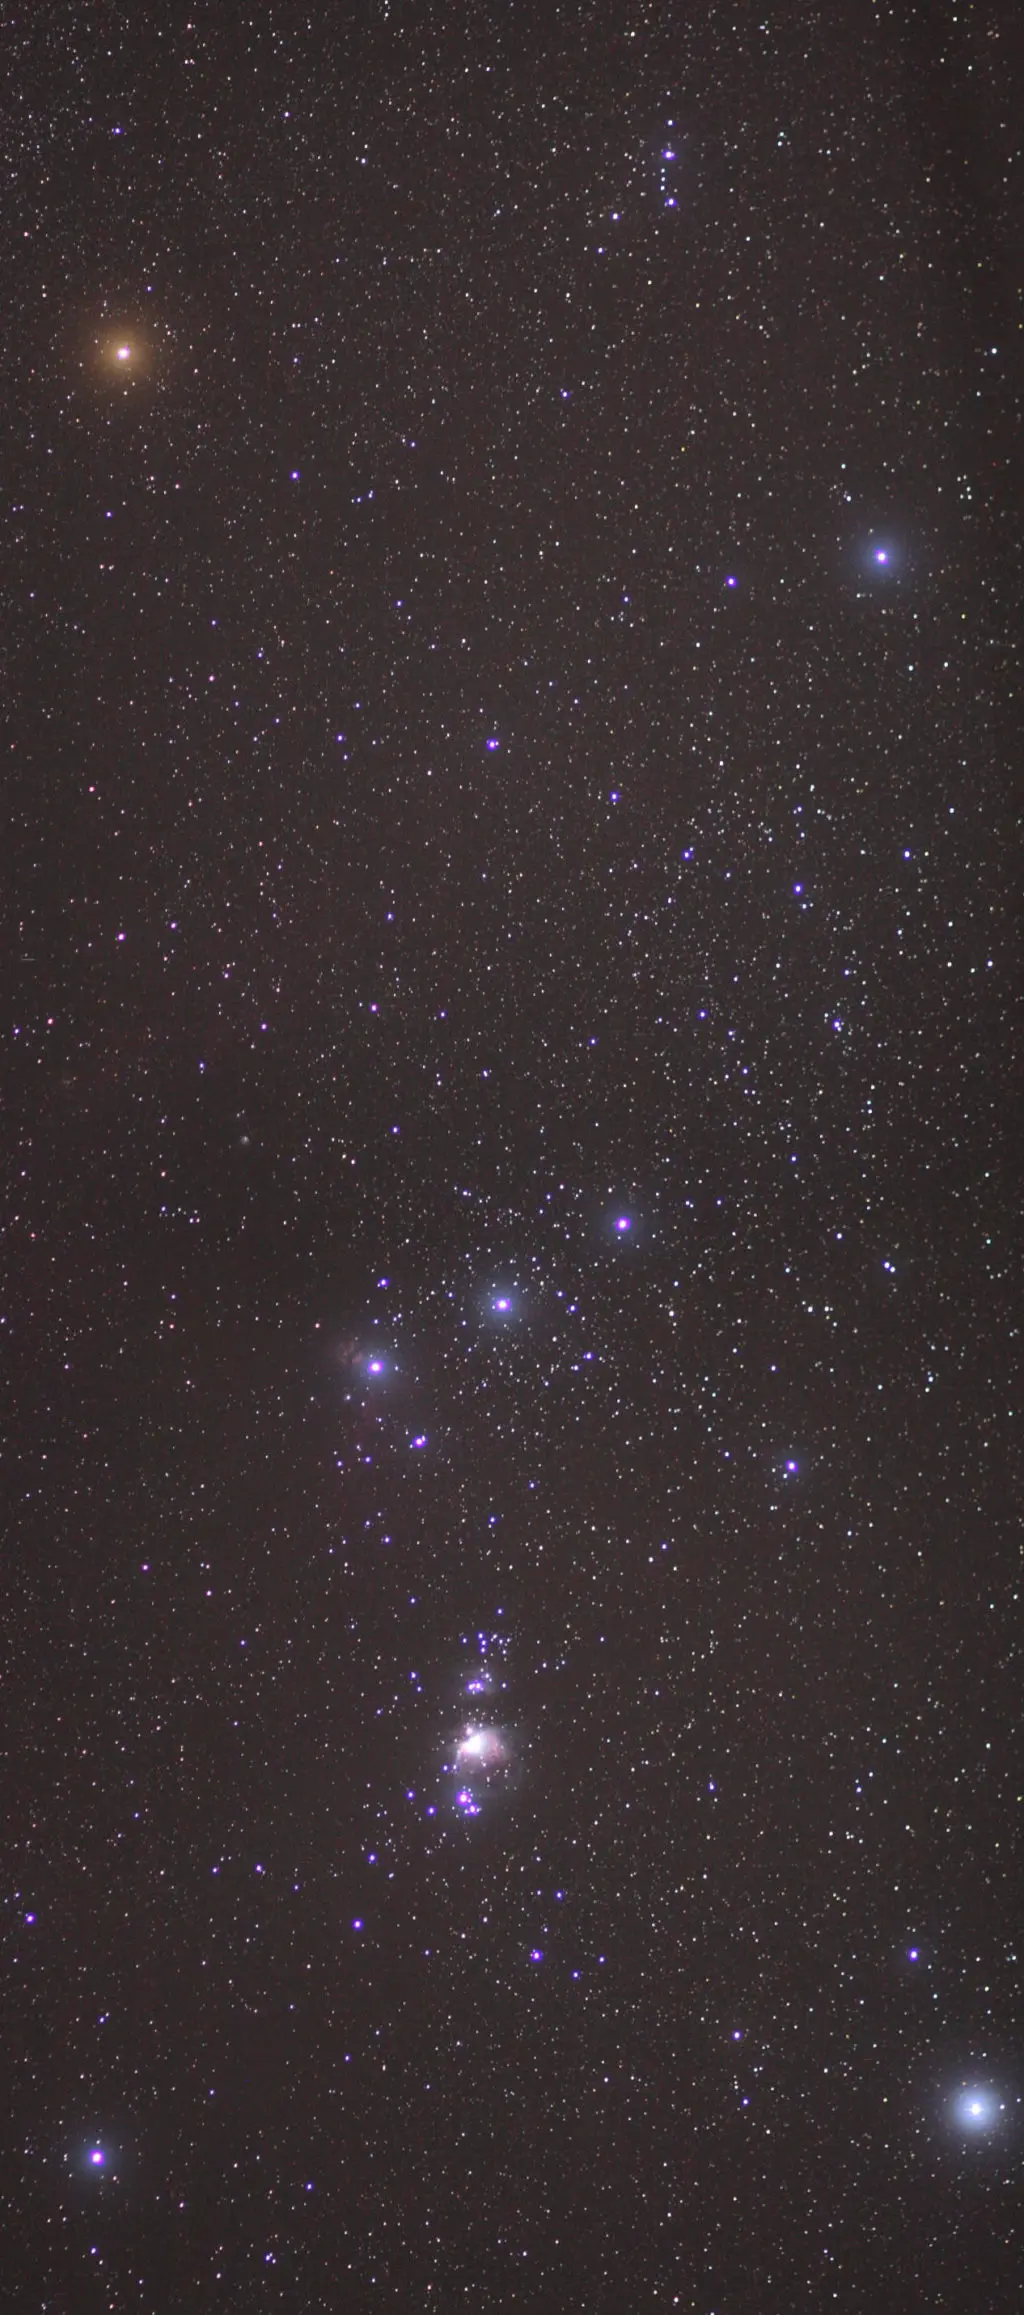
You can now crop your image to the desired format. As you can see, the Orion Nebula, the Running man nebula, the Horsehead nebula, and the Flame Nebula are quite clear with acceptable details. You can also faintly see the M78 which is a reflection nebula in the constellation of Orion.
If you image for more time, that is about 30 mins to an hour or even more, you will be able to collect more light from these deep-sky objects and nearby areas to create stunning Nebula images.
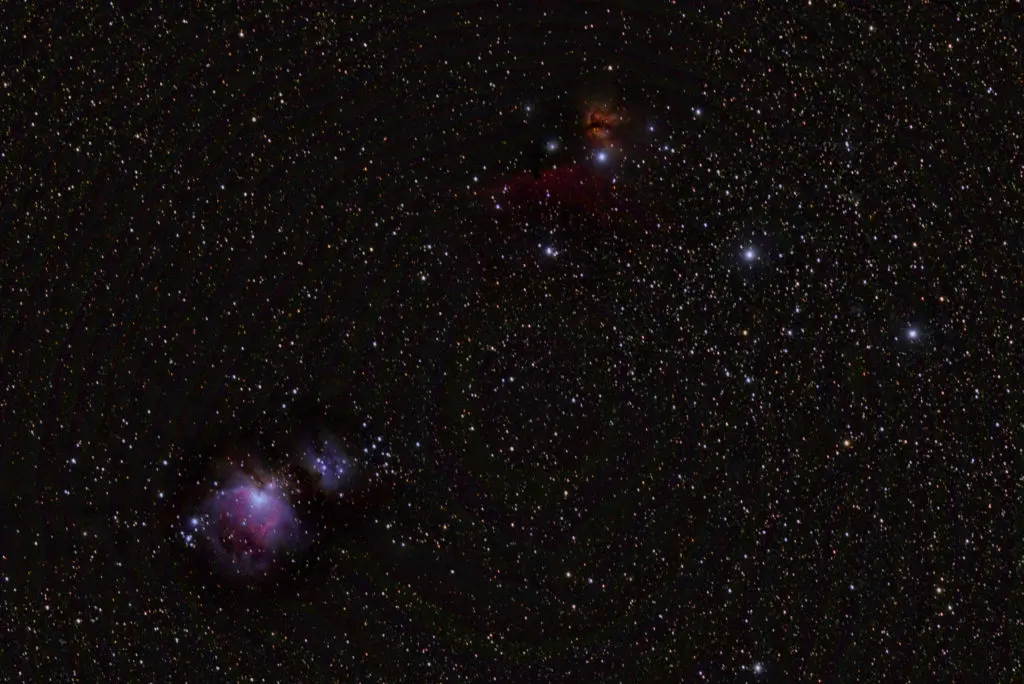

In the closely cropped image above, you can see some star trails. If you follow the NPF rule to calculate shutter speed, then you will be able to avoid these trails.
Many deep space objects like nebulae, galaxies, clusters, etc., can be photographed with the equipment that you have in hand. It is fun and exciting to see and photograph these objects that are hundreds and thousands of light years away from us.
Conclusion
By learning to capture deep-sky objects and processing them, your night sky images will start to improve. You need to make use of the right equipment and filters if you want to step up the game in astrophotography. Why not try them now in the winter season when the nights are longer and the skies are clearer.
Further Resources:
- Astrophotography for Beginners: Start Your Journey Here
- Star Photography: Dos And Don’ts When Photographing The Stars
- How To Focus In Low Light For Impressive Blue Hour, Night, And Astrophotography
- Should You Turn Noise Reduction On Or Off For Astrophotography?
- Behind the shot: Great Orion Nebula
- Deep Sky With Your DSLR


5 Comments
Thankyou so much for posting this wealth of info. Ive ways been interested in astropjotography but overwhelmed by my failures and the processing.
Thank you Brent. Hope you find this information helpful and try astrophotography again. It is not so difficult as it seems. All the best! 🙂
Excellent article with complete workflow that I have been searching for! I got a few photographs of Orion nebula in city light conditions, but they looked awful. Now that you explained how to take various kinds of frames, stack them and do post processing, I hope I should be able to that now. Thank you so much for the detailed explanation.
I have Tamron 600mm lens , 35mm , 50mm and 24to105 mm lens which lens is better?
Hi Thammu, you can use a focal length of 50 mm to capture the entire constellation, 105mm to capture the orion nebula along with orion’s belt and about 300 or 400mm to get closeup shots of the orion nebula. As the focal length increases, your exposure times will get very short, which means you will have to increase the iso quite a bit to get the exposure right and capture some details, unless you will be using a tracking mount.