There are several natural phenomena that occur naturally for us to witness and photograph. One such phenomenon is the “Alpenglow” that most of us would be familiar with. Even if you are not familiar with this term, here we will take a look at what Alpenglow is, what causes it, of course how to photograph the Alpenglow as well as some stunning images of Alpenglow for inspiration – everything you need to get out and photograph them.
In this article, we are not going to go into too much detail nor the arguments around the cause of Alpenglow, but we have explained the discrepancies out there on what causes it. Either way, as photographers, when nature presents this natural phenomenon, we shouldn't miss it. Or maybe you could just chase Alpenglow and photograph them from various locations – what a fun project.
So, What Is Alpenglow?
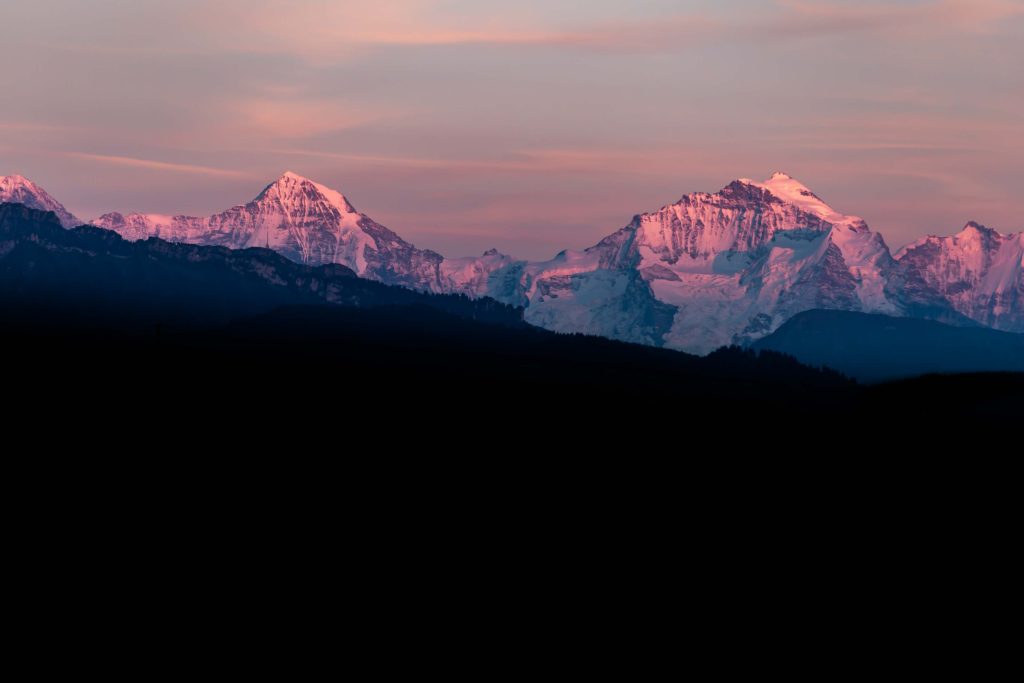
Alpenglow is an optical phenomenon that causes a pinkish-red horizontal glowing band opposite the horizon of the rising or setting sun. It makes the summit of the mountains, clouds and the sky glow in reddish or rosy hues and this phenomenon occurs just before sunrise or after sunset. You can witness these especially on taller mountains and is more prominent if the mountains are snow-covered.
Usually, just after the sun has set if you look towards the east, or just before sunrise if you look towards the west, you can see the horizon, clouds, mountain summits and other tall structures, have a soft purplish/pinkish glow provided conditions are favourable in the atmosphere. Sometimes even the low lands and buildings glow at this time and this phenomenon occurs for quite a while before sunrise or after sunset.
What Causes Alpenglow?
There are discrepancies about what causes Alpenglow – direct or indirect sunlight?
Most of the argument is that Alpenglow is caused by indirect sunlight, but depending on altitude, for one observer the sun may have set whereas for another observer at a higher altitude, the sun may not have set.
Let us look into this in detail below! I have created graphics to illustrate the two cases below.
Note: These are just illustrations to help understand the phenomenon easily and in no way represent any realistic scale or distances.
Case 1: Direct Sunlight
Consider an observer who is standing at ground level with no obstructions to the horizon where the sun is setting and from this observer's point of view, the sun has set and is below the horizon, but they can still see sunlight on the mountain peaks.
If another observer was standing on top of a tall mountain at the same time as the observer at sea level, in the same location, during the time the sun set below the horizon for the observer on the ground, the observer on the mountain would still be able to see the sun above the horizon. Here is a rough illustration of this!

So, in this case, the light that makes the peaks glow red or pink is direct light from the sun (this could be nearby or distant peaks). Since this light travels a huge distance through the earth's atmosphere, the shorter wavelengths like blue, are scattered and only the longer wavelengths at the red end of the spectrum reach the earth. It is this red light that gives a pinkish glow to the mountains and the glow caused due to direct sunlight will cast well-defined shadows. This occurs during the golden hour.
Just to make the above fact clear, when we are at sea level, the sun rises above or sets below the horizon at a different time compared to when you are at a higher altitude at the same time in the same location – for example on top of a tall mountain or a very tall building or on an aeroplane.
Note: Sunrise is a minute earlier or sunset is a minute later for every 1.5 km (4921.3 feet) of height above sea level.
Case 2: Indirect Sunlight
In case of glow caused by indirect sunlight, the sun has set for both the observers – the one on the ground at sea level and the one on top of the mountain. You may still be able to see a glow on the mountain peaks provided the conditions are favourable at that time. You will also be able to see stunning colours close to the horizon. These are seen in the west before sunrise or in the east after sunset.
How does this happen or what causes this glow?
The sunlight, in this case, is no longer directly falling on the mountain peaks but is reflected off the particles (for example water particles in the air, ice crystals and other atmospheric particles) in the earth's atmosphere.

The glow, in this case, is very subtle but stunningly beautiful. The colours can range from deep pink to purple and the shadows are very few and if any, they are subtle shadows unlike the well-defined ones when the light hits directly.
Since the sunlight in this case as well travels through large areas of the atmosphere, the light is red or reddish-pink.
You may have witnessed that even a long time after the sun has set (or well early before sunrise), you will be able to see brilliant red, pink, purple hues in the sky for quite a long time that is, during the blue hour or twilight. These colours are caused due to Alpenglow. Even in landscapes or cityscapes, if you look closely or make long exposure images, you can see a pinkish-purple glow during this time.
So, the question is often asked whether it is the direct or indirect sunlight that causes Alpenglow, here is what I personally think.
- When it comes to direct light illuminating the mountain peaks, it is perceived as Alpenglow by some people, because when the sun has set for someone at sea level, the sun is still above the horizon for someone at a very high altitude. In this case, an observer witnessing the glow from sea level sees the direct sunlight hitting the tallest peaks and perceives it as Alpenglow because for them the sun has set.
- After sunset (that is during twilight) you can still see mountains glowing with a pinkish-purple tint and this glow is due to indirect sunlight. This can be seen before sunrise and after sunset.
There are discrepancies over what causes Alpenglow and I think it is caused due to indirect sunlight.
What do you think causes Alpenglow? Please leave your thoughts in the comments section below!
When Is The Best Time To View Alpenglow?
Season:
The best season for Alpenglow is usually the summer season when you do not have much cloud cover and the atmospheric particles are quite stable to help with the reflection of sunlight back to the mountains. But, Alpenglow in winter can be the most brilliant when the mountains are snowcapped!
This does not mean that other seasons are not recommended. As long as the conditions are favourable, like enough clouds and atmospheric particles, Alpenglow can be witnessed at all seasons.
Location:
Mountains are the best subjects to reflect off this glow and for stunning photography. So if you live close to a mountain or can drive up there really early or stay late after sunset, by all means, do it. Tall mountains across the world are the best locations for witnessing and photographing the Alpenglow.
Make sure the landscape you are going to photograph is facing the sunrise or sunset because Alpenglow is caused when sunlight is reflected off atmospheric particles to the opposite side of the sunrise or sunset.
Time of the Day:
The best time of the day is during the blue hour, before sunrise and after sunset. You can see the glow quite early before sunrise where you can capture the deep blues turning to purplish pink, red and then orange and vice versa in the evening quite late after sunset.
As mentioned earlier, Alpenglow is not light from sunrise or sunset, but the first light (before sunrise) or last light (after sunset) of the sun that gets reflected off the particles in the atmosphere. So, be there in the location well ahead of sunrise – at least an hour and a half before sunrise and in the evening stay back late after sunset if possible.
If you ask me, I would always recommend early in the morning as everything is quiet, calm, clean and magical in the morning. Moreover, mornings can yield beautiful skies and rolling fog to add to the landscape you will be photographing. You can just soak in the experience, get your gear ready and photograph the beauty that unfolds in front of you.
How To Photograph Alpenglow?
There is no special technique or settings required to photograph the Alpenglow. You need to use the gear and settings that you would normally use when photographing the blue hour or when photographing landscapes during the golden hour. In scenarios when the glow is a bit intense at a particular point, you will need to use the correct metering mode to get the exposure right.
We will still quickly run through the basic gear and camera settings required to photograph the Alpenglow.
1. Gear:
- You need a camera that will let you shoot in manual mode.
- Have at least 2 lenses in hand – a wide-angle (somewhere between 14 to 24mm) and a telephoto lens (between 200 to 400mm) so you get to photograph a wider vista of the magical landscape and closer details of the peaks glowing. If you have 2 cameras, have the 2 lenses on 2 cameras so you can quickly get all the shots you need or, change lenses quickly to get the shot as you have very little time when the Alpenglow puts on its show!
- You will need a lens with wider apertures (preferably f/2.8) because Alpenglow itself is faint and you want more light to get into the camera without increasing the ISO too much especially if you are handholding.
- You will need a sturdy tripod that can hold your camera/lens combination and withstand breezy or windy conditions if any. Using a tripod will let you shoot at lower ISO values with longer exposure times/slower shutter speeds so you can let more light in.
- Use a cable release or the timer delay to avoid blur due to camera shake.

2. Camera Settings:
- Mount your camera on the tripod
- Set your camera on manual mode as this gives you more control over the settings.
- Use spot metering if the light at a point is very intense compared to the other areas, so you do not blow out the details in the illuminated area.
- Keep an eye on your histogram for correct exposure so you get the shadow and highlight details perfect.
- Set your white balance to the desired values. Usually, 4000-5000K should work, but if you are doubtful, shoot raw using Auto White Balance (AWB) so you can later make adjustments while post-processing.
- Set your ISO to the lowest possible unless you are shooting handheld and are tied in with a particular shutter speed.
- In order to get crisp landscape shots, it is better to shoot at narrow aperture values so you get sharp details of the entire scene. Find your lens' sweet spot or shoot between f/11 and f/16 so you get all the elements in the frame in focus.
- Calculate the shutter speed based on the above ISO and aperture values. Usually, for Alpenglow, the shutter speed will be slower for the above settings as the light will be very faint.
- Use the mirror lockup feature if you are using a DSLR to avoid camera shake due to mirror movements.
- Use a cable release to release the shutter.
- If you are shooting handheld for some reason, by all means, open up the aperture and increase the ISO, so you get the required shot.
- Use hyperfocal distance or focus one third into the scene for wider landscape shots so you get all the elements in the frame in perfect focus.

3. Post Processing:
Here are some basic things to look out for when post-processing the images that you captured.
- Make sure that you shoot raw all the time so you have a detailed file to work with, to bring out all the brilliant colours and details in the image.
- Crop your image to the desired composition.
- If you did not get the white balance right in camera, make sure you adjust it when post-processing.
- Make basic adjustments in your image to get your exposure, contrast, highlights, shadows details right. If using Lightroom, use the “Dehaze” tool to get rid of any haziness in the image and add slight clarity if required. Do not go high on both dehaze and clarity sliders.
- Use the vibrance slider to add pop to less vibrant colours if necessary. As it is, images of Alpenglow are usually rich in colours, so you will not have to add too much pop while post-processing.
- Use the HSL panel to bring out any specific colours in the scene if you do not see the colours that you witnessed.
- Play with the tone curve to give some pop and contrast to the image.
- If you need to apply Lens profile corrections apply it before cropping.
- Used a gradient filter or brush tool and add or fine-tune adjustments in the sky if there are not enough details/colours.
4. Some Important Tips:
- Be prepared during the journey as you will be travelling through dark zones and sometimes hiking through trails in the dark. Take headlamps, flashlights and anything else needed to protect and safeguard yourself. Take someone with you if possible or inform someone about your whereabouts.
- Early mornings and late evenings in the mountains can be quite cold. So make sure you wear warm clothing and take warm drinks with you.
- Make use of apps like Photopills or The Photographer's Ephemeris to plan and be prepared for the location you will be shooting.
- This beautiful phenomenon does not last for a long time. So be prepared with the camera settings and make use of the few minutes (usually between 5 to 10 minutes and sometimes longer or shorter) when you can see the glow. This time may vary between locations, atmospheric conditions and seasons.
- Look for areas with reflections or other features if possible in the scene so you can create images with brilliant compositions.
- Try long exposure images if possible, especially if there are rolling fog or water features in the frame.
- Try a panorama of the scene if it is too wide or if you want a very wide frame. Try shooting the panorama in portrait orientation, so you get a lot of the scene in the frame.
- Try various compositions, orientations and focal lengths to get all the shots that you possibly can.
- If the weather is too cold, make sure you protect the gear with something that will avoid lens fogging up.
- Most importantly, Alpenglow is a breathtaking phenomenon to watch. So do not get lost in the camera and its settings, but also make sure you take time to experience it with your own eyes.
- Visit the location on different days and different seasons because each day will bring a different but beautiful surprise for you!
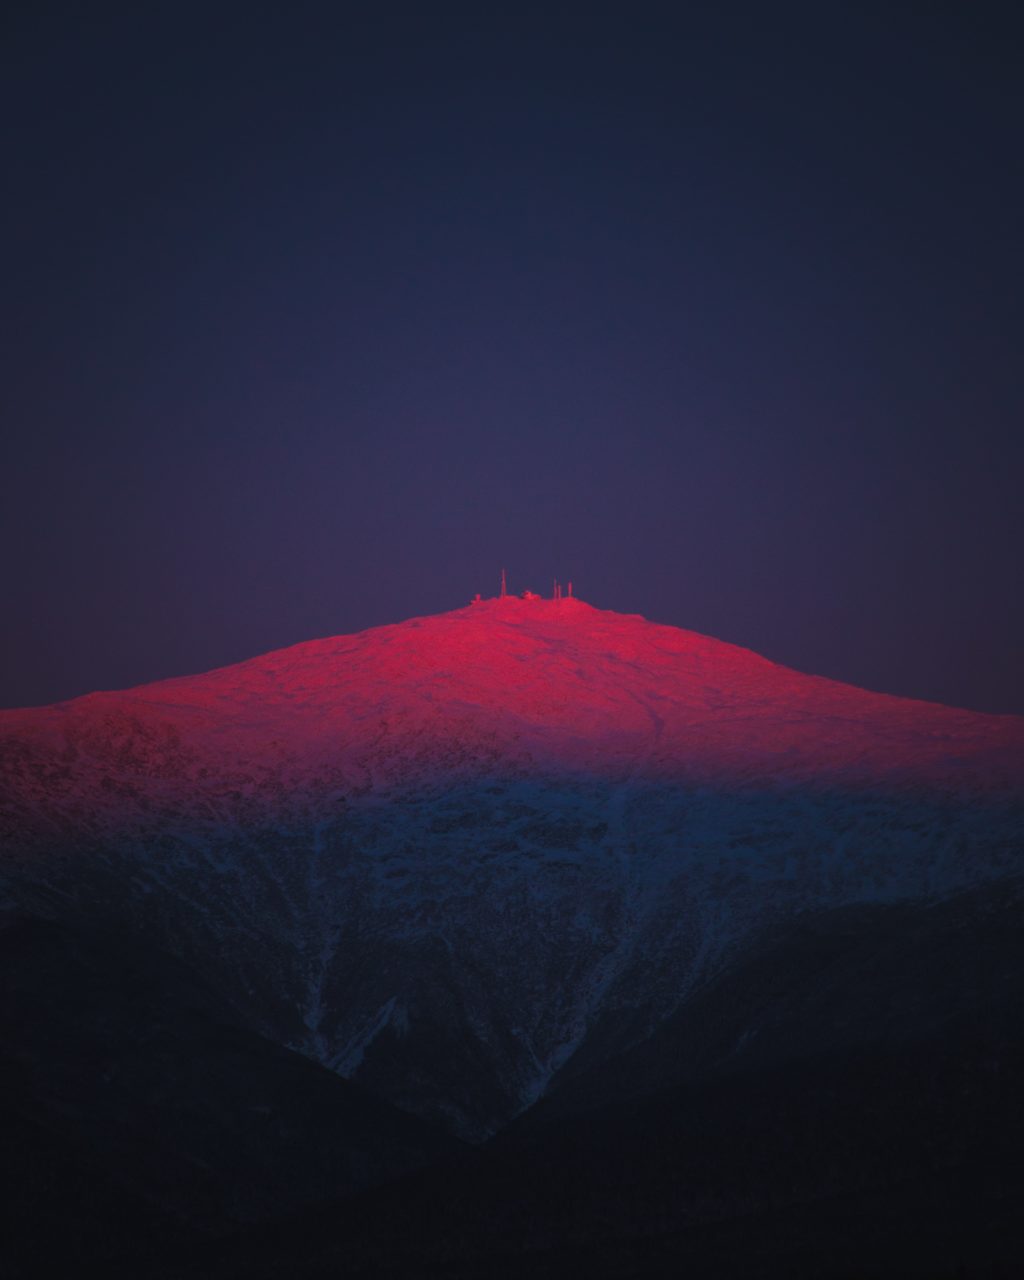
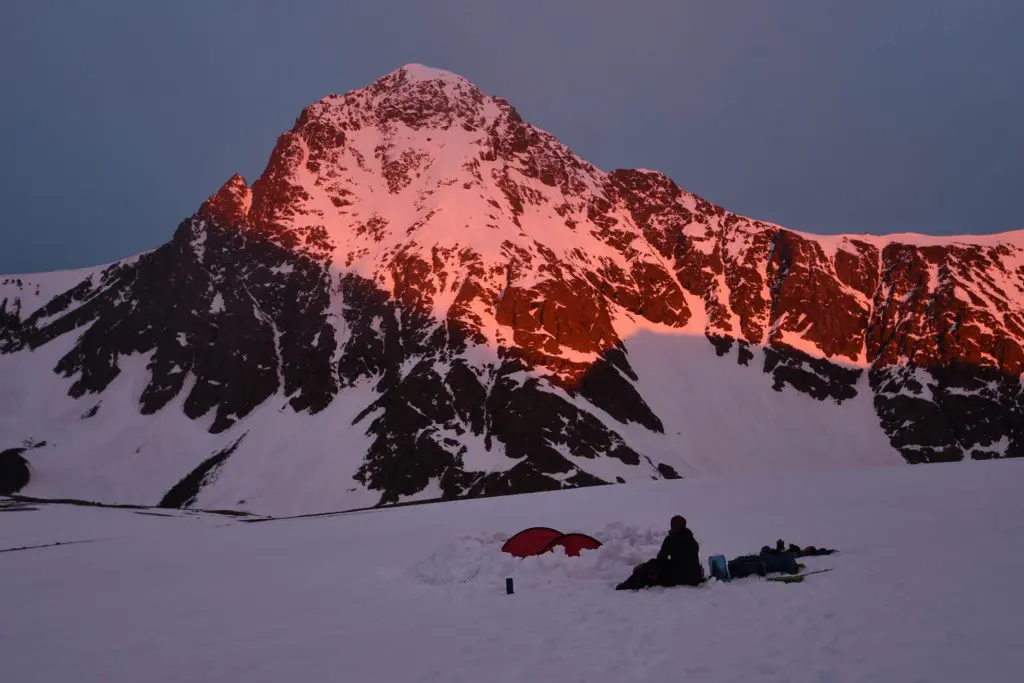
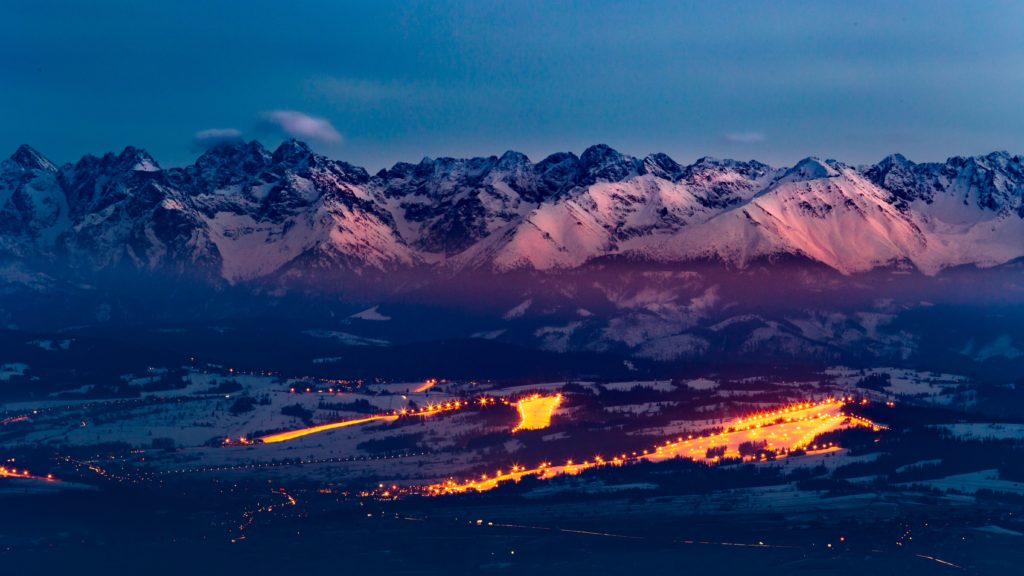
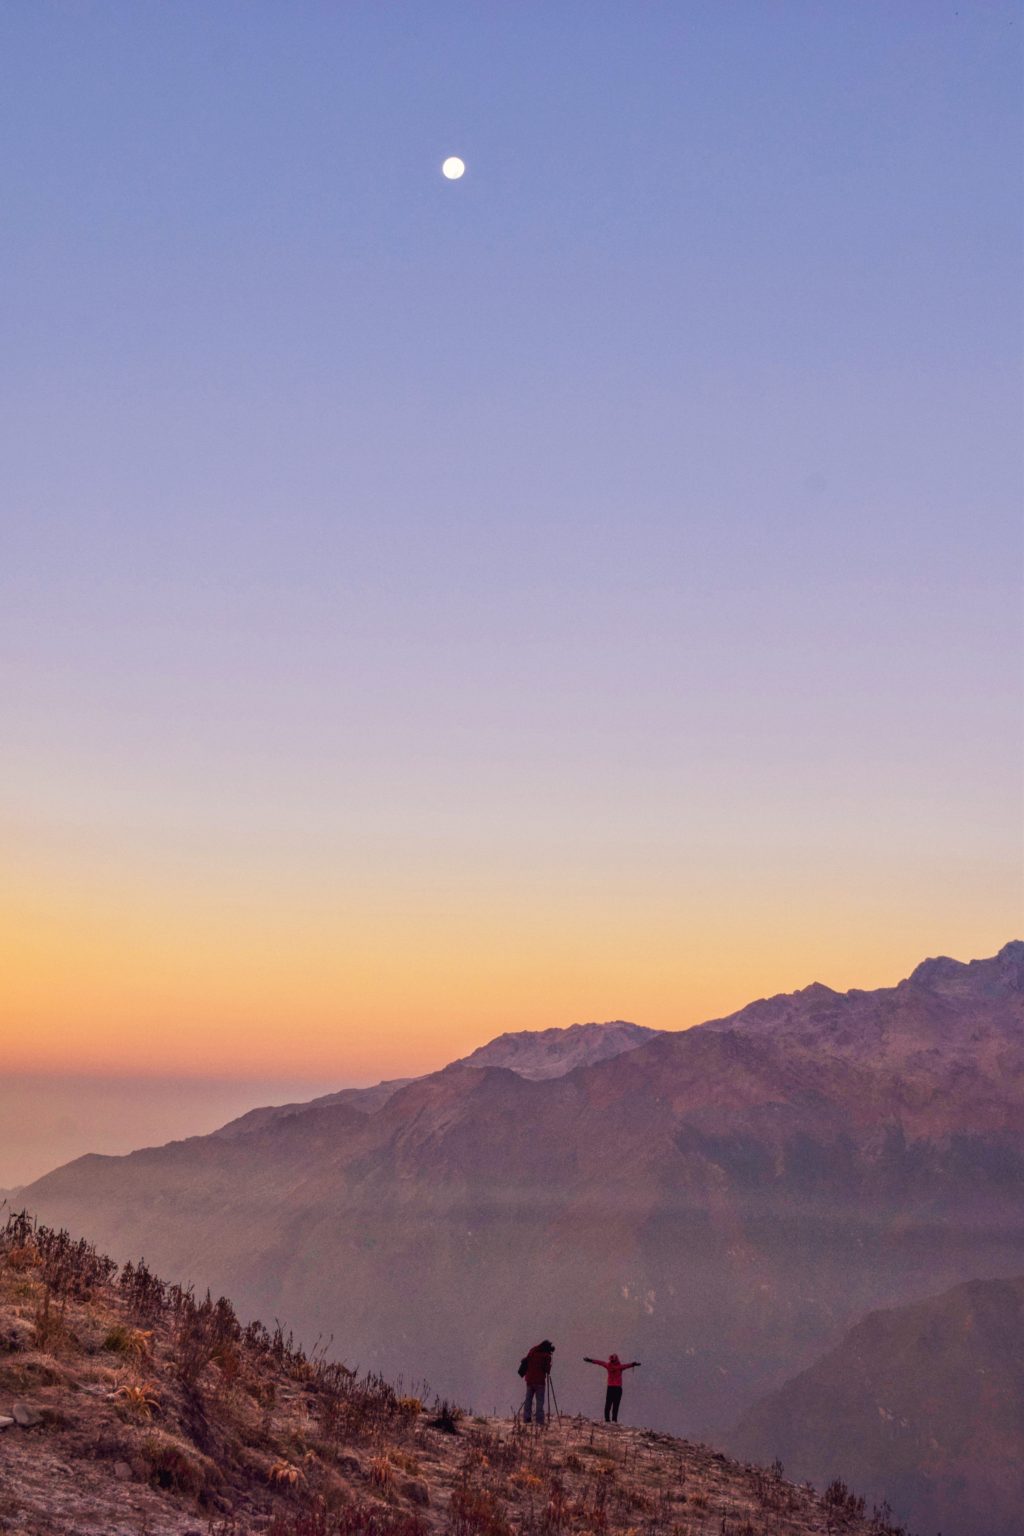
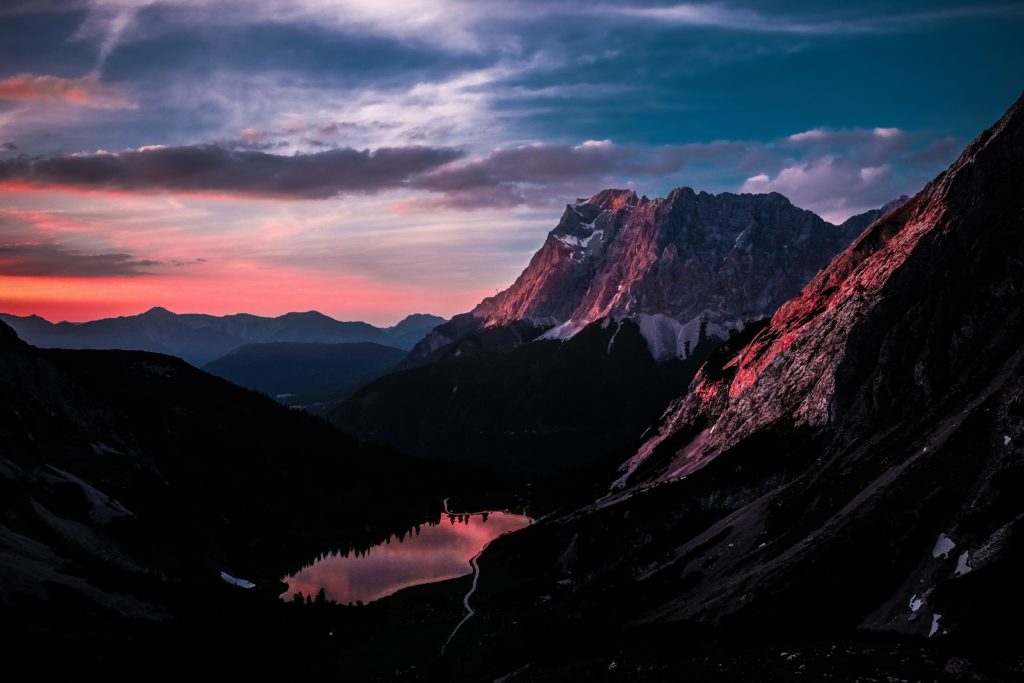
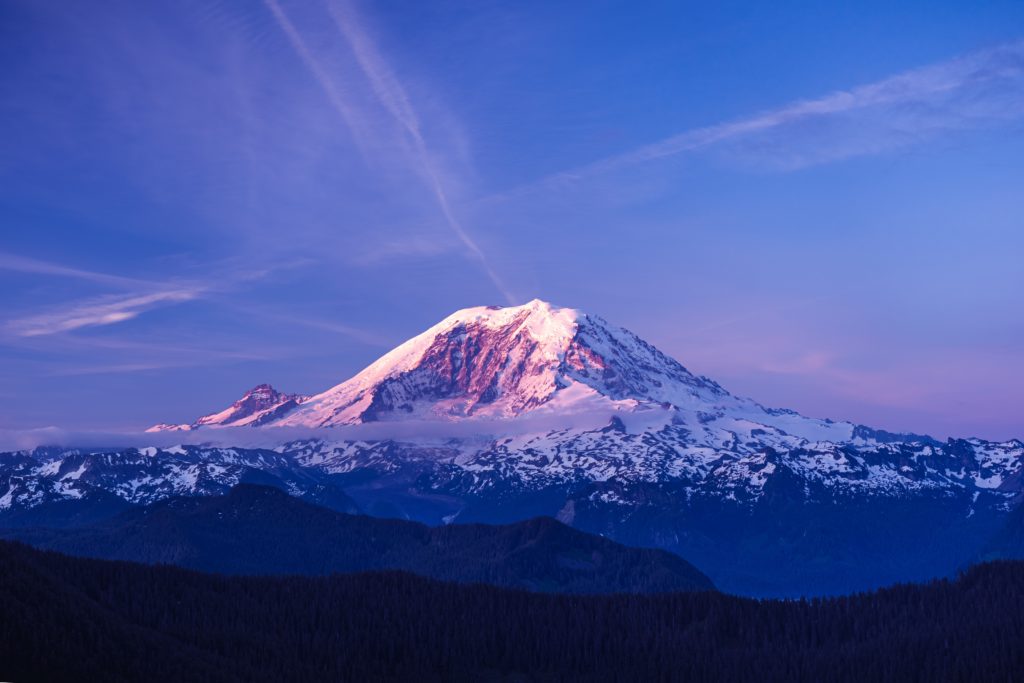
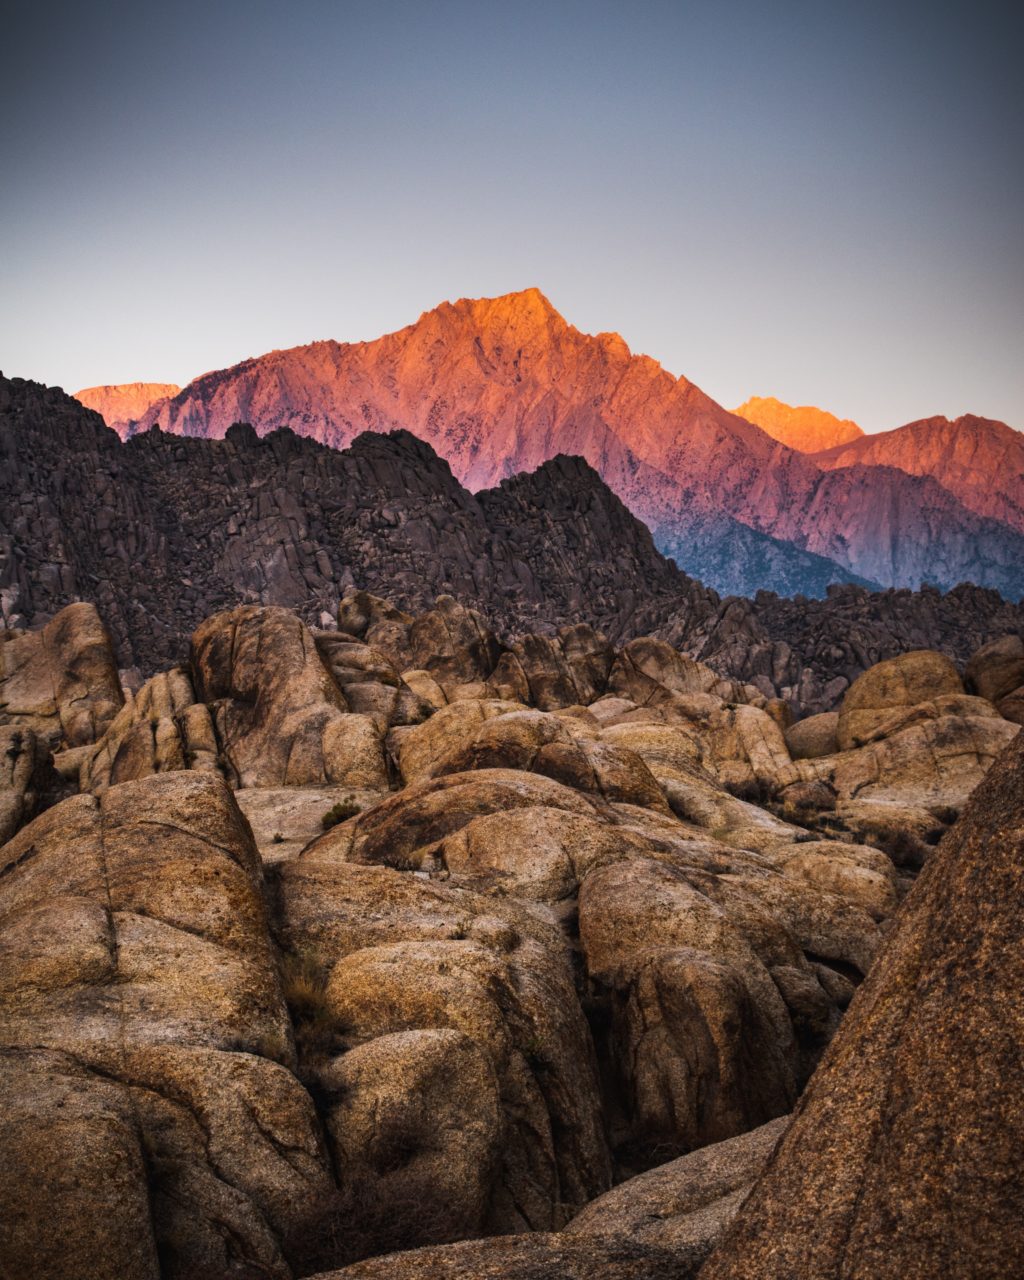
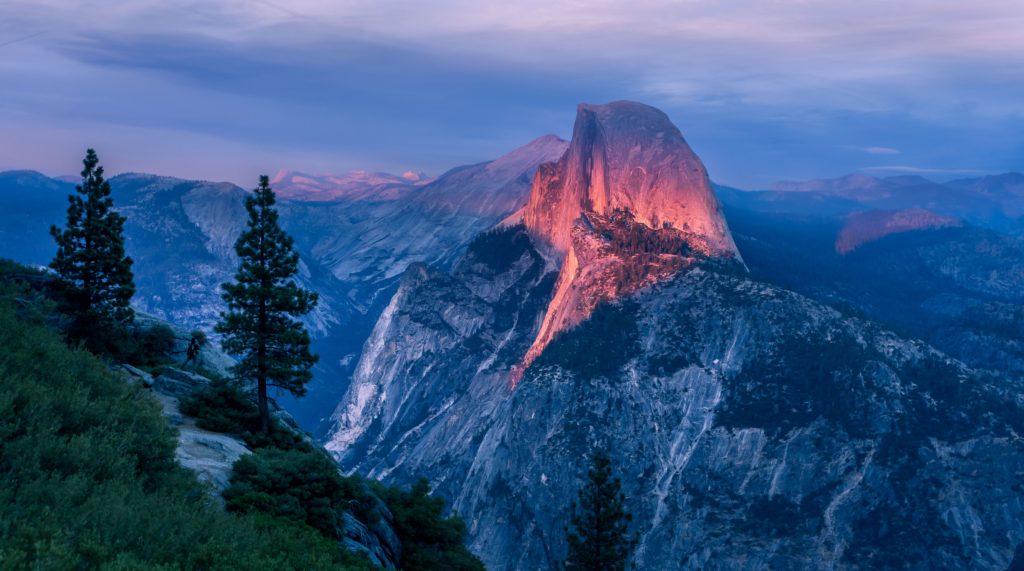
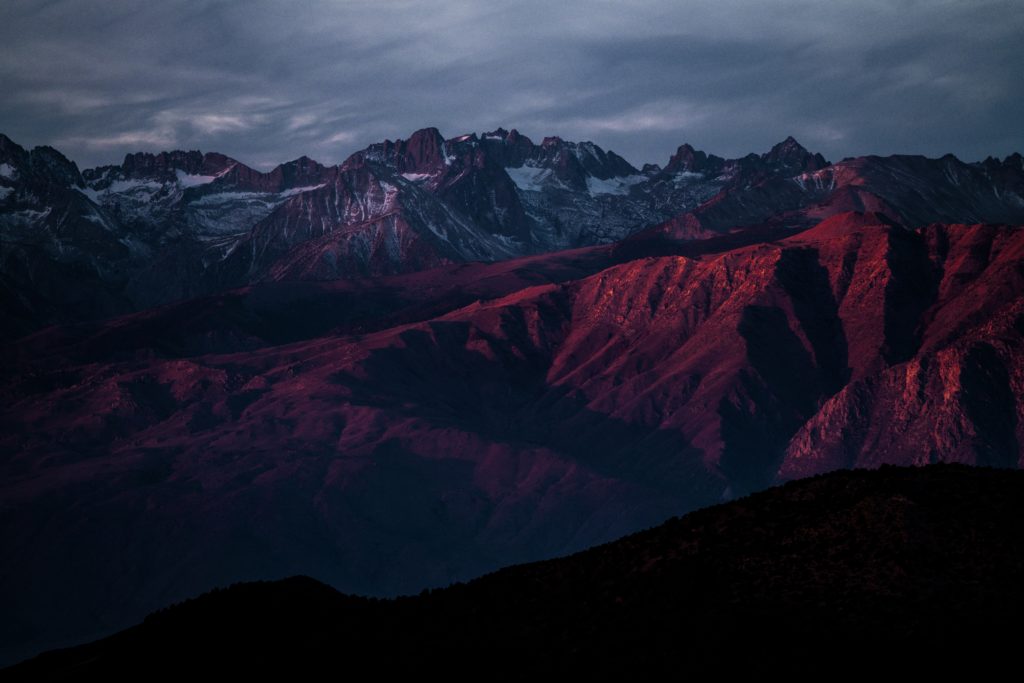
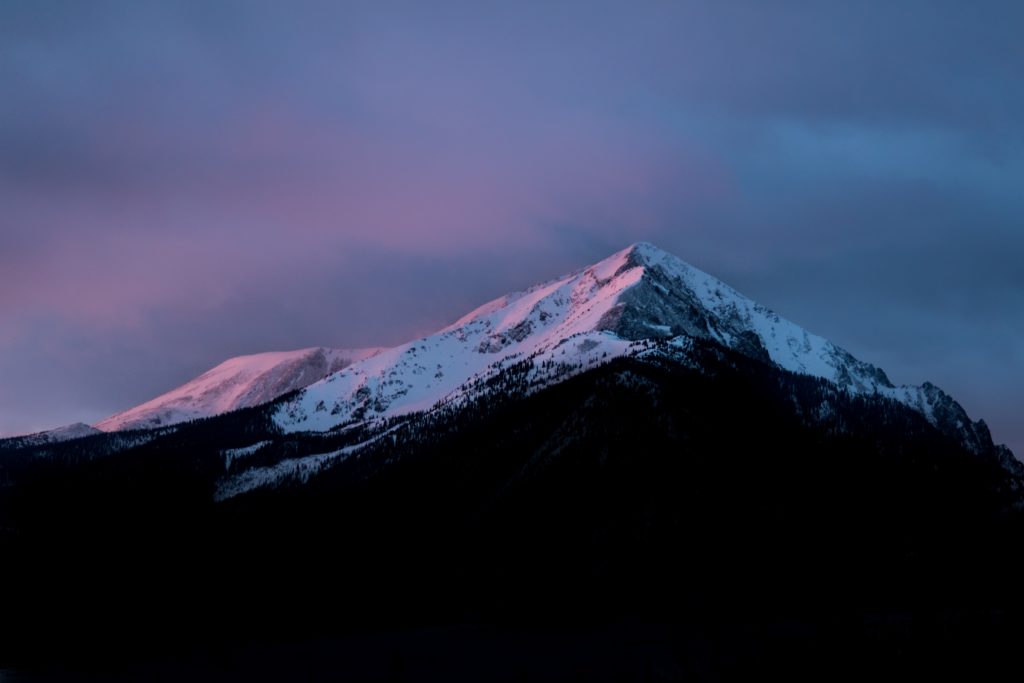
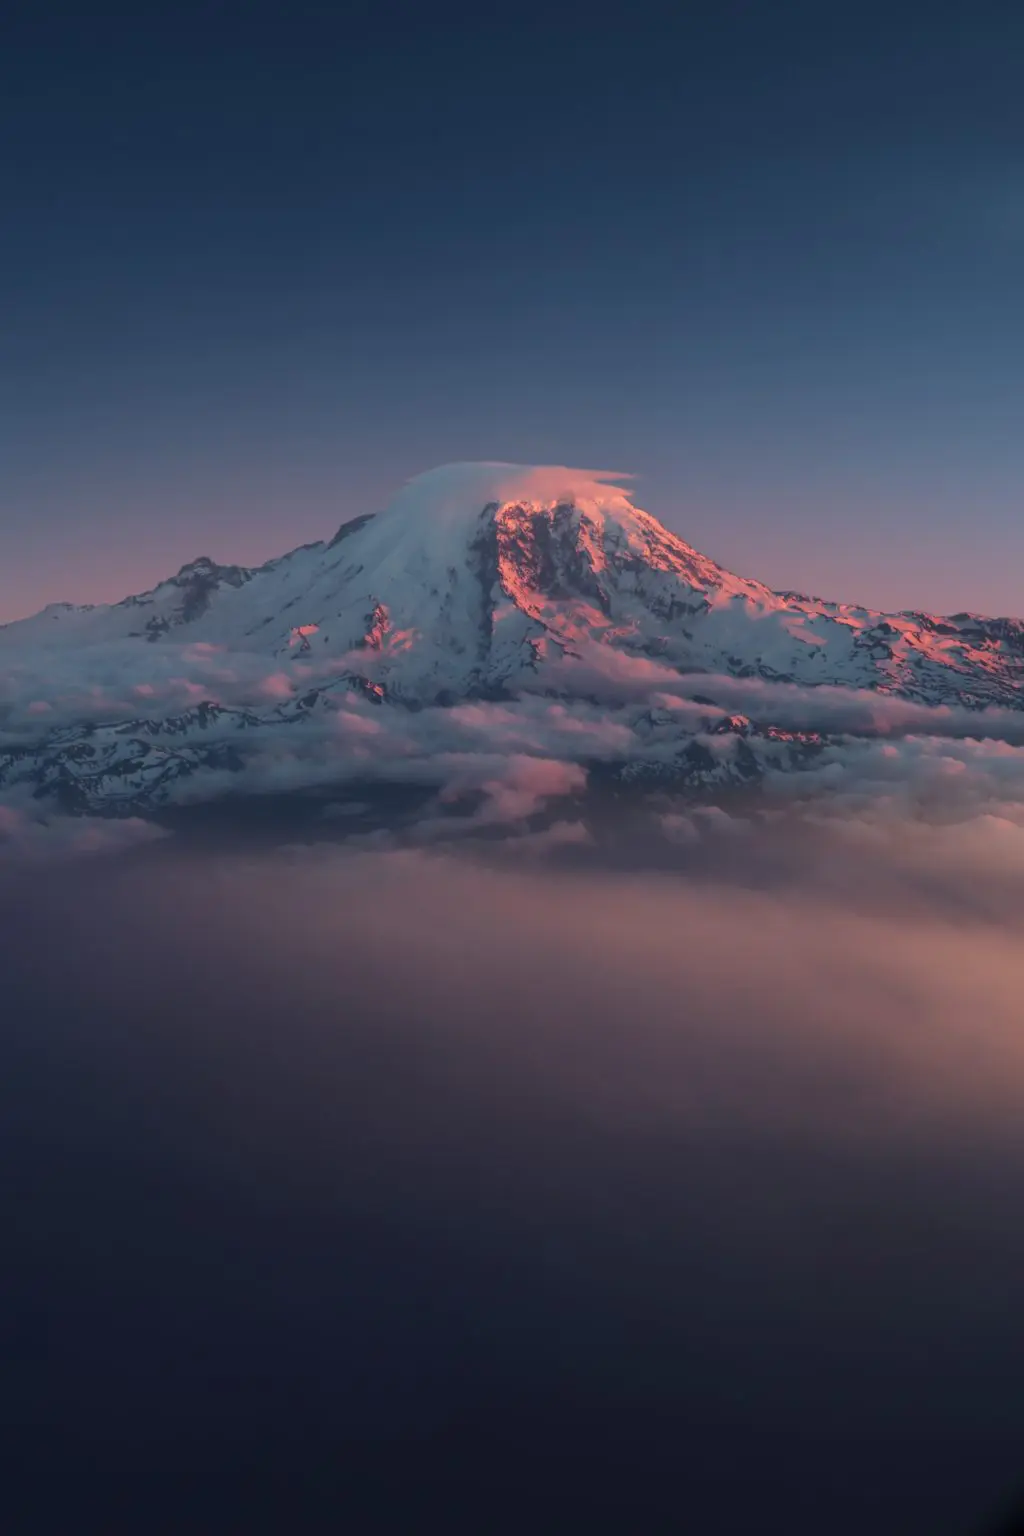
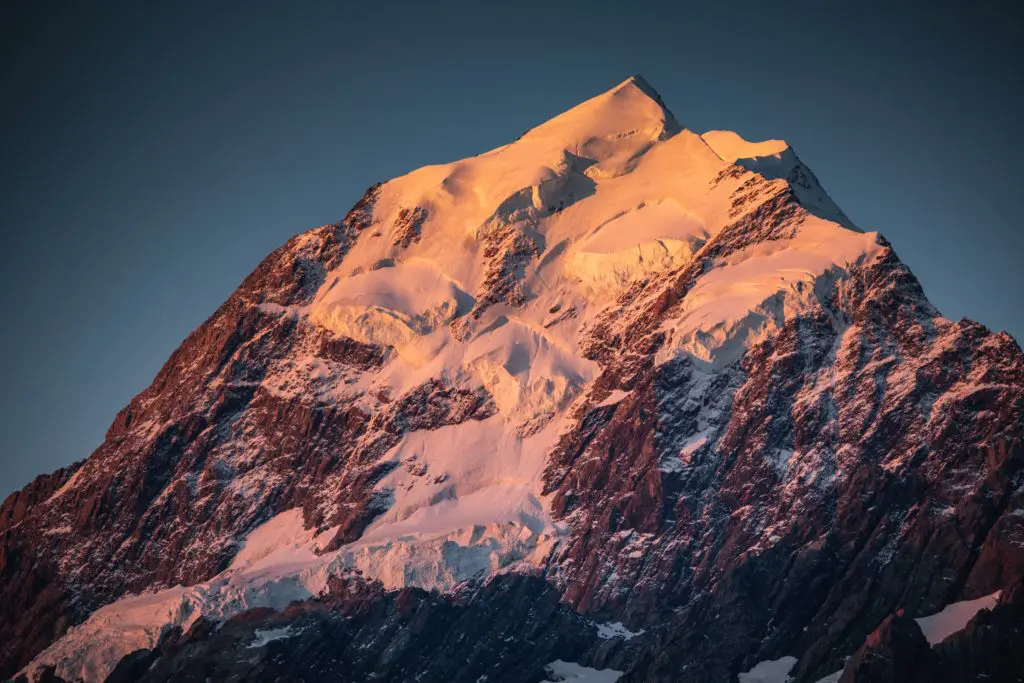
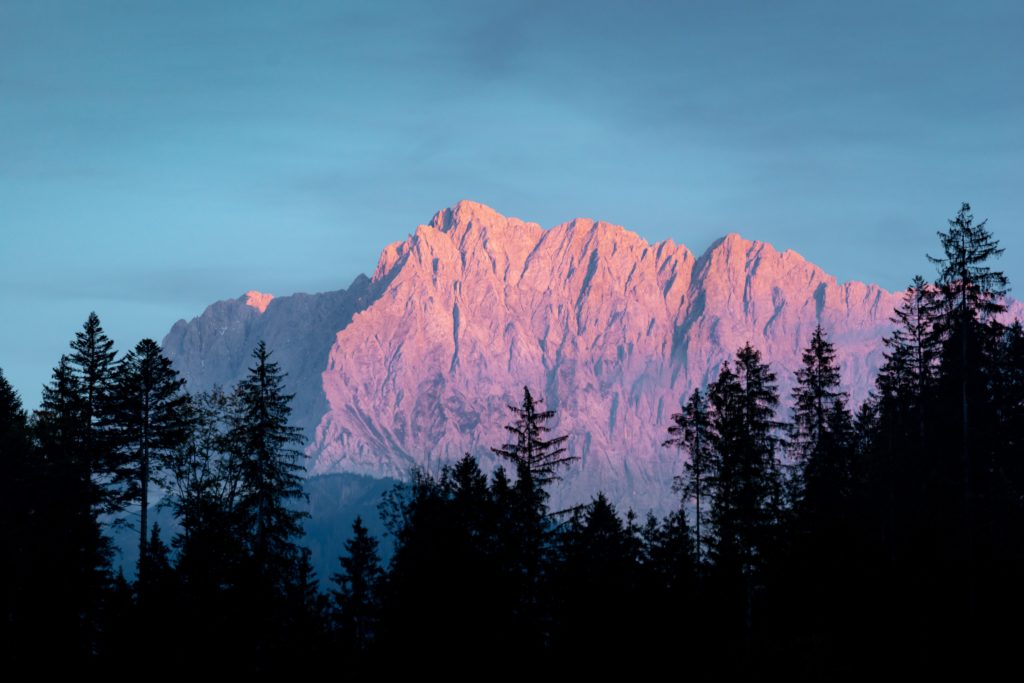
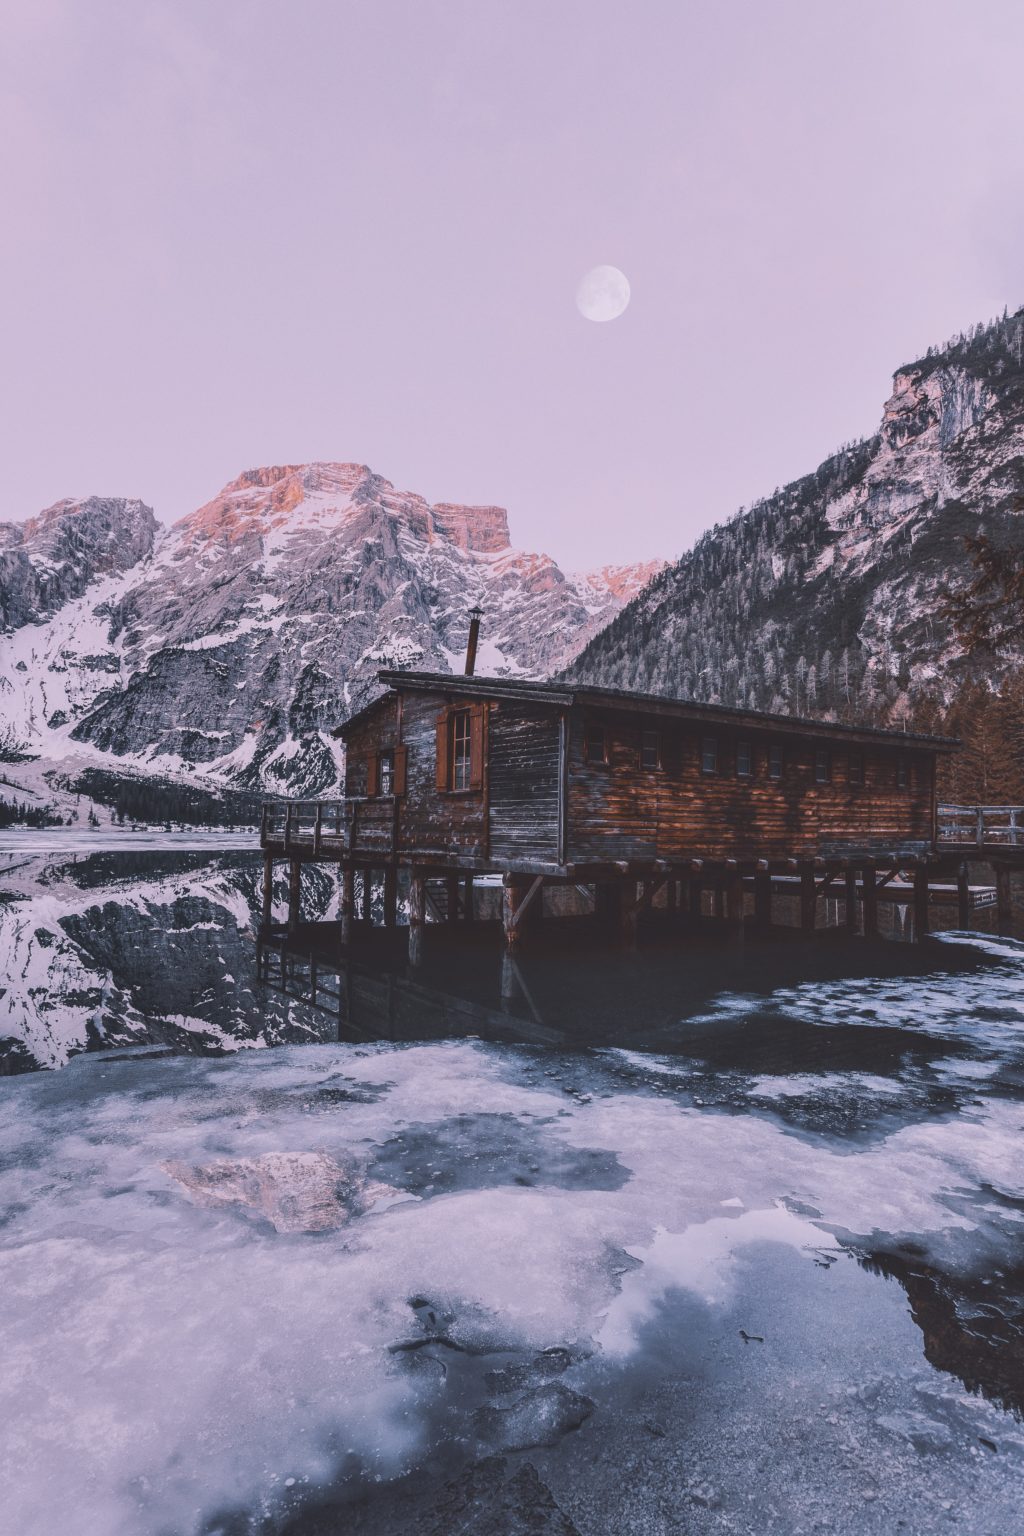
Here are some Stunning Images of Alpenglow:
The images below are a combination of glow that is a result of direct and indirect sunlight.


What are your thoughts on the Alpenglow and what causes it? Please leave your thoughts in the comments section below.
Further Reading:
- What Is Alpenglow?
- Challenging The Traditional Definition of Alpenglow
- 5 Tips for Capturing Successful Alpenglow Shots
Further Landscape Photography Tutorial Resources:
We here at Light Stalking have gathered together a fantastic resource page just on Landscape Photography. We think all these resources in one place will ensure you to become a great landscape photographer.


.jpg)
.jpg)
.jpg)
2 Comments
Excellent article, Dahlia!
Thank you Kent 🙂